
Francisco Javier Cruces Doval
Thursday, March 28, 2024 | 5 minutes
VPN site to site Wireguard
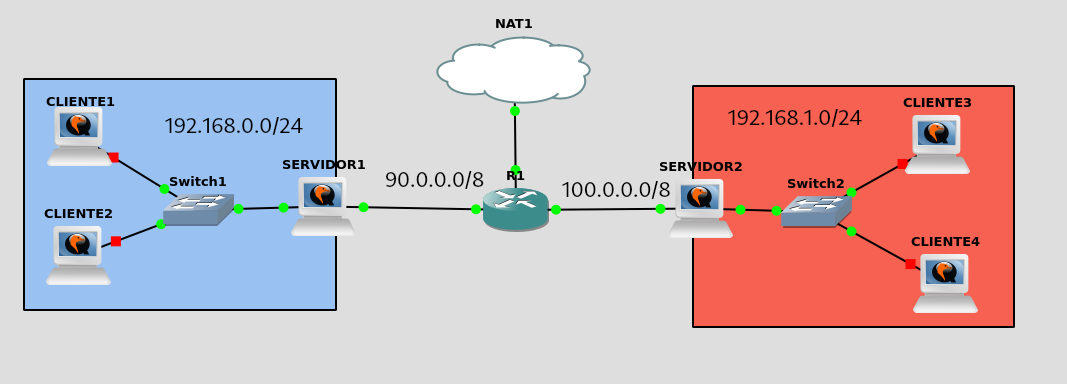
[!NOTE] I will start from the VPN post remote access with Wireguard, so you may refer to this one during this article.
Key generation
The first thing we will do is to install both the Wireguard package in both machines:
root@servidor1:~# sudo apt update && sudo apt install wireguard
debian@servidor2:~$ sudo apt update && sudo apt install wireguard
Let’s generate the pairs of keys that will be used to encrypt the connection. We will need a key for the server and a couple of additional keys for each client.
We’ll start with the server key pair 1:
debian@servidor1:~$ wg genkey | sudo tee /etc/wireguard/server_private.key | wg pubkey | sudo tee /etc/wireguard/server_public.key
2/RjGUbiQuaFR7atYaQ8lcczz2wXxO9aIwfzZEMPXCQ=

#Puedes visualizar la clave privada posteriormente :
debian@servidor1:~$ sudo cat /etc/wireguard/server_private.key
2Gg3EnKD+rdyMPEjMikZTwq2w0m78KrEcUsAJ/8icFA=

#Puedes visualizar la clave publica posteriormente :
debian@servidor1:~$ sudo cat /etc/wireguard/server_public.key
2/RjGUbiQuaFR7atYaQ8lcczz2wXxO9aIwfzZEMPXCQ=
We move to the service2 and generate yours:
#Generamos el par de claves para el cliente de acceso remoto servidor2
debian@servidor2:~$ wg genkey | sudo tee /etc/wireguard/client_private.key | wg pubkey | sudo tee /etc/wireguard/client_public.key
gS2ED2zfzMHBttMpFhH3MvRpr8D4ALEDTumNcib8A2g=

#Puedes visualizar la clave privada posteriormente :
debian@servidor2:~$ sudo cat /etc/wireguard/client_private.key
8IdsSwunfU5zJQzS5nZg4D//cFEbRa+27HGOQE1V90k=

#Puedes visualizar la clave publica posteriormente :
debian@servidor2:~$ sudo cat /etc/wireguard/client_public.key
gS2ED2zfzMHBttMpFhH3MvRpr8D4ALEDTumNcib8A2g=
Wireguard configuration
We will modify the configuration file on the server machine 1. The only necessary modification will be in the “AllowedIPs” parameter, where we must add the network address to which we will connect. In addition, we will include in the “Peer Endpoint” field the IP address of the other machine, as both will act as servers in this configuration.
debian@servidor1:~$ sudo cat /etc/wireguard/wg0.conf
[Interface]
Address = 10.99.99.1
PrivateKey = 2Gg3EnKD+rdyMPEjMikZTwq2w0m78KrEcUsAJ/8icFA=
ListenPort = 51820

[Peer]
Publickey = gS2ED2zfzMHBttMpFhH3MvRpr8D4ALEDTumNcib8A2g=
AllowedIPs = 10.99.99.2/32,192.168.1.0/24
PersistentKeepAlive = 25
Endpoint = 100.0.0.2:51820
The same for the service machine 2, the configuration would be as follows:
debian@servidor2:~$ sudo cat /etc/wireguard/wg0.conf
[Interface]
Address = 10.99.99.2/24
PrivateKey = 8IdsSwunfU5zJQzS5nZg4D//cFEbRa+27HGOQE1V90k=
ListenPort = 51820

[Peer]
PublicKey = 2/RjGUbiQuaFR7atYaQ8lcczz2wXxO9aIwfzZEMPXCQ=
AllowedIPs = 10.99.99.1/32,192.168.0.0/24
Endpoint = 90.0.0.2:51820
PersistentKeepalive = 25
As I have the tunnels of the previous exercise, we will lower them and upload them to the new configuration:
debian@servidor1:~$ sudo wg-quick down wg0
debian@servidor2:~$ sudo wg-quick down wg0

debian@servidor1:~$ sudo wg-quick up wg0
debian@servidor1:~$ sudo wg-quick up wg0
We will check that both servers have created the wg0 interface, which is the one that corresponds to us by the name of the configuration file:
debian@servidor1:~$ sudo ip link show wg0
11: wg0: <POINTOPOINT,NOARP,UP,LOWER_UP> mtu 1420 qdisc noqueue state UNKNOWN mode DEFAULT group default qlen 1000
    link/none

debian@servidor2:~$ sudo ip link show wg0
11: wg0: <POINTOPOINT,NOARP,UP,LOWER_UP> mtu 1420 qdisc noqueue state UNKNOWN mode DEFAULT group default qlen 1000
    link/none
Below I will show you the routing tables of the 2 servers to see that routes have been created to reach both private networks through the wg0 interface:
debian@servidor1:~$ ip r
default via 90.0.0.1 dev ens3 onlink
10.99.99.2 dev wg0 scope link
90.0.0.0/24 dev ens3 proto kernel scope link src 90.0.0.2
192.168.0.0/24 dev ens4 proto kernel scope link src 192.168.0.1
192.168.1.0/24 dev wg0 scope link

debian@servidor2:~$ ip r
default via 100.0.0.1 dev ens3 onlink
10.99.99.0/24 dev wg0 proto kernel scope link src 10.99.99.2
100.0.0.0/24 dev ens3 proto kernel scope link src 100.0.0.2
192.168.0.0/24 dev wg0 scope link
192.168.1.0/24 dev ens4 proto kernel scope link src 192.168.1.1
Operating check
Now, both private networks are fully connected, allowing us to access from either one to the other. We will conduct some tests from the customers to make sure the connection is working properly.
I will do a ping from the network 192.168.0.0 to the 192.168.1.0 with client1:
#cliente1 --> servidor2
debian@cliente1:~$ ping 192.168.1.1 -c 1
PING 192.168.1.1 (192.168.1.1) 56(84) bytes of data.
64 bytes from 192.168.1.1: icmp_seq=1 ttl=63 time=17.6 ms

--- 192.168.1.1 ping statistics ---
1 packets transmitted, 1 received, 0% packet loss, time 0ms
rtt min/avg/max/mdev = 17.554/17.554/17.554/0.000 ms

#Cliente1 --> Cliente 3
debian@cliente1:~$ ping 192.168.1.2 -c 1
PING 192.168.1.2 (192.168.1.2) 56(84) bytes of data.
64 bytes from 192.168.1.2: icmp_seq=1 ttl=62 time=12.9 ms
debian@cliente1:~$ ping 192.168.1.1 -c 1
PING 192.168.1.1 (192.168.1.1) 56(84) bytes of data.
64 bytes from 192.168.1.1: icmp_seq=1 ttl=63 time=17.8 ms

--- 192.168.1.1 ping statistics ---
1 packets transmitted, 1 received, 0% packet loss, time 0ms
rtt min/avg/max/mdev = 17.803/17.803/17.803/0.000 ms

#Cliente1 --> Windows
debian@cliente1:~$ ping 192.168.1.5 -c 1
PING 192.168.1.5 (192.168.1.5) 56(84) bytes of data.
64 bytes from 192.168.1.5: icmp_seq=1 ttl=126 time=19.9 ms

--- 192.168.1.5 ping statistics ---
1 packets transmitted, 1 received, 0% packet loss, time 0ms
rtt min/avg/max/mdev = 19.906/19.906/19.906/0.000 ms

#Cliente1 --> Android
debian@cliente1:~$ ping 192.168.1.4 -c 1
PING 192.168.1.4 (192.168.1.4) 56(84) bytes of data.
64 bytes from 192.168.1.4: icmp_seq=1 ttl=62 time=20.8 ms

--- 192.168.1.4 ping statistics ---
1 packets transmitted, 1 received, 0% packet loss, time 0ms
rtt min/avg/max/mdev = 20.834/20.834/20.834/0.000 ms
As you can see, I have connectivity from any client on the network 192.168.0.0 to 192.168.1.0.
Let’s check it in the opposite direction, i.e. from the network 192.168.1.0 to the 192.168.0.0:
#Cliente3 --> Servidor1
debian@cliente3:~$ ping 192.168.0.1 -c 1
PING 192.168.0.1 (192.168.0.1) 56(84) bytes of data.
64 bytes from 192.168.0.1: icmp_seq=1 ttl=63 time=16.6 ms

--- 192.168.0.1 ping statistics ---
1 packets transmitted, 1 received, 0% packet loss, time 0ms
rtt min/avg/max/mdev = 16.581/16.581/16.581/0.000 ms

#Cliente3 --> Cliente1
debian@cliente3:~$ ping 192.168.0.2 -c 1
PING 192.168.0.2 (192.168.0.2) 56(84) bytes of data.
64 bytes from 192.168.0.2: icmp_seq=1 ttl=62 time=21.0 ms

--- 192.168.0.2 ping statistics ---
1 packets transmitted, 1 received, 0% packet loss, time 0ms
rtt min/avg/max/mdev = 21.031/21.031/21.031/0.000 ms

#Cliente3 --> Cliente2
debian@cliente3:~$ ping 192.168.0.3 -c 1
PING 192.168.0.3 (192.168.0.3) 56(84) bytes of data.
64 bytes from 192.168.0.3: icmp_seq=1 ttl=62 time=16.1 ms

--- 192.168.0.3 ping statistics ---
1 packets transmitted, 1 received, 0% packet loss, time 0ms
rtt min/avg/max/mdev = 16.115/16.115/16.115/0.000 ms
To make sure that the traffic is going through the tunnel at the 2 ends we will do a traceroute from the 2 networks:
From the network 192.168.0.0 to the 192.168.1.0:
debian@cliente1:~$ traceroute 192.168.1.2
traceroute to 192.168.1.2 (192.168.1.2), 30 hops max, 60 byte packets
 1  192.168.0.1 (192.168.0.1)  0.629 ms  0.601 ms  0.595 ms
 2  10.99.99.2 (10.99.99.2)  13.677 ms  13.667 ms  13.657 ms
 3  192.168.1.2 (192.168.1.2)  13.649 ms  13.636 ms  13.626 ms
From the network 192.168.1.0 to the 192.168.0.0:
debian@cliente3:~$ traceroute 192.168.0.3
traceroute to 192.168.0.3 (192.168.0.3), 30 hops max, 60 byte packets
 1  192.168.1.1 (192.168.1.1)  0.430 ms  0.399 ms  0.393 ms
 2  10.99.99.1 (10.99.99.1)  19.343 ms  19.337 ms  19.329 ms
 3  192.168.0.3 (192.168.0.3)  19.324 ms  19.320 ms  19.313 ms