
Francisco Javier Cruces Doval
Thursday, March 28, 2024 | 9 minutes
VPN Wireguard remote access
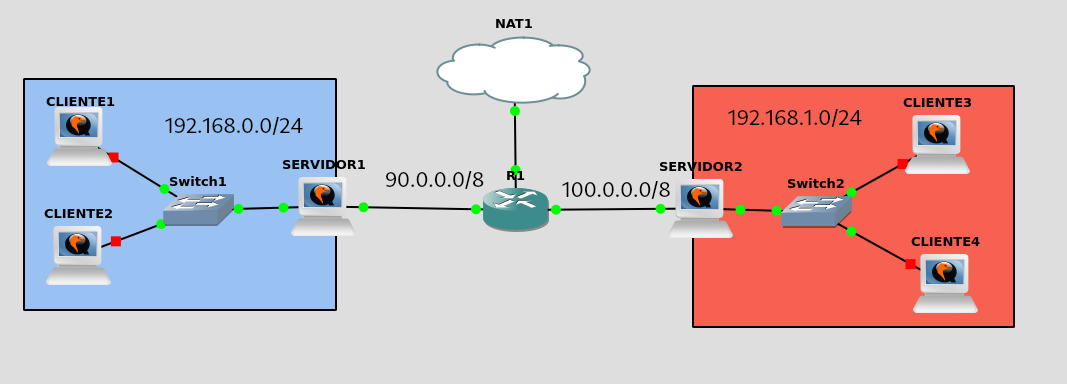
First I will configure the server machine as a VPN remote access and server server as a VPN client. I will then set up a Windows and Android client.
The first thing we will do is to install both the Wireguard package in both machines:
root@servidor1:~# sudo apt update && sudo apt install wireguard
debian@servidor2:~$ sudo apt update && sudo apt install wireguard
Let’s generate the pairs of keys that will be used to encrypt the connection. We will need a key for the server and a couple of additional keys for each client.
We’ll start with the server key pair 1:
debian@servidor1:~$ wg genkey | sudo tee /etc/wireguard/server_private.key | wg pubkey | sudo tee /etc/wireguard/server_public.key
2/RjGUbiQuaFR7atYaQ8lcczz2wXxO9aIwfzZEMPXCQ=

#Puedes visualizar la clave privada posteriormente :
debian@servidor1:~$ sudo cat /etc/wireguard/server_private.key
2Gg3EnKD+rdyMPEjMikZTwq2w0m78KrEcUsAJ/8icFA=

#Puedes visualizar la clave publica posteriormente :
debian@servidor1:~$ sudo cat /etc/wireguard/server_public.key
2/RjGUbiQuaFR7atYaQ8lcczz2wXxO9aIwfzZEMPXCQ=
We move to the service2 and generate yours:
#Generamos el par de claves para el cliente de acceso remoto servidor2
debian@servidor2:~$ wg genkey | sudo tee /etc/wireguard/client_private.key | wg pubkey | sudo tee /etc/wireguard/client_public.key
gS2ED2zfzMHBttMpFhH3MvRpr8D4ALEDTumNcib8A2g=

#Puedes visualizar la clave privada posteriormente :
debian@servidor2:~$ sudo cat /etc/wireguard/client_private.key
8IdsSwunfU5zJQzS5nZg4D//cFEbRa+27HGOQE1V90k=

#Puedes visualizar la clave publica posteriormente :
debian@servidor2:~$ sudo cat /etc/wireguard/client_public.key
gS2ED2zfzMHBttMpFhH3MvRpr8D4ALEDTumNcib8A2g=
Once the keys are generated, we will proceed to configure the Wireguard remote access server, in my case I will call the wg0.conf configuration file. I’m gonna add you in every parameter of the configuration a comment so you know what you have to put in every field:
debian@servidor1:~$ sudo cat /etc/wireguard/wg0.conf
[Interface]
#IP que tendrá el túnel VPN , en concreto la interfaz wg0 que es como has llamado el fichero de conf
Address = 10.99.99.1
#Clave privada del servidor
PrivateKey = 2Gg3EnKD+rdyMPEjMikZTwq2w0m78KrEcUsAJ/8icFA=
#Puerto de escucha , 51820 es el puerto por defecto de Wireguard
ListenPort = 51820

#Si no tienes activado el bit de forwarding por defecto puedes hacerlo asi :
PreUp = sysctl -w net.ipv4.ip_forward=1

#Este apartado hace referencia a la configuración de los clientes :
[Peer]
#Clave pública del cliente
Publickey = gS2ED2zfzMHBttMpFhH3MvRpr8D4ALEDTumNcib8A2g=
#IP del túnel VPN del cliente
AllowedIPs = 10.99.99.2/32
#Tiempo de espera que tendrá activo el túnel si no hay trafico
PersistentKeepAlive = 25
We will now set up a debian client, I have given the same name to the configuration file so the interface will also be called wg0:
debian@servidor2:~$ sudo cat /etc/wireguard/wg0.conf
  [Interface]
    Address = 10.99.99.2/24
    #Clave privada del cliente
    PrivateKey = 8IdsSwunfU5zJQzS5nZg4D//cFEbRa+27HGOQE1V90k=
    #Puerto de escucha del servidor
    ListenPort = 51820

    [Peer]
    #Clave pública del servidor
    PublicKey = 2/RjGUbiQuaFR7atYaQ8lcczz2wXxO9aIwfzZEMPXCQ=
    AllowedIPs = 0.0.0.0/0
    #Punto de acceso del servidor
    Endpoint = 90.0.0.2:51820
    #Tiempo de espera de la conexión
    PersistentKeepalive = 25
Once we have configured both files we will lift the tunnel, for this we have several ways to do it, personally the most comfortable I see is using the wg-quick command.
We raise the tunnel on the server:
debian@servidor1:~$ sudo wg-quick up wg0
[#] sysctl -w net.ipv4.ip_forward=1
net.ipv4.ip_forward = 1
[#] ip link add wg0 type wireguard
[#] wg setconf wg0 /dev/fd/63
[#] ip -4 address add 10.99.99.1 dev wg0
[#] ip link set mtu 1420 up dev wg0
[#] ip -4 route add 10.99.99.2/32 dev wg0
We raise the other end, in this case our client is servant2:
debian@servidor2:~$ sudo wg-quick up wg0
[#] ip link add wg0 type wireguard
[#] wg setconf wg0 /dev/fd/63
[#] ip -4 address add 10.99.99.2/24 dev wg0
[#] ip link set mtu 1420 up dev wg0
[#] wg set wg0 fwmark 51820
[#] ip -4 route add 0.0.0.0/0 dev wg0 table 51820
[#] ip -4 rule add not fwmark 51820 table 51820
[#] ip -4 rule add table main suppress_prefixlength 0
[#] sysctl -q net.ipv4.conf.all.src_valid_mark=1
[#] iptables-restore -n
Once this is done we will check that at both ends we have created a new interface, which is called the same as our configuration file without the .conf extension.
We check that it was created in servant1:
debian@servidor1:~$ ip -4 a
1: lo: <LOOPBACK,UP,LOWER_UP> mtu 65536 qdisc noqueue state UNKNOWN group default qlen 1000
    inet 127.0.0.1/8 scope host lo
       valid_lft forever preferred_lft forever
2: ens3: <BROADCAST,MULTICAST,UP,LOWER_UP> mtu 1500 qdisc fq_codel state UP group default qlen 1000
    altname enp0s3
    inet 90.0.0.2/24 brd 90.0.0.255 scope global ens3
       valid_lft forever preferred_lft forever
3: ens4: <BROADCAST,MULTICAST,UP,LOWER_UP> mtu 1500 qdisc fq_codel state UP group default qlen 1000
    altname enp0s4
    inet 192.168.0.1/24 brd 192.168.0.255 scope global ens4
       valid_lft forever preferred_lft forever
6: wg0: <POINTOPOINT,NOARP,UP,LOWER_UP> mtu 1420 qdisc noqueue state UNKNOWN group default qlen 1000
    inet 10.99.99.1/32 scope global wg0
       valid_lft forever preferred_lft forever
We check that it was created in servers2:
debian@servidor2:~$ ip -4 a
1: lo: <LOOPBACK,UP,LOWER_UP> mtu 65536 qdisc noqueue state UNKNOWN group default qlen 1000
    inet 127.0.0.1/8 scope host lo
       valid_lft forever preferred_lft forever
2: ens3: <BROADCAST,MULTICAST,UP,LOWER_UP> mtu 1500 qdisc fq_codel state UP group default qlen 1000
    altname enp0s3
    inet 100.0.0.2/24 brd 100.0.0.255 scope global ens3
       valid_lft forever preferred_lft forever
3: ens4: <BROADCAST,MULTICAST,UP,LOWER_UP> mtu 1500 qdisc fq_codel state UP group default qlen 1000
    altname enp0s4
    inet 192.168.1.1/24 brd 192.168.1.255 scope global ens4
       valid_lft forever preferred_lft forever
6: wg0: <POINTOPOINT,NOARP,UP,LOWER_UP> mtu 1420 qdisc noqueue state UNKNOWN group default qlen 1000
    inet 10.99.99.2/24 scope global wg0
       valid_lft forever preferred_lft forever
We will also check the routes that have been created on the server and on the client:
debian@servidor1:~$ ip r
default via 90.0.0.1 dev ens3 onlink
10.99.99.2 dev wg0 scope link
10.99.99.4 dev wg0 scope link
90.0.0.0/24 dev ens3 proto kernel scope link src 90.0.0.2
192.168.0.0/24 dev ens4 proto kernel scope link src 192.168.0.1

debian@servidor2:~$ ip r
default via 100.0.0.1 dev ens3 onlink
10.99.99.0/24 dev wg0 proto kernel scope link src 10.99.99.2
100.0.0.0/24 dev ens3 proto kernel scope link src 100.0.0.2
192.168.1.0/24 dev ens4 proto kernel scope link src 192.168.1.1
Let’s check that from our client (server 2) we have access to the different machines of our network:
##Ping con el túnel del extremo servidor1
debian@servidor2:~$ ping 10.99.99.1 -c 1
PING 10.99.99.1 (10.99.99.1) 56(84) bytes of data.
64 bytes from 10.99.99.1: icmp_seq=1 ttl=64 time=14.9 ms

--- 10.99.99.1 ping statistics ---
1 packets transmitted, 1 received, 0% packet loss, time 0ms
rtt min/avg/max/mdev = 14.862/14.862/14.862/0.000 ms

##Pings con cliente1 :
debian@servidor2:~$ ping 192.168.0.2 -c 1
PING 192.168.0.2 (192.168.0.2) 56(84) bytes of data.
64 bytes from 192.168.0.2: icmp_seq=1 ttl=63 time=17.5 ms

--- 192.168.0.2 ping statistics ---
1 packets transmitted, 1 received, 0% packet loss, time 0ms
rtt min/avg/max/mdev = 17.503/17.503/17.503/0.000 ms

#Ping con cliente2
debian@servidor2:~$ ping 192.168.0.3 -c 1
PING 192.168.0.3 (192.168.0.3) 56(84) bytes of data.
64 bytes from 192.168.0.3: icmp_seq=1 ttl=63 time=16.5 ms

--- 192.168.0.3 ping statistics ---
1 packets transmitted, 1 received, 0% packet loss, time 0ms
rtt min/avg/max/mdev = 16.522/16.522/16.522/0.000 ms

##Ping con la ip privada del servidor1
debian@servidor2:~$ ping 192.168.0.1 -c 1
PING 192.168.0.1 (192.168.0.1) 56(84) bytes of data.
64 bytes from 192.168.0.1: icmp_seq=1 ttl=64 time=20.3 ms

--- 192.168.0.1 ping statistics ---
1 packets transmitted, 1 received, 0% packet loss, time 0ms
rtt min/avg/max/mdev = 20.272/20.272/20.272/0.000 ms
Although my stage is set, the private IP addresses are not erased we will check that the traffic goes through the tunnel, making use of traceroute:
debian@servidor2:~$ traceroute 192.168.0.2
traceroute to 192.168.0.2 (192.168.0.2), 30 hops max, 60 byte packets
 1  10.99.99.1 (10.99.99.1)  18.692 ms  28.987 ms  28.951 ms
 2  192.168.0.2 (192.168.0.2)  28.912 ms  28.877 ms  28.859 ms
android client configuration
The virtual android machine is quite uncomfortable to control, so I’m going to generate the keys and your configuration file on the server. Then we’ll get him out of this with Apache.
We generate the keys to android:
debian@servidor1:~$ wg genkey | tee androidprivate | wg pubkey > androidpublic
debian@servidor1:~$ cat androidprivate
CBY5o2iko7xXQrNAFcFDIKohOngawB1uvws7aDDgl0g=
debian@servidor1:~$ cat androidpublic
cBGl5QWOsbZyI2GN1MXDxUsfeMmI5sKnp3VkxW9lO3g=
The configuration file would be as follows:
debian@servidor1:~$ sudo cat android.conf
[Interface]
Address = 10.99.99.4
PrivateKey = CBY5o2iko7xXQrNAFcFDIKohOngawB1uvws7aDDgl0g=
ListenPort = 51820

[Peer]
Publickey = 2/RjGUbiQuaFR7atYaQ8lcczz2wXxO9aIwfzZEMPXCQ=
AllowedIPs = 0.0.0.0/0
Endpoint = 90.0.0.2:51820
I have installed apache and will copy this file to the document root to get it to the android machine. I use this medium as it is a fictional scenario.
debian@servidor1:~$ sudo cp android.conf /var/www/html/
From a terminal, as the browser does not work too well we download the file:

Now let’s add this new client to the server configuration file:
debian@servidor1:~$ sudo cat /etc/wireguard/wg0.conf
#Al final del todo :)
[Peer]
Publickey = cBGl5QWOsbZyI2GN1MXDxUsfeMmI5sKnp3VkxW9lO3g=
AllowedIPs = 10.99.99.4/32
PersistentKeepAlive = 25
Don’t forget to restart the tunnel:
debian@servidor1:~$ sudo wg-quick down wg0
debian@servidor1:~$ sudo wg-quick up wg0
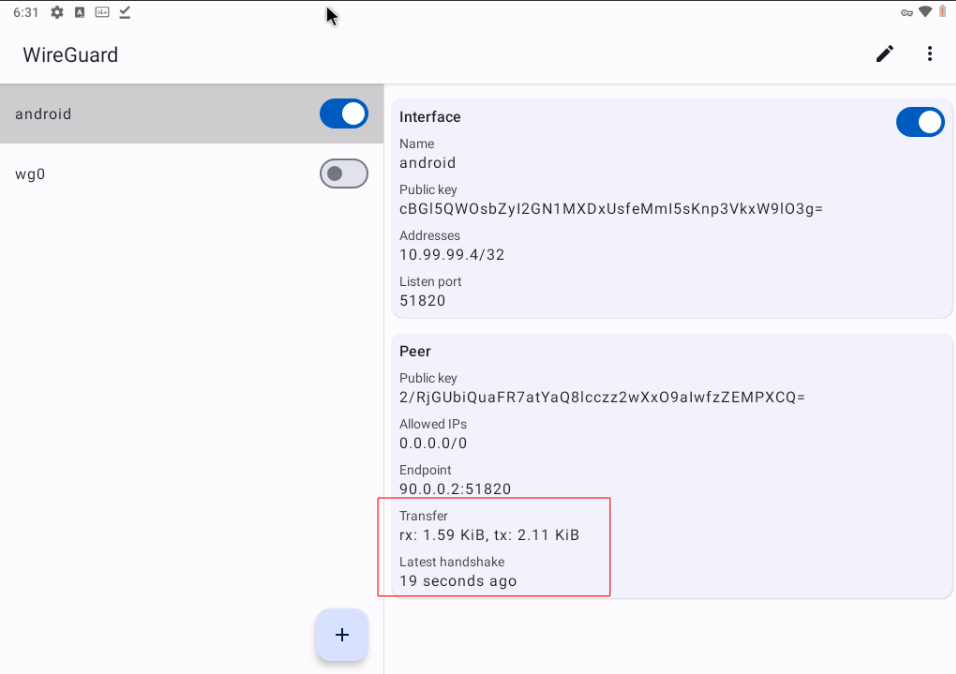
Now open the wireguard application and give it import from file and activate the connection. Activate the tunnel and make sure the handshake occurs:
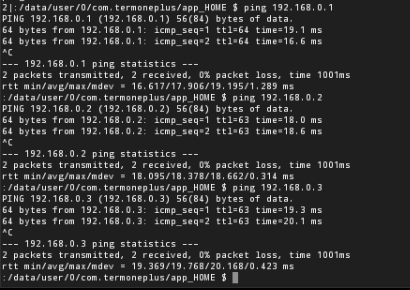
If we open a terminal we can pings the customers:
Windows client configuration
We’re going to repeat the process but now with our Windows client.
In order to copy and paste, I will make the key generation of this client in the service machine.
We’ll start by generating the key pair.
debian@servidor1:~$ wg genkey | tee winprivate | wg pubkey > winpublic

debian@servidor1:~$ cat winprivate
QKGQEdrB9FBYRZsLNgc3qr9m8/lx+uc9n5vvj67I9m8=

debian@servidor1:~$ cat winpublic
E8VdupsWJ7vCTO7SF3oXUciUrsRgJ3p6T+F5UbbLngo=
We create the configuration file for this client:
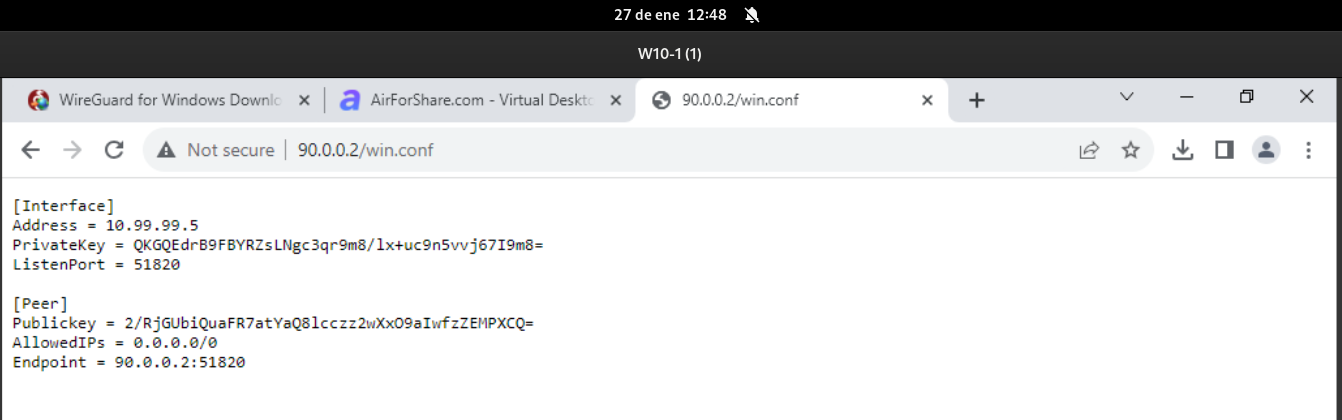
debian@servidor1:~$ cat win.conf
[Interface]
Address = 10.99.99.5
PrivateKey = QKGQEdrB9FBYRZsLNgc3qr9m8/lx+uc9n5vvj67I9m8=
ListenPort = 51820

[Peer]
Publickey = 2/RjGUbiQuaFR7atYaQ8lcczz2wXxO9aIwfzZEMPXCQ=
AllowedIPs = 0.0.0.0/0
Endpoint = 90.0.0.2:51820
I’ll move it to the document root so I can download it on my Windows, don’t do this in a real environment.
debian@servidor1:~$ sudo cp win.conf /var/www/html/
Remember to set up this new customer in the service machine:
debian@servidor1:~$ sudo nano /etc/wireguard/wg0.conf

[Peer]
Publickey = E8VdupsWJ7vCTO7SF3oXUciUrsRgJ3p6T+F5UbbLngo=
AllowedIPs = 10.99.99.5/32
PersistentKeepAlive = 25
For the changes to be applied, restart the tunnel:
debian@servidor1:~$ sudo wg-quick down wg0
debian@servidor1:~$ sudo wg-quick up wg0
Once we have all set up, access the Windows machine and download the configuration file:
Open the wireguard application and select to import from file:
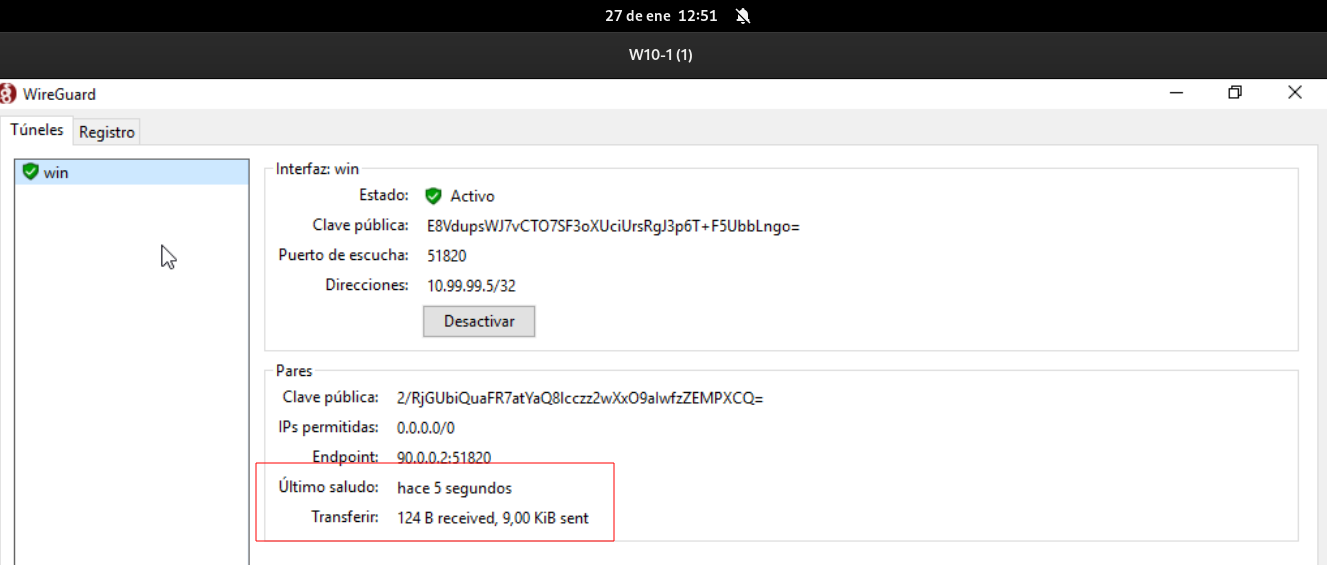
Once the tunnel is activated and the handshake has been checked:
If we return to our Windows, we will have created a new interface:
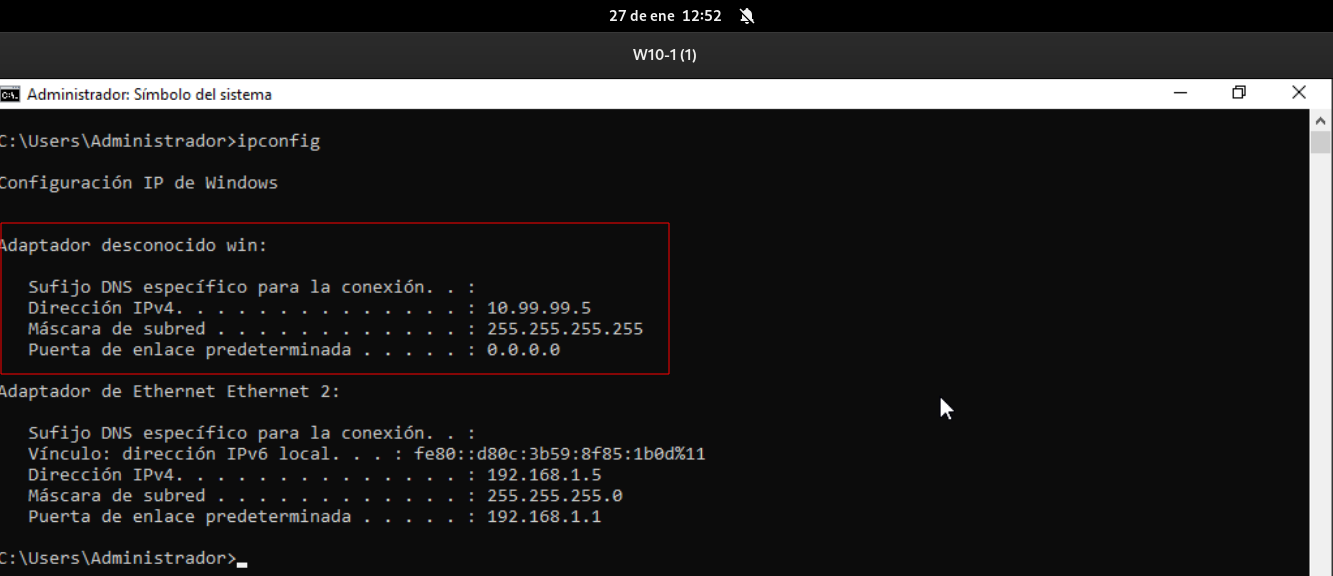
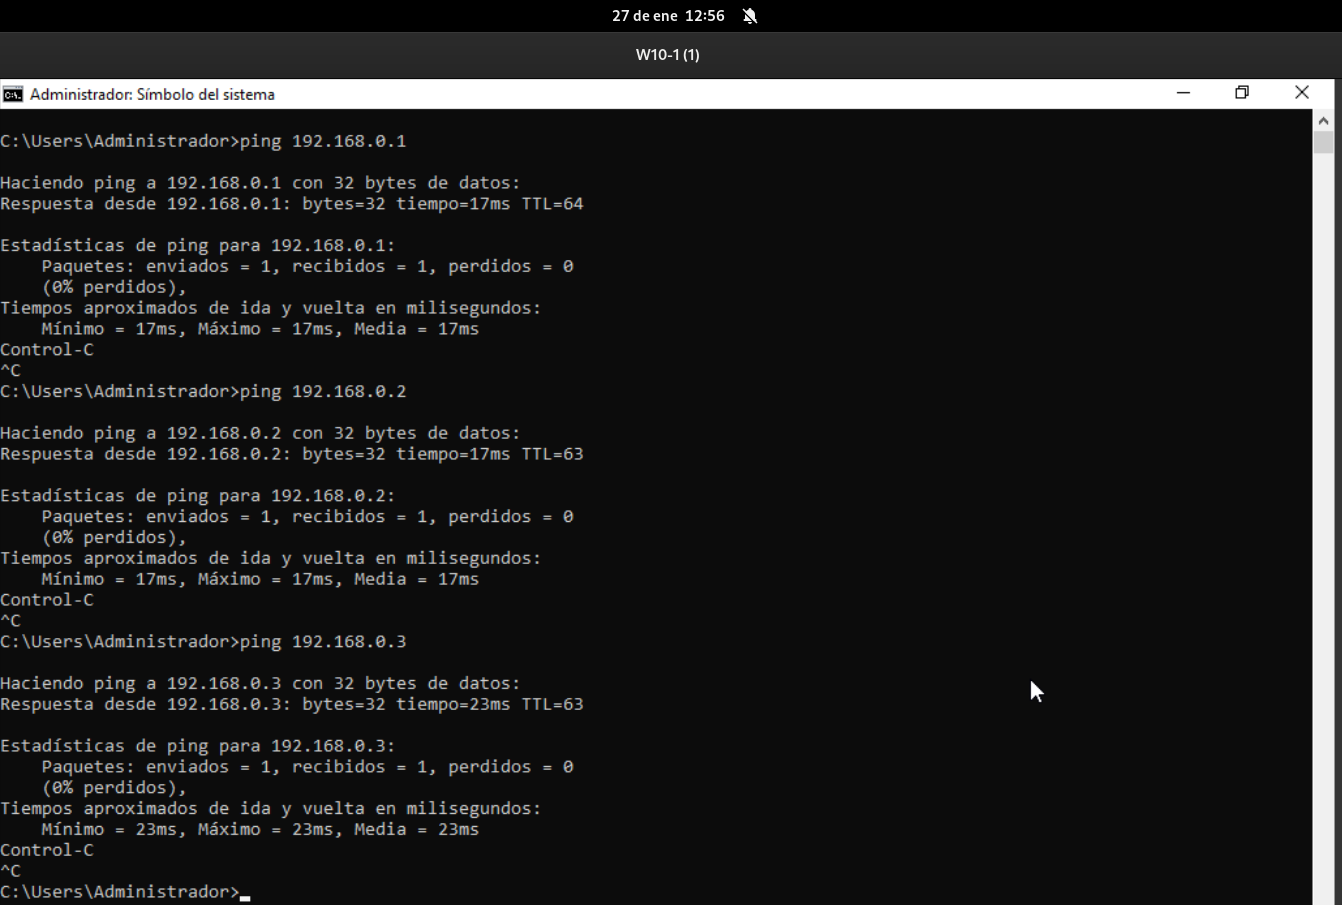
And we’ll have connectivity to the network machines 192.168.0.0 / 24:
By way of curiosity we can see on the server that customers are connected:
debian@servidor1:~$ sudo wg show
interface: wg0
  public key: 2/RjGUbiQuaFR7atYaQ8lcczz2wXxO9aIwfzZEMPXCQ=
  private key: (hidden)
  listening port: 51820

peer: cBGl5QWOsbZyI2GN1MXDxUsfeMmI5sKnp3VkxW9lO3g=
  endpoint: 100.0.0.2:51820
  allowed ips: 10.99.99.4/32
  latest handshake: 1 minute, 14 seconds ago
  transfer: 6.43 KiB received, 788 B sent
  persistent keepalive: every 25 seconds

peer: E8VdupsWJ7vCTO7SF3oXUciUrsRgJ3p6T+F5UbbLngo=
  endpoint: 100.0.0.2:49981
  allowed ips: 10.99.99.5/32
  latest handshake: 1 minute, 32 seconds ago
  transfer: 46.23 KiB received, 1.64 KiB sent
  persistent keepalive: every 25 seconds

peer: gS2ED2zfzMHBttMpFhH3MvRpr8D4ALEDTumNcib8A2g=
  allowed ips: 10.99.99.2/32
  persistent keepalive: every 25 seconds