Francisco Javier Cruces Doval
Thursday, March 28, 2024 | 15 minutes
Create certification authority (CA) and self-signed certificates in Linux
At first a student will establish a Certified Authority and sign a certificate for the other student’s page. We will then test it on the Apache and Nginx web servers.
Create the certifying authority
Step 1: Creating directories and files
The first step will be to generate a directory in which you will locate your certification authority, in order to maintain an organization at all times. The directory name will be CA /. In turn, you have to generate several subdirectories within it:
- certsdb: The signed certificates shall be stored in that directory.
- certreqs: In that directory, the certificate signature application files (CSR) shall be stored.
- crl: The list of certificates that have been revoked (CRL) shall be stored in that directory.
- private: The private key of the certifying authority shall be stored in this directory.
debian@javiercrucesCA:~$ sudo mkdir /CA
debian@javiercrucesCA:~$ cd !$
debian@javiercrucesCA:/CA$ sudo mkdir certsdb certreqs crl private
debian@javiercrucesCA:/CA$ sudo chmod 700 private/
debian@javiercrucesCA:/CA$ sudo touch index.txt
Once the directories are generated, move into the father CA / directory. When you are within it, you list the content in a graphic way so you can appreciate that everything has been generated correctly, making use of tree. You’ll see that the 4 directories have been properly generated. Before continuing it is recommended to change the permissions to 700 to the private directory /, as it will contain the private key of the CA and we are interested that only the owner has access to it. In addition, we will need in the current directory a file that will act as a database for existing index.txt name certificates
debian@javiercrucesCA:/CA$ sudo tree -p
[drwxr-xr-x]  .
├── [drwxr-xr-x]  certreqs
├── [drwxr-xr-x]  certsdb
├── [drwxr-xr-x]  crl
├── [-rw-r--r--]  index.txt
└── [drwx------]  private

5 directories, 1 file
debian@javiercrucesCA:/CA$
Step 2: Openssl configuration file
The most likely is that you want to use an openssl configuration file other than that of our machine, so try to make the certifying authority as isolated as possible from it, so make a copy of your native configuration file and adapt it to your needs. This file is normally found in / usr / lib / ssl / openssl.cnf, although it may also be in / etc / openssl.cnf or in / usr / share / ssl / openssl.cnf, you will have to copy it to the current directory and modify it with a text editor.
debian@javiercrucesCA:/CA$ sudo cp /usr/lib/ssl/openssl.cnf ./
debian@javiercrucesCA:/CA$ ls -l
total 32
drwxr-xr-x 2 root root  4096 Jan  8 19:22 certreqs
drwxr-xr-x 2 root root  4096 Jan  8 19:22 certsdb
drwxr-xr-x 2 root root  4096 Jan  8 19:22 crl
-rw-r--r-- 1 root root     0 Jan  8 19:23 index.txt
-rw-r--r-- 1 root root 12332 Jan  8 19:26 openssl.cnf
drwx------ 2 root root  4096 Jan  8 19:22 private
Within it, appropriate adaptations must be made to make use of the directories previously generated, as well as to indicate certain basic information about the certifying authority, which your partner must know, as it will be requested at the time of the generation of the certificate signature application file. The amendments to be made are as follows:
dir = / root / CA certs = $dir / certsdb new _ certs _ dir = $certs
[ CA_default ]

dir             = /CA           # Where everything is kept
certs           = $dir/certsdb          # Where the issued certs are kept
crl_dir         = $dir/crl              # Where the issued crl are kept
database        = $dir/index.txt        # database index file.
#unique_subject = no                    # Set to 'no' to allow creation of
                                        # several certs with same subject.
new_certs_dir   = $certs                # default place for new certs.
countryName _ default = EN stateOrProvinceName _ default = Sevilla localityName _ default = Two Sisters 0.organizationName _ default = IES Gonzalo Nazareno organization
[ req_distinguished_name ]
countryName                     = Country Name (2 letter code)
countryName_default             = ES
countryName_min                 = 2
countryName_max                 = 2

stateOrProvinceName             = State or Province Name (full name)
stateOrProvinceName_default     = Sevilla

localityName                    = Dos Hermanas

0.organizationName              = Organization Name (eg, company)
0.organizationName_default      = IES Gonzalo Nazareno

#we can do this but it is not needed normally :-)
#1.organizationName             = Second Organization Name (eg, company)
#1.organizationName_default     = World Wide Web Pty Ltd

organizationalUnitName          = Organizational Unit Name (eg, section)
organizationalUnitName_default  = Informatica
#challenge #challenge #challenge #unstructural
[ req_attributes ]
challengePassword               = A challenge password
challengePassword_min           = 4
challengePassword_max           = 20

unstructuredName                = An optional company name
Step 3: Creation and signature of our own certificate
After that, you will have everything ready to generate your key pair and a certificate signature application file that you will then self-sign, running the command for:
debian@javiercrucesCA:/CA$ sudo openssl req -new -newkey rsa:4096 -keyout private/cakey.pem -out careq.pem -config ./openssl.cnf

Enter PEM pass phrase:
Verifying - Enter PEM pass phrase:
-----
You are about to be asked to enter information that will be incorporated
into your certificate request.
What you are about to enter is what is called a Distinguished Name or a DN.
There are quite a few fields but you can leave some blank
For some fields there will be a default value,
If you enter '.', the field will be left blank.
-----
Country Name (2 letter code) [ES]:ES
State or Province Name (full name) [Sevilla]:Sevilla
Dos Hermanas []:
Organization Name (eg, company) [IES Gonzalo Nazareno]:
Organizational Unit Name (eg, section) [Informatica]:
Common Name (e.g. server FQDN or YOUR name) []:javiercruces.iesgn.org
Email Address []:javierasping@gmail.com
As you can see, a passing sentence is requested to protect the private key that we are going to generate, as well as certain basic information for the certificate signature application file, which must match that we have previously entered into the openssl configuration file. The last two fields are not generic, so we must fill them out on a case-by-case basis. After that, we will be able to proceed with the self-signing of the certificate, which we will then have to provide to customers to include in their list of CA certificates, so that they are not shown the warning when using HTTPS. As I mentioned earlier, in a real situation, this process is usually carried out by companies with a certain reputation whose certificate is imported by default in the browsers. To do this, run the command:
debian@javiercrucesCA:/CA$ sudo openssl ca -create_serial -out cacert.pem -days 365 -keyfile private/cakey.pem -selfsign -extensions v3_ca -config ./openssl.cnf -infiles careq.pem
Using configuration from ./openssl.cnf
Enter pass phrase for private/cakey.pem:
Check that the request matches the signature
Signature ok
Certificate Details:
        Serial Number:
            74:1e:8a:f8:24:45:14:9e:28:f1:83:04:7c:7d:6c:0f:5f:3b:ac:f2
        Validity
            Not Before: Jan  8 19:57:17 2024 GMT
            Not After : Jan  7 19:57:17 2025 GMT
        Subject:
            countryName               = ES
            stateOrProvinceName       = Sevilla
            organizationName          = IES Gonzalo Nazareno
            organizationalUnitName    = Informatica
            commonName                = javiercruces.iesgn.org
            emailAddress              = javierasping@gmail.com
        X509v3 extensions:
            X509v3 Subject Key Identifier:
                E3:9C:A3:CF:0E:33:EB:83:45:40:00:9B:04:4A:A9:9B:C8:8C:A9:62
            X509v3 Authority Key Identifier:
                E3:9C:A3:CF:0E:33:EB:83:45:40:00:9B:04:4A:A9:9B:C8:8C:A9:62
            X509v3 Basic Constraints: critical
                CA:TRUE
Certificate is to be certified until Jan  7 19:57:17 2025 GMT (365 days)
Sign the certificate? [y/n]:y


1 out of 1 certificate requests certified, commit? [y/n]y
Write out database with 1 new entries
Data Base Updated
debian@javiercrucesCA:/CA$
Where:
- create _ serial: We suggest that you generate a 128 bit serial to start. Thanks to that randomness, if we had to start again, we would not overwrite the existing ones. It’s very important.
- out: We specify where the signed certificate will be stored. In this case, in the current directory, with the name cact.pem.
- Days: We specify the validity on days of the signed certificate. In this case, 365 days.
- keyfile: We indicate the private key to use to sign that certificate. In this case, the one generated in the previous step, private / cakey.pem.
- selfsign: Let’s tell openssl we’re going to sign the certificate.
- extensions: We indicate to openssl the section of the configuration file in which the extensions to use are found. In this case, v3 _ ca.
- config: We specify openssl using the modified configuration file, not the native one, with the name openssl.cnf.
- unfaithful: We indicate what we want to sign, in this case, the CSR for our new certifying authority created in the previous step, with the name careq.pem.
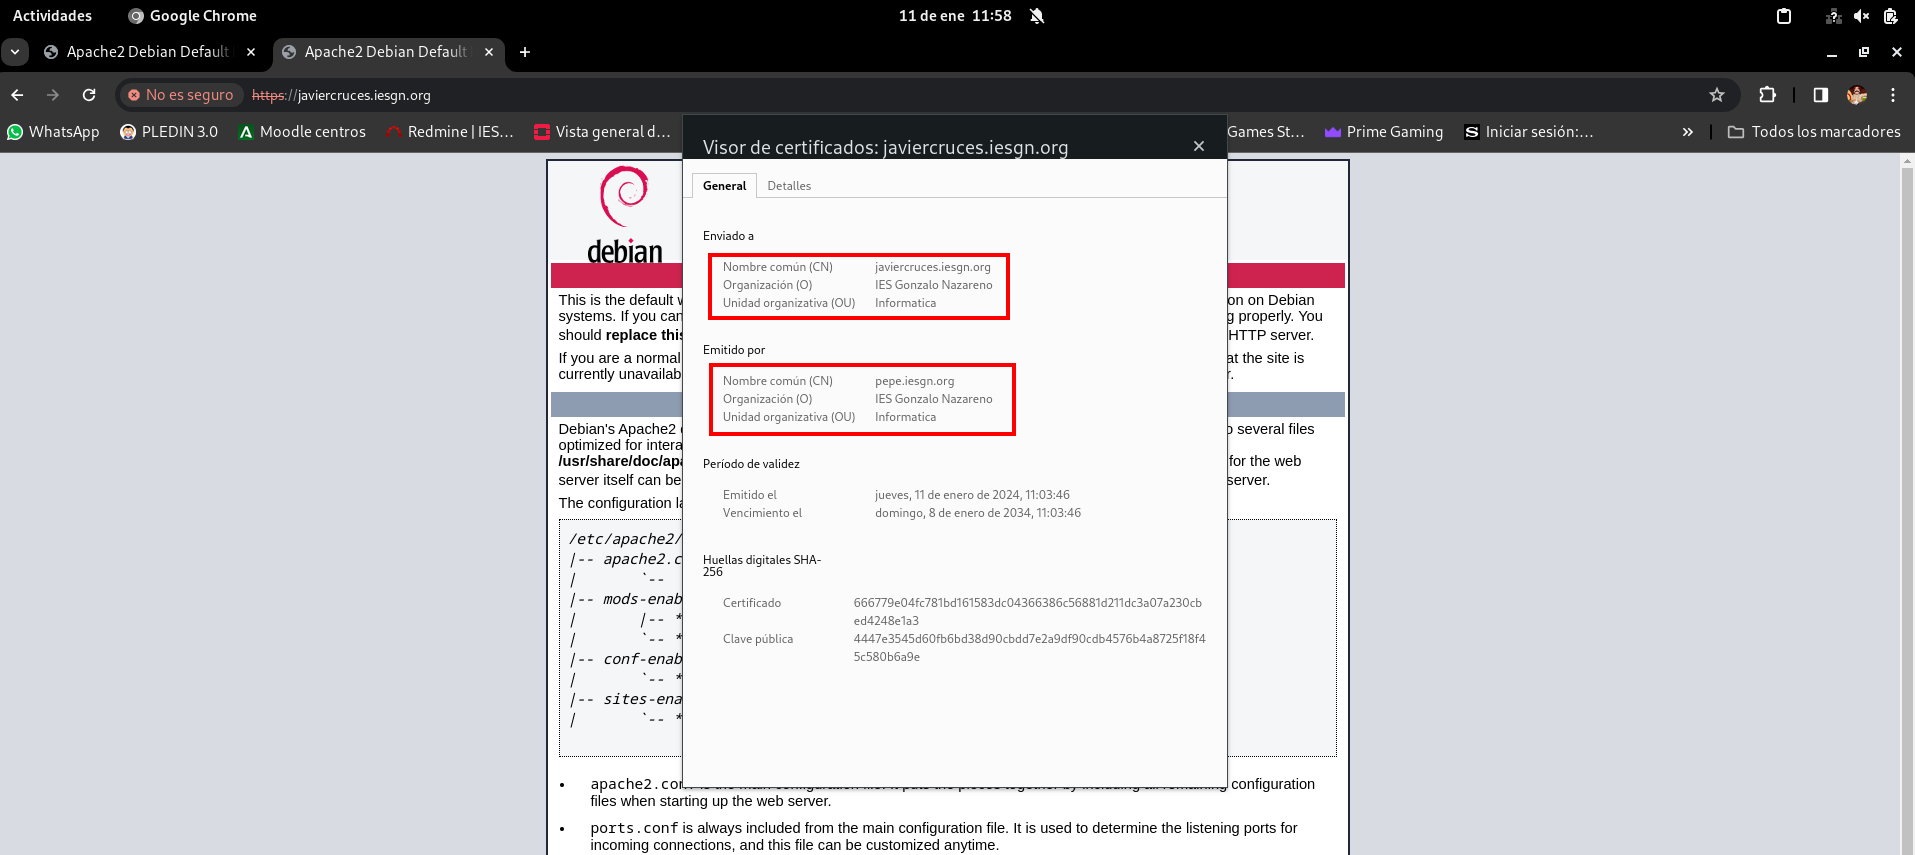
As you can see at the output of the command, we have been asked to make sure that even if the private key reached bad hands, they cannot make fraudulent signatures. In addition, before signing the certificate, we have been shown all the information concerning the certificate, and we have been asked for confirmation. To verify that the certificate of the certifying authority is contained in the current directory, list the content of the certificate and check that, in fact, there is a cact.pem file that is the result of signing the application file of the Careq.pem. certificate.
debian@javiercrucesCA:/CA$ sudo tree
.
├── cacert.pem
├── careq.pem
├── certreqs
├── certsdb
│   └── 741E8AF82445149E28F183047C7D6C0F5F3BACF2.pem
├── crl
├── index.txt
├── index.txt.attr
├── index.txt.old
├── openssl.cnf
├── private
│   └── cakey.pem
└── serial

5 directories, 9 files
debian@javiercrucesCA:/CA$
Step 4: Signature of licence applications
It is all ready to proceed to sign the certificate for your partner’s server, so you must place your certificate signature application file within certreqs /, which is where they should be located.
debian@javiercrucesCA:~$ sudo ls -l /CA/certreqs/
total 4
-rw-r--r-- 1 root root 1785 Jan 11 10:00 peperc.csr
You can proceed to sign it, using the command:
debian@javiercrucesCA:/CA$ sudo openssl ca -config openssl.cnf -extensions v3_req -days 3650 -notext -md sha256 -in certreqs/peperc.csr -out certsdb/pepe.csr.pem
Using configuration from openssl.cnf
Enter pass phrase for /CA/private/cakey.pem:
Check that the request matches the signature
Signature ok
Certificate Details:
        Serial Number:
            74:1e:8a:f8:24:45:14:9e:28:f1:83:04:7c:7d:6c:0f:5f:3b:ac:f3
        Validity
            Not Before: Jan 11 10:01:58 2024 GMT
            Not After : Jan  8 10:01:58 2034 GMT
        Subject:
            countryName               = ES
            stateOrProvinceName       = Sevilla
            organizationName          = IES Gonzalo Nazareno
            commonName                = pfoter15
            emailAddress              = pepepfoter15@gmail.com
        X509v3 extensions:
            X509v3 Basic Constraints:
                CA:FALSE
            X509v3 Key Usage:
                Digital Signature, Non Repudiation, Key Encipherment
Certificate is to be certified until Jan  8 10:01:58 2034 GMT (3650 days)
Sign the certificate? [y/n]:y


1 out of 1 certificate requests certified, commit? [y/n]y
Write out database with 1 new entries
Database updated
Where:
- config: We specify openssl using the modified configuration file, not the native one, with the name openssl.cnf.
- out: We specify where the signed certificate will be stored. In this case, within the certsdb / directory, with the name nombre.crt.
- infidel: We indicate what we want to sign, in this case, the CSR of our partner, located in certreqs / with name nombre.csr.
At first, the certificate is already signed within certsdb /, so to verify it, you will list the content of that directory.
There must be a total of 3 files within it: one corresponding to the certificate of the certifying authority itself, and two corresponding to your partner, which are exactly the same but with different names, one with one identifier and the other with a common name that we have established in order to identify it more easily.
debian@javiercrucesCA:~$ sudo ls -l /CA/certsdb/
total 16
-rw-r--r-- 1 root root 7429 Jan  8 19:57 741E8AF82445149E28F183047C7D6C0F5F3BACF2.pem
-rw-r--r-- 1 root root 2139 Jan 11 10:02 741E8AF82445149E28F183047C7D6C0F5F3BACF3.pem
-rw-r--r-- 1 root root 2139 Jan 11 10:02 pepe.csr.pem
Step 5: Sending certificates to the web server.
So far your share has come, as only the certsdb / nombre.crt file, which is its signed certificate, together with the certificate of the certifying authority, which contains the public key, would be allowed to be sent to your partner, in order to be able to verify that signature on its certificate, the name of cact.pem. Finally, you will show the content of the index.txt file, which is a kind of flat text database with information on the certificates signed by the certifying authority. Within it, we find basic information corresponding to the two signed certificates: that of the certification authority itself and that of our partner, in addition to its current state of validity.
I’m going to send and bring me from the instance of pepe the different files, he has configured my public key so that I can connect:
debian@javiercrucesCA:~$ scp javiercd.csr 172.22.200.113:/home/debian/
javiercd.csr                          100% 1886   839.4KB/s   00:00

debian@javiercrucesCA:~$ scp 172.22.200.113:/home/debian/peperc.csr ./
peperc.csr                            100% 1785   432.6KB/s   00:00

-- Le envio su certificado firmado
debian@javiercrucesCA:~$ scp 172.22.200.113:/CA/certsdb/pepe.csr.pem
pepe.csr.pem                           100% 1785   432.6KB/s   00:00

debian@javiercrucesCA:~$ scp /CA/cacert.pem  172.22.200.113:/home/debian/pub_javi.pem
cacert.pem                            100% 7429   582.6KB/s   00:00

debian@javiercrucesCA:~$ scp 172.22.200.113:/CA/cacert.pem ./pub_pepe.pem
cacert.pem                            100% 7389     1.2MB/s   00:00
Task 2: Configure HTTPS
Step 1: Key creation and certificate application.
The first thing you have to do is create a certificate signature application (CSR or Certificate Signing Request) and get it to your partner. In this case, let’s do it with openssl, but it could be done with other multiple software options.
To create a certificate signature application, we must first have a private key that will be associated with it, so we will generate a 4096 bit RSA private key, which will be stored in /etc/ssl/private/, running the command for it:
debian@javiercrucesCA:~$ sudo openssl genrsa 4096 > javiercd.key
debian@javiercrucesCA:~$ sudo mv javiercd.key /etc/ssl/private/
Once generated, we will change the permissions of it to 400, so that only the owner can read the content, as it is a private key. This step is not mandatory but is recommended for safety. Write the command necessary for it.
debian@javiercrucesCA:~$ sudo chmod 400 /etc/ssl/private/javiercd.key
After that, we will create a .csr file of application for a certificate signature to be signed by the certifying authority (CA) created by our partner. This file does not contain confidential information, so it will not import the route where we store it or the assigned permits. In my case, I will store it in the current directory, running the openssl req command, with the options:
- new: We indicate that the creation of the application for a certificate is interactive, as it will ask for certain parameters.
- key: We indicate the private key to associate with this application for a certificate. In this case, the one generated in the previous step, /etc/ssl/private/tunombre.key.
- out: We specify where the certificate signature application will be stored. In this case, in the current directory, with the name tunombre.csr.
During the execution, you will ask us for a series of values to identify the certificate, which we will have to fill in according to the configuration we have made in the certification unit.
This information will have to be given to us by the certifying authority, except for the last two values, which in the case of the Common Name, you will put the FQDN of the web on which we want to configure HTTPS. In addition, you will need to enter your email in the Email Address section.
debian@javiercrucesCA:/CA$ sudo openssl ca -config openssl.cnf -extensions v3_req -days 3650 -notext -md sha256 -in certreqs/peperc.csr -out certsdb/pepe.csr.pem
Using configuration from openssl.cnf
Enter pass phrase for /CA/private/cakey.pem:
Check that the request matches the signature
Signature ok
Certificate Details:
        Serial Number:
            74:1e:8a:f8:24:45:14:9e:28:f1:83:04:7c:7d:6c:0f:5f:3b:ac:f3
        Validity
            Not Before: Jan 11 10:01:58 2024 GMT
            Not After : Jan  8 10:01:58 2034 GMT
        Subject:
            countryName               = ES
            stateOrProvinceName       = Sevilla
            organizationName          = IES Gonzalo Nazareno
            commonName                = pfoter15
            emailAddress              = pepepfoter15@gmail.com
        X509v3 extensions:
            X509v3 Basic Constraints:
                CA:FALSE
            X509v3 Key Usage:
                Digital Signature, Non Repudiation, Key Encipherment
Certificate is to be certified until Jan  8 10:01:58 2034 GMT (3650 days)
Sign the certificate? [y/n]:y


1 out of 1 certificate requests certified, commit? [y/n]y
Write out database with 1 new entries
Database updated
To verify that the signature request file has been correctly generated, list the content of the current directory. There must be a file named tunombre.csr that you must send to your partner, so that it is signed by the corresponding certifying authority that you have created.
debian@javiercrucesCA:~$ ls -l
total 16
-rw-r--r-- 1 root   root   1886 Jan 11 09:40 javiercd.csr
In my case I’ll get it to you using SCP:
debian@javiercrucesCA:~$ scp javiercd.csr 172.22.200.113:/home/debian/
javiercd.csr                          100% 1886   839.4KB/s   00:00
Once signed, I’ll get it from your server.
Step 2: Certificate storage on the server
In addition to that signed certificate, you must send us the public key of the certification authority, that is, the certificate of the certificate, so that you can verify your signature on our certificate. Store both files in /etc/ssl/certs/ and list the contents of that directory.
debian@javiercrucesCA:~$ sudo mv javiercd.csr.pem /etc/ssl/certs/
debian@javiercrucesCA:~$ sudo mv pub_pepe.pem /etc/ssl/certs
There must be a file of the name tunombre.crt that is the result of the signature of the application for signature of the certificate that we have previously sent you, and another of the name cact.pem, which is the certificate of the certifying authority, with which the signature of the certifying authority on that certificate of the server will then be checked.
debian@javiercrucesCA:/CA$ sudo ls -l /etc/ssl/certs | grep javi
-rw-r--r-- 1 debian debian   2175 Jan 11 10:05 javiercd.csr.pem
debian@javiercrucesCA:/CA$ sudo ls -l /etc/ssl/certs | grep pepe
-rw-r--r-- 1 root   root     7389 Jan 11 11:24 pub_pepe.pem
debian@javiercrucesCA:/CA$ sudo ls -l /etc/ssl/private/
total 8
-r-------- 1 debian debian   3272 Jan 11 09:37 javiercd.key
Step 3: Apache configuration
As apache2 included a default VirtualHost for incoming requests by port 80 (HTTP), it contains a default one for incoming requests by port 443 (HTTPS), by name default-ssl, which by default is disabled, so we will proceed to modify it taking into account the following directives:
- ServerName: As in the previous VirtualHost, we will have to indicate the domain name through which we will access the server.
- SSLEngine: Activates the SSL engine, necessary to make use of HTTPS, so its value should be on.
- SSLCertificateFile: We indicate the route of the server certificate signed by the CA. In this case, / etc / ssl / certs / tunombre.crt.
- SSLCertificateKeyFile: We indicate the route of the private key associated with the server certificate. In this case, / etc / ssl / private / tunombre.key.
- SSLCACertificateFile: We indicate the route of the CA certificate with which we will check the signature of our certificate. In this case, / etc / ssl / certs / cact.pem.
debian@javiercrucesCA:/CA$ sudo a2enmod ssl
debian@javiercrucesCA:/CA$ sudo a2ensite default-ssl.conf

debian@javiercrucesCA:~$ sudo cat /etc/apache2/sites-available/default-ssl.conf
<VirtualHost *:80>
  ServerName javiercruces.iesgn.org

  Redirect permanent / https://javiercruces.iesgn.org/
</VirtualHost>
<VirtualHost *:443>
	ServerAdmin webmaster@localhost
	ServerName javiercruces.iesgn.org
	DocumentRoot /var/www/html

	ErrorLog ${APACHE_LOG_DIR}/error.log
	CustomLog ${APACHE_LOG_DIR}/access.log combined

	SSLEngine on

	SSLCertificateFile      /etc/ssl/certs/javiercd.csr.pem
	SSLCertificateKeyFile   /etc/ssl/private/javiercd.key
</VirtualHost>

debian@javiercrucesCA:~$ sudo systemctl reload apache2.service
Demonstration:
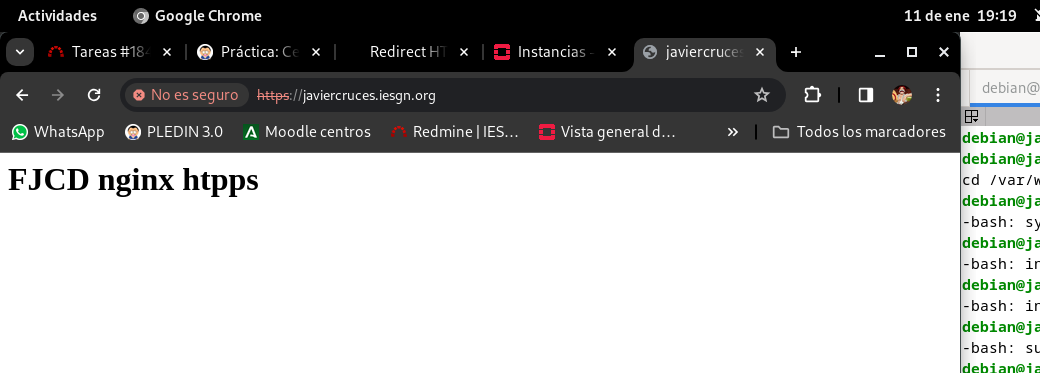
Step 4: Nginx configuration
Let’s force the https configuration on Nginx
Here’s the virtualhost configuration:
debian@javiercrucesCA:/var/www/sad$ sudo cat /etc/nginx/sites-available/default
server {
    listen 80;
    listen [::]:80;
    server_name javiercruces.iesgn.org;

    # Redirección a HTTPS
    return 301 https://$host$request_uri;
}

server {
    listen 443 ssl;
    listen [::]:443 ssl;
    root /var/www/sad;
    index  index.php index.html index.htm;
    server_name moodle.javiercd.es;

    ssl_certificate /etc/ssl/certs/javiercd.csr.pem;
    ssl_certificate_key /etc/ssl/private/javiercd.key;

}