
Francisco Javier Cruces Doval
Friday, September 8, 2023 | 16 minutes
Underworld evolution
The world of UNDERWORLD has evolved greatly in recent months, so you must perform network management tasks to face the new situation.
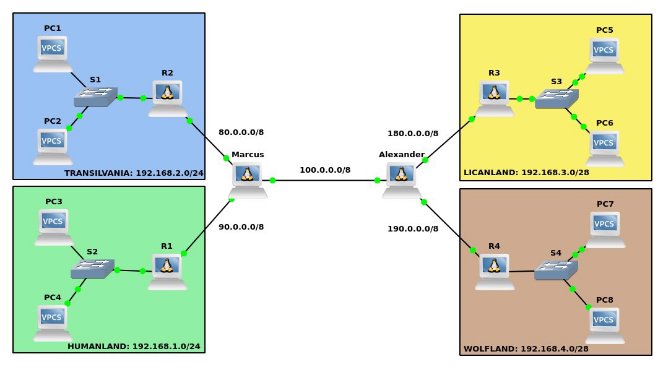
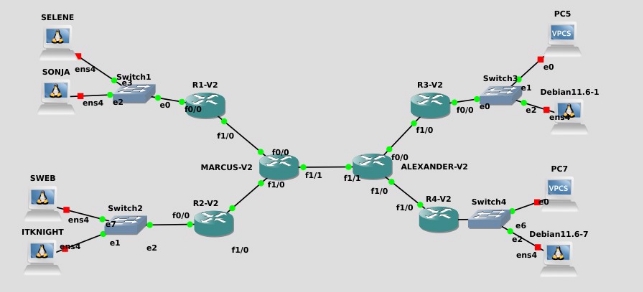
On one hand, the Internet has been discovered in the Underworld, allowing each of the sub-worlds (remember: vampires, werewolves, lycanthropes, and humans) to connect to a router that, in turn, connects them to one of the two large routers that form Underworld’s Internet, called Marcus (for humans and vampires) and Alexander (for werewolves and lycanthropes). Marcus and Alexander are connected to each other.
The scheme would be as follows:
On the other hand, the beings of the underworld have discovered a vulnerability in CISCO routers that allows them to bypass the access control lists, returning to the chaos you previously prevented with the ACLs.
Your tasks will consist of:
- Replacing the CISCO routers in the network infrastructure with Linux machines following the scheme shown.
- Properly configure the Linux machines to function as routers.
- Create the necessary routing tables for all machines to communicate with each other, considering that internal networks will have private addresses and we will have public addresses on the Internet.
- Configure the necessary firewalls on the routers so that:
- VAMPIRES cannot communicate with the other species.
- WEREWOLVES and LYCANTHROPES, since they are not so repulsive when they meet, can communicate with each other. They will not have communication with the other species.
- HUMANS will also not be able to communicate with the other species.
- Configure the DHCP service that the werewolves and lycanthropes had under the same conditions they had when using CISCO routers.
- Configure the firewalls with the necessary rules so that, from HUMANLAND, IT KNIGHT can continue communicating with his two favorite vampires (SONJA and SELENE).
- Perform the necessary configurations to set up a web server in HUMANLAND accessible from anywhere in UNDERWORLD.
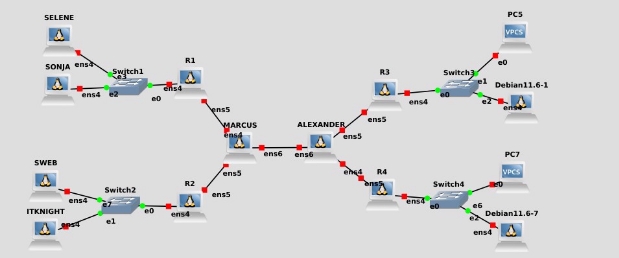
Preparation of the scenario in Linux
Configuration of the network interfaces
The first thing we will do is add the necessary network interfaces to each router. To do this, with the machine turned off, we right-click > settings > network and add the slots that are needed for each machine:

We will need the following number of network interfaces for each device:
- Router 1, 2, 3, and 4: will need 2 network interfaces
- MARCUS and ALEXANDER: will need 3 network interfaces
- PCs: will need 1 network interface
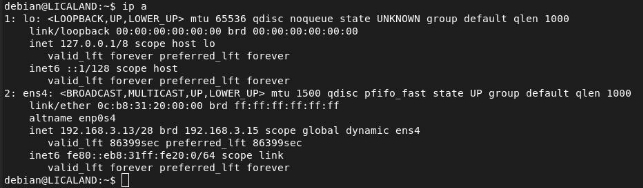
Once this is done, we will edit the file /etc/network/interfaces to perform our network configuration.
Subsequently, we will restart the networking service with systemctl restart networking.service so that the network configuration we indicated is applied.
Configuration of the network interface Router 1:

Configuration of the network interface Router 2:

Configuration of the network interface Router 3:

Configuration of the network interface Router 4:

Configuration of the network interface Router MARCUS:

Configuration of the network interface Router ALEXANDER:

Enabling the forwarding bit
If we want to make a Linux machine act as a router, which means it routes packets that are not destined for it, we must enable the forwarding bit.
Additionally, we will take this opportunity to permanently enable the forwarding bit on the routers of the scenario by editing the file /etc/sysctl.conf and uncommenting this line:

We will repeat this for the six routers we have in the scenario:
Router 1:

Router 2:

Router 3:

Router 4:

Router MARCUS:

Router ALEXANDER:

Now all our machines are configured to act as routers and will route any packets that are sent to them that are not for them.
Route configuration
Here I will show if I have added any routes manually and the routing tables of the devices.
Router MARCUS:


Router ALEXANDER:


Router 1:

Router 2:


Router 4:

With the network configuration I have on the interfaces, I have only added 2 manual routes on the routers of MARCUS and ALEXANDER; in the rest it was not necessary since it is generated automatically with the gateway we placed when configuring the network interfaces.
I could have saved writing them if I had placed the IP of the other as the gateway on the interface configured in the network 100.X.X.X.
Connectivity test
We are going to check if we have routed correctly, so I will ping from each router to each one of the edges of the scenario.
Router 1:

Router 2:

Router 3:

Router 4:

It is confirmed that we have connectivity between all routers; the PCs will not have “connectivity” until we configure the SNAT.
DHCP Configuration
Lycanthropes
The lycanthropes, on their part, hire you to assign their IPs via DHCP as well, but they indicate that they cannot receive the first 10 addresses of their range (not counting the network one or the gateway), as these are reserved for the leaders of their clan who are traveling and will return in a few days.
With the machine connected to the NAT cloud and the interface that is connected configured via DHCP, we will download the DHCP server; to do this, we must first run an apt update because the machine does not have the repositories loaded in memory:


When it finishes installing, it will give us an error; this is because the service is not configured and does not know which interface the server should assign addresses to:
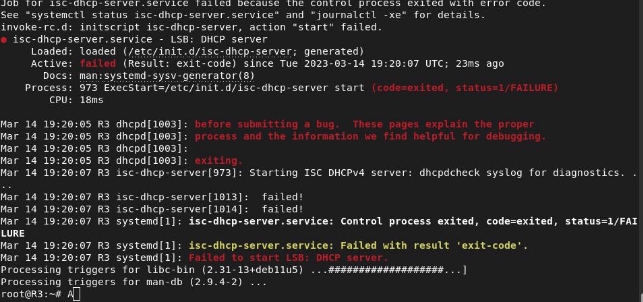
To do this, we will edit the file /etc/default/isc-dhcp-server and add the name of the interface in the IPV4 section:

Now we will configure the scope with the requirements requested by the lycanthropes by editing the file /etc/dhcp/dhcpd.conf:

We must keep in mind that the configuration we put here is consistent with the network configuration we have; we need to consider that we have a /28, so in this case, we can only have 14 assignable addresses.
But if we follow the statement, they do not want the first 10, so we can only assign 3 to our clients.
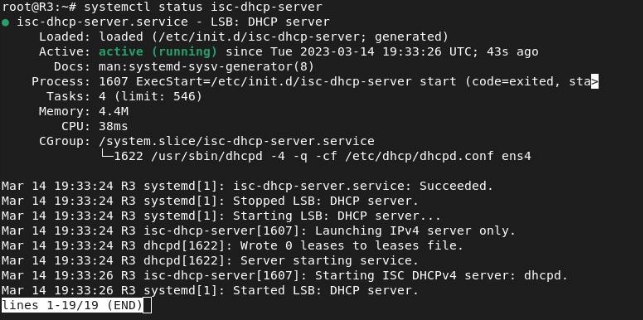
Once this is done, we will restart the service:

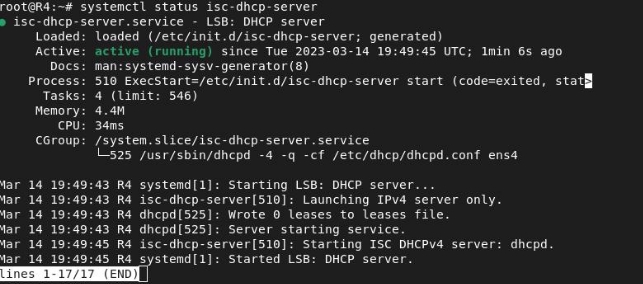
And we will see if it is working, checking the status:
We will assign an IP to a PC to check that it works:

Werewolves
The werewolves, who are quite clumsy at entering IP addresses into their machines, ask you to configure the DHCP service for all their machines to receive an IP automatically.
With the machine connected to the NAT cloud and the interface that is connected configured via DHCP, we will download the DHCP server; to do this, we must first run an apt update because the machine does not have the repositories loaded in memory:


When it finishes installing, it will give us an error; this is because the service is not configured and does not know which interface the server should assign addresses to:
To do this, we will edit the file /etc/default/isc-dhcp-server and add the name of the interface in the IPV4 section:

Fortunately, the werewolves are less demanding, and they want the entire range of addresses distributed, so for this, we will edit the file /etc/dhcp/dhcpd.conf:

Now we will restart the service:

We will check the status to ensure that it is working correctly:
We will assign an address to a client to make sure everything works correctly:

SNAT Configuration
To complete the preparation phase, we will need to configure SNAT so that the different races can communicate with each other.
Router 1:
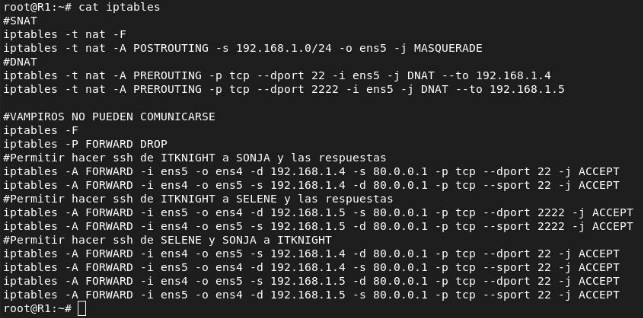
I created a file called iptables to save all the rules from the practice:

To demonstrate that the rule works, here is a capture between Router 1 and PC1:

We see that once outside the network between R1 and MARCUS, SNAT has been applied:

Router 2:
I created a file called iptables to save all the rules from the practice:

To demonstrate that the rule works, here is a capture between Router 2 and PC3. We see that the source is a private IP address:

We see that once outside the network between R2 and MARCUS, SNAT has been applied, since the source is now a public IP address:

Router 3:
I created a file called iptables to save all the rules from the practice:

To demonstrate that the rule works, here is a capture between Router 3 and PC5. We see that the source is a private IP address:

We see that once outside the network between R3 and ALEXANDER, SNAT has been applied, since the source is now a public IP address:

Router 4:
I created a file called iptables to save all the rules from the practice:

To demonstrate that the rule works, here is a capture between Router 4 and PC7. We see that the source is a private IP address:

We see that once outside the network between R4 and ALEXANDER, SNAT has been applied since the source is now a public IP address:

With the current scenario, any PC is capable of reaching all public addresses in our network:

DNAT Configuration
For the machines to be able to communicate with each other, ssh has been installed on them, so we will need to configure DNAT.
R1
For this network, since we have two clients, I changed the port that ssh uses:

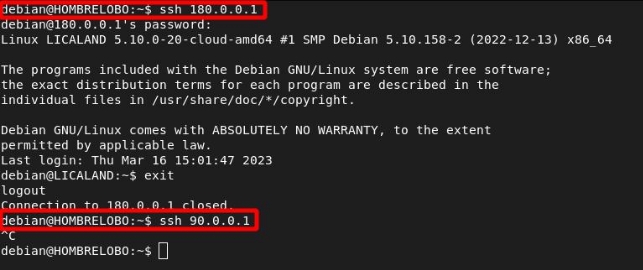
We check that I can connect to both hosts from another network, thus confirming that DNAT works.
Sonja:

Selene:

R2
In this network, we only have one client that we want to be accessible from the outside, so we will only have one DNAT rule:

To check the rule, I will connect from the vampires to the humans:

R3
In this network, since there is a DHCP service running, for the DNAT rule to function correctly, we must reserve our host or configure the interface statically.
I will do the former for convenience, for this we go to the file /etc/dhcp/dhcpd.conf and write the following:
host ReservationName { hardware ethernet HOST_MAC_ADDR; fixed-address RESERVED_IP;}

Once this is done, we restart the service:

And I will set the following rule:

Now let’s check that I can connect to this host:
R4
In this network, we will also configure a reservation on the server to keep our rules active; in this case, I will assign the address 192.168.4.5.

We will restart the service and check that our host has been assigned the reserved IP; if not, we will request another with dhclient:

Now we will add the DNAT rule so that the ssh server can be reached:

We check that the rule is functioning, and we can connect from another network:
Firewall Configuration
Vampires cannot communicate with the other species
I will set a default DROP policy in the FORWARD table to block all traffic coming from the vampire network:

We will verify that the vampires are unable to reach the other networks:

We can see the hits it has made to confirm that the rule is working:

Allow communication between Werewolves and Lycanthropes
WEREWOLVES and LYCANTHROPES, since they are not so repulsive when they cross paths, will be able to communicate with each other. They will not have communication with the other species.
I will set a default DROP policy in the FORWARD table, then allow traffic that comes in through interface ens4 and goes out through ens5, and vice versa to permit traffic between these two networks:

We see that they can communicate with each other; however, they cannot access Humans or Vampires:
We will check that the rules have hits:

HUMANS will also not be able to communicate with the other species
With the rules we currently have, communication between Humans and other species is not possible; we can see that in R2 without any additional rules, we cannot connect:

We see that we cannot communicate:

If we want to prohibit human traffic on our router and not rely on external rules in case they change, we will add a default DROP policy:

We will see the hits in the default policy:

Configure the necessary rules in the firewalls so that, from HUMANLAND, IT KNIGHT can continue communicating with his two favorite vampires (SONJA and SELENE).
The IPs of these machines are:
- IT KNIGHT (SSH) –> 192.168.2.3:22
- SONJA (SSH) –> 192.168.1.4:22
- SELENE (SSH) –> 192.168.1.5:2222
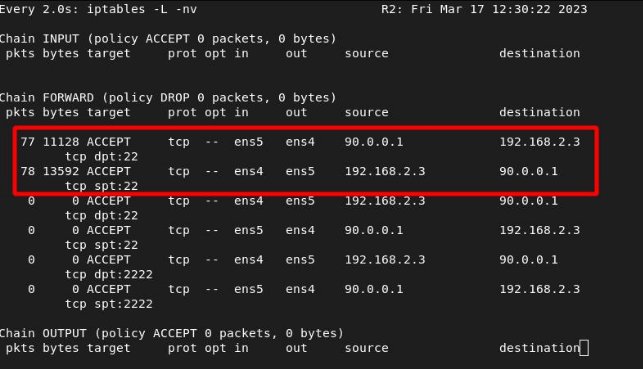
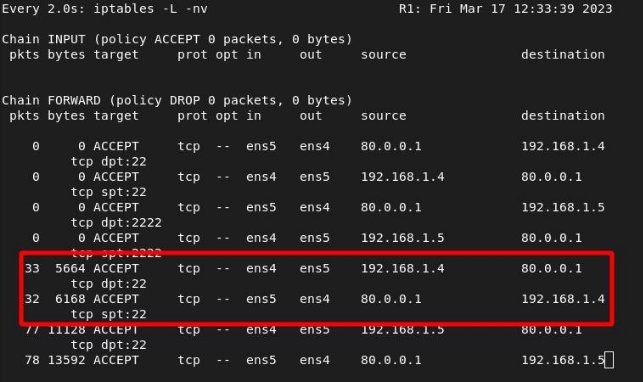
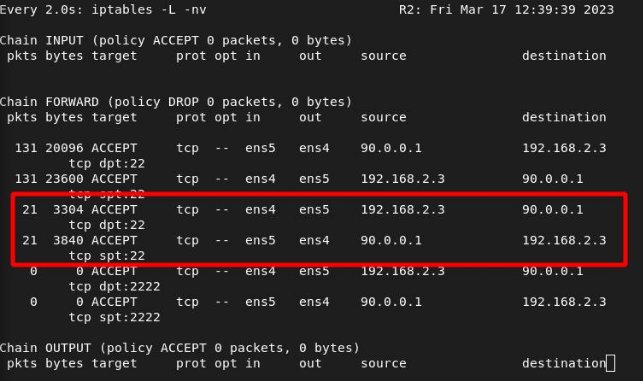
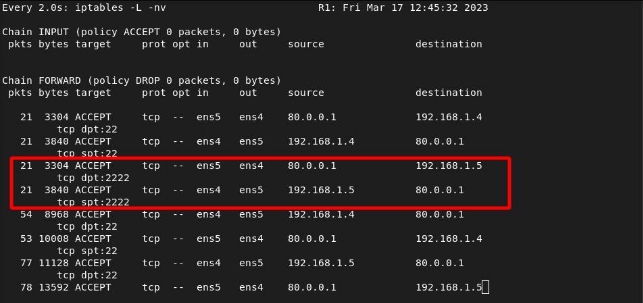
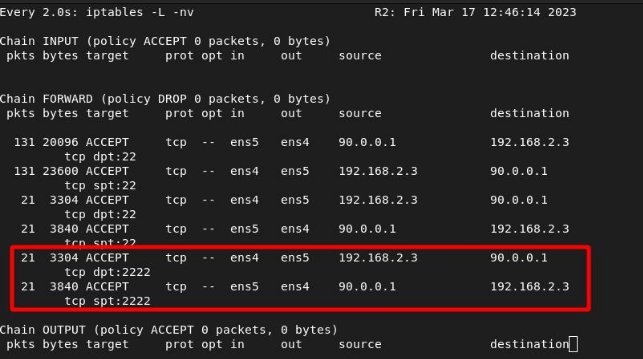
In router 1, the necessary rules to allow this communication are:
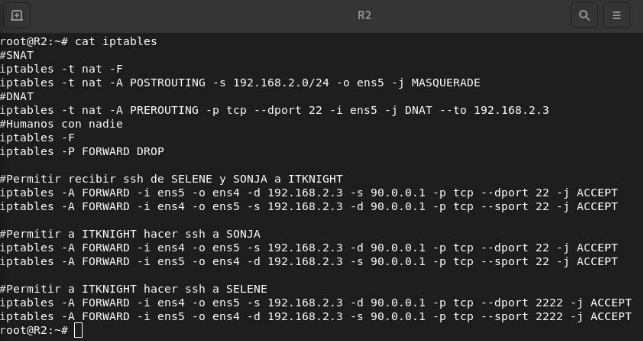
In router 2, the necessary rules to allow this communication are:
We will check action by action to ensure that these rules fulfill their purpose.
SELENE –> ITKNIGHT

In router 1:
In router 2:
SONJA –> ITKNIGHT
We ssh:

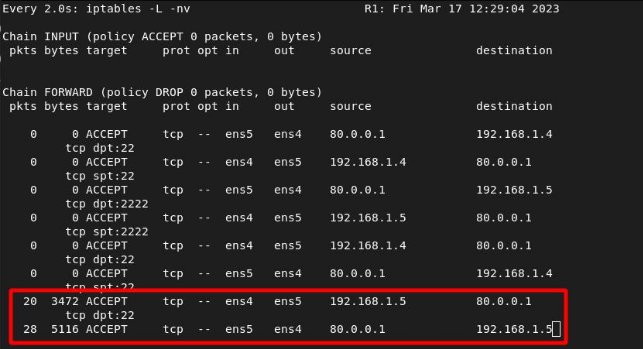
We see the hits from router 1:
We see the hits from router 2 (same rule as the previous section):
ITKNIGHT –> SONJA
We ssh:

We see the hits from router 1:
We see the hits from router 2:
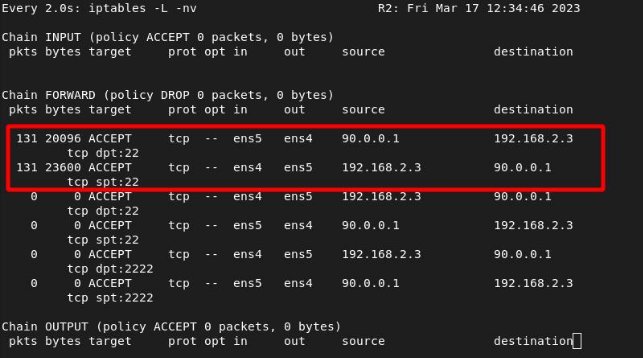
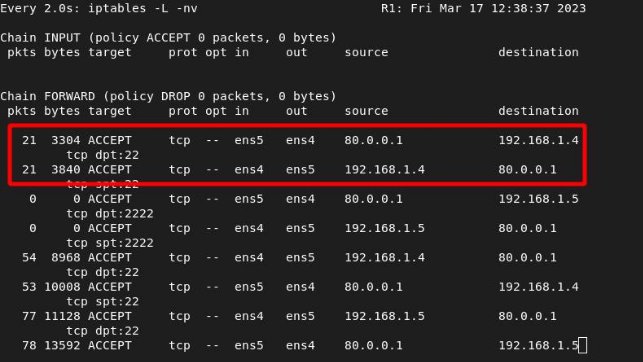
ITKNIGHT –> SELENE
We launch the ssh:

We see the hits from router 1:
We see the hits from router 2:
HUMANLAND Web Server
Perform the necessary configurations to set up a web server in HUMANLAND accessible from anywhere in UNDERWORLD.
I have assigned it the IP 192.168.2.10.
The first thing we must configure is the DNAT on router R2 (HUMANLAND):

Now in router 2, we will allow requests to the server and their responses:

In router 1, we allow requests and their responses:

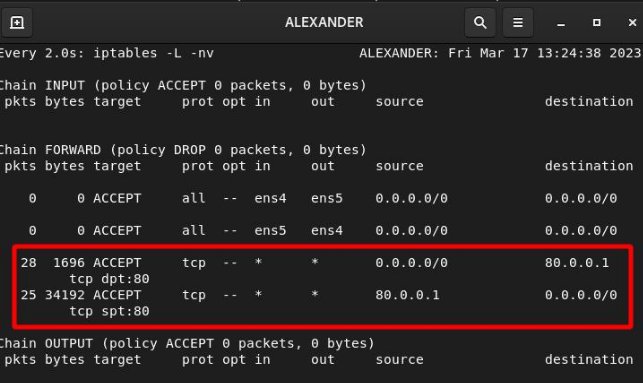
Finally, in ALEXANDER, we allow web requests to pass through:

Let’s check that it can be accessed from all networks.
VAMPIRES:

We check the hits in router 1:

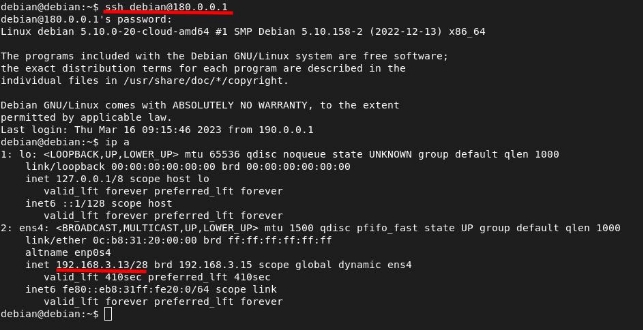
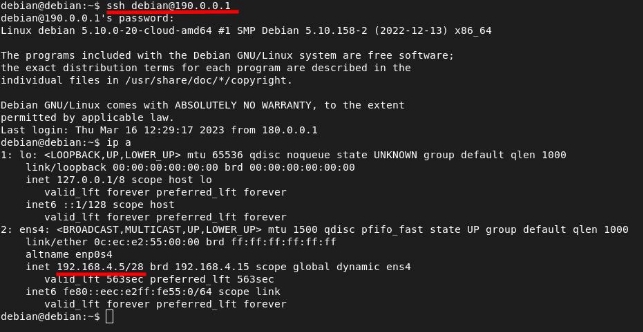
WEREWOLVES AND LYCANTHROPES
We make the web request from both networks:


We check the hits in router ALEXANDER:
Finally, we see the hits in Router 2 (HUMANS) for the DNAT rule:

Scenario with Cisco routers
Configuration of the interfaces
R1


R2


R3


R4


MARCUS


ALEXANDER


Routing Tables
R1
We add the default route:

Thus, R1’s routing table will look like:

R2
We add the default route:

Thus, R2’s routing table will look like:

R3
We add the default route:

Thus, R3’s routing table will look like:

R4
We add the default route:

Thus, R4’s routing table will look like:

MARCUS
We add the default route:

Thus, MARCUS’s routing table will look like:

ALEXANDER
We add the default route:

Thus, ALEXANDER’s routing table will look like:

Connectivity Test
We will check that we have routed correctly, so I will ping from each router to each of the edges of the scenario.
R1 → to the edges:

R2 → to the edges:

R3 → to the edges:

R4 → to the edges:

DHCP Configuration Lycanthropes
The lycanthropes, on their part, hire you to assign their IPs via DHCP as well, but they indicate that they cannot receive the first 10 addresses of their range (not counting the network one or the gateway), as these are reserved for the leaders of their clan who are traveling and will return in a few days.
The first thing we will do is establish the range of excluded IPs from the set (pool) of addresses that the service will assign by indicating the initial and final IP of the range, both included:

We name the DHCP service range:

We define the network to which it will provide DHCP service:

We include the gateway that will offer the service:

With this, we would have set up the DHCP server. With the following command, we can view the service statistics to see if it is running:

We will also confirm that the lease has been granted to our host:

DHCP Werewolves
The werewolves, who are quite clumsy at entering IP addresses into their machines, ask you to configure the DHCP service for all their machines to receive an available IP automatically.
In the previous section, I detailed each part of the configuration of a DHCP server in Cisco; here I show you the configuration for the Werewolf network:

We will check that it is working:

SNAT Configuration
Router 1:
The first step is to create an ACL to allow the traffic we want to perform SNAT on:

We will assign this rule to the internal interface of our network:

Now we will create a pool with the public IPs; the command would be this, but it does not show completely in the terminal:

We enable NAT:

We indicate which interface is for “inside”:

We specify the “outside” interface:

The SNAT should be working, so let’s verify it:

We see that the rule has HITS:

Router 2:
The first step is to create an ACL to allow the traffic we want to perform SNAT on:

We will assign this rule to the internal interface of our network:

Now we will create a pool with the public IPs; the command would be this, but it does not show completely in the terminal:

We enable NAT:

We indicate which interface is for “inside”:

We specify the “outside” interface:

The SNAT should be working, so let’s verify it by checking if the rule has HITS:

Router 3:
The first step is to create an ACL to allow the traffic we want to perform SNAT on:

We will assign this rule to the internal interface of our network:

Now we will create a pool with the public IPs; the command would be this, but it does not show completely in the terminal:

We enable NAT:

We indicate which interface is for “inside”:

We specify the “outside” interface:

The SNAT should be working, so let’s verify it by checking if the rule has HITS:

Router 4:
The first step is to create an ACL to allow the traffic we want to perform SNAT on:

We will assign this rule to the internal interface of our network:

Now we will create a pool with the public IPs; the command would be this, but it does not show completely in the terminal:

We enable NAT:

We indicate which interface is for “inside”:

We specify the “outside” interface:

The SNAT should be working, so let’s verify it by checking if the rule has HITS:

DNAT Configuration
R1

Checking:

R2

Checking:

R3

Checking:

R4

Checking:

Firewall Configuration
Vampires cannot communicate with the other species
For this, we will delete the existing rule in the list:

Now we will deny outgoing traffic from the vampire network:

We confirm they cannot communicate:

We look at the hits from the rules:

Allow communication between Werewolves and Lycanthropes
WEREWOLVES and LYCANTHROPES, since they are not so repulsive when they cross paths, will be able to communicate with each other. They will not have communication with the other species.
With these two rules, we allow any host from our local networks to exit when the destination is werewolves or lycanthropes:
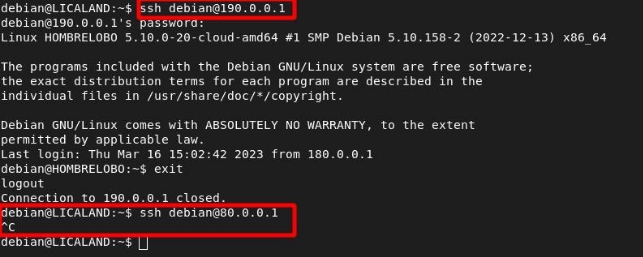
- R3 → 180.0.0.1
- R4 → 190.0.0.1


We see that it blocks the packets that are not from HL to LC or from LC to HL:


HUMANS will also not be able to communicate with the other species
With the rules we currently have, communication with other species by humans is not possible; we can see that in R2 without any additional rules, we cannot connect since our packets will reach the networks.

To truly prevent humans from communicating without depending on the rules of the other kingdoms, we will prevent them from exiting the kingdom:

If we check now, they will not be able to exit the kingdom:

We look at the hits:

Configure the necessary rules in the firewalls so that, from HUMANLAND, IT KNIGHT can continue communicating with his two favorite vampires (SONJA and SELENE).
The IPs of these machines are:
- IT KNIGHT (SSH) –> 192.168.2.3:22
- SONJA (SSH) –> 192.168.1.4:22
- SELENE (SSH) –> 192.168.1.5:2222
To allow the vampires to communicate with humans:

We allow outgoing messages to the public of the vampires when the port is 22 and 2222:


Now we will allow the vampires to connect to the humans using port 22:


I don’t know why it’s not working… it only goes through if I don’t place any rules; even allowing ALL SSH traffic doesn’t help… I have also allowed all ICMP, but it still occurs.
The nat and SNAT are working fine, but when it comes to making the ssh rules, the following happens in the local network. Since the router drops them back despite the traffic being allowed.