
Francisco Javier Cruces Doval
Sunday, October 8, 2023 | 13 minutes
Basic IPv6 Scenario
Throughout this guide, we will explore the configuration of a basic scenario using IPv6 networks on both Linux and Cisco devices. We will also address the configuration of an Apache server using IPv6 capabilities.
Linux IPV6 Self-Configuration
Connect two Linux machines to the same switch and check that they have IPv6 connectivity using the local link address.
We’ll check the IPV6 that the different pcs have. PC1 has - > fe80::ef7:42ff:fe92:0/64

While PC2 has - > fe80:: e5f: 61ff: feee: 0 / 64

These two addresses are called local link and are automatically assigned to each network interface. This type will only allow us to communicate with the devices of our local network and have the prefix - > FE80:: / 10
If we do a ping from one of these to another with the local link address we can communicate:


SLAAC
Add a third Linux machine to the same network and connect it as a router so that it gives global IPv6 addresses to the other two using SLAAC. Do not forget to install RADVD. Check that they have connectivity.
The first thing we will do is set the network interface per ipv6 of our router in this case I will assign you the prefix 3333: db7::
We calculate the fixed part of our address:
R1 - > 0c: 01: 30: a0: 00: 00 - > 0c: 01: 30: ff: faith: a0: 00: 00 - > 0E: 01: 30: FF: FE: A0: 00: 00
We edit the interfaces and apply the configuration of our network card:

We restarted the service and would have a global address:

SLAAC (Stateless Address Self-reliability) is a unique configuration mechanism for IPV6. There is no equivalent in IPV4. Which allows the nodes in our network to be automatically configured.
From the local link address that all hosts have, by means of the neghbour discovery protocol requests if there is any router within the local network will provide you with the network configuration parameters
The first thing we will do to configure SLAAC will be to install the radvd package:

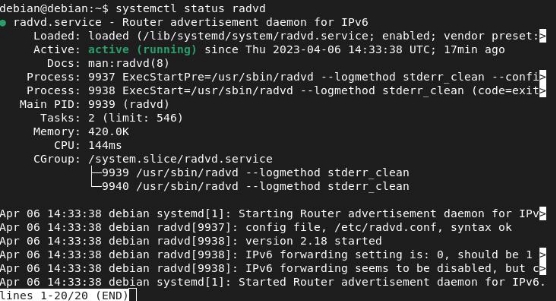
If we look at the state of the demon this will tell us that you do not find your configuration file:

So we will generate you one by indicating the interface that is going to distribute directions and we will also tell you the behavior that you will have on our network:

-**MinRtrAdvInterval:**Indicates the minimum time in seconds by which the router will send a message in seconds. -**MaxRtrAdvInterval:**Indicates the maximum time in second by which the router will send a message.
-**AdvSendAdvert:**Indicates whether or not the interface sent warnings. -**AdvManagedFlag:**Indicates whether we want the service to use DHCPv6 (on) or not (off). -**Prefix:**Indicates the network prefix using SLAAC to assign addresses. -**AdvValidLifetime:**Indicates time in seconds that an IPV6 address will be valid. -**AdvPreferenredLifetime:**Indicates time in seconds that an address generated from the prefix will be preferred instead of other directions.
Once done we restart the service and the demon will start setting up our customers:
We will also have to set the forwarding bit for ipv6 in our router, as with ipv4 we edit the / etc / sysctl.conf file:

SLAAC messages
We can see how the PC1 has been configured using SLAAC:
The PC2 has also been configured:

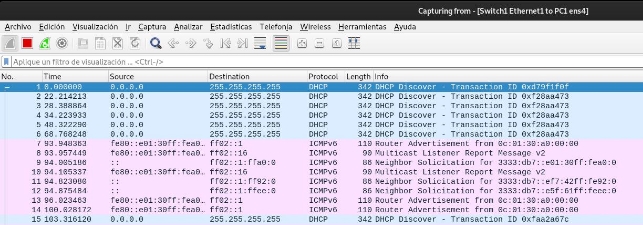
We will study the messages that have intervened in this SLAAC configuration, if we number them as in this Wireshark capture:


-Router application(RS) (It does not appear in the capture): The PC sends an RS message to all routers to indicate that it needs an RA, this message is sent if it does not receive any RA after a while. -Router Advertising(RA): Once the router receives the RS or periodically sends an RA in which the network prefix and its length are included. The RA message is sent to the IPv6 address of all nodes, FF02:: 1, with the link-local address of the router as the IPv6 address of origin. (N0 6 and 12). -Multicast Listar Report Message v2: Indicates that the x device has started a listening session for multicast traffic (No 7 and 9). -Needbor Application(NS): It is used to know the MAC address of a device in your network, it is similar to the ARP protocol. (No 10,11,613). -Neighbbor Advertising(NA): It is the response message of an NS (No 614).
Once the client has received an RA, it then sets its IPV6 address, with a 64-bit network prefix but needs an IID (Interface Identifier).
There are two ways that customers can create their own unique IID:
-**EUI-64:**via the EUI-64 process, PC1 creates an IID using its 48-bit MAC address. -**Random generation:**The 64-bit IID can be a random number generated by the client operating system.
Since SLAAC is a state-of-the-art process, for customers to use this recently created IPv6 address, you must verify that it is unique. The customer will send an NS with its own address as the target IPv6 address. If no other device responds with a neighbor’s ad message, the address is unique and can be used by the customer. If it receives an NA, the address is not unique, and the operating system must determine a new interface ID to use.
This process is part of the detection of ICMPv6 neighbors and is known as “detection of duplicate addresses (DAS).”

This image explains the configuration of an interface by SLAAC. Now let’s check that different customers have connectivity between themselves:
PC1 - > 3333:db7::ef7:42ff:fe92:0 PC2 - > 3333:db7::e5f:61ff:feee:0 R1 - > 3333:db7::e01:30ff:fea0:0
Router 1:

PC2:

We have to keep in mind that these address “concessions” are not stored anywhere, i.e. on the server we do not store the settings that the service has performed.
DHCPv6 with SLAAC
Change the settings to use DHCPv6 instead of SLAAC by also sending DNS servers. Check that the machines have connectivity.
For this we install the DHCPv6 server, the package is the same for ipv4:

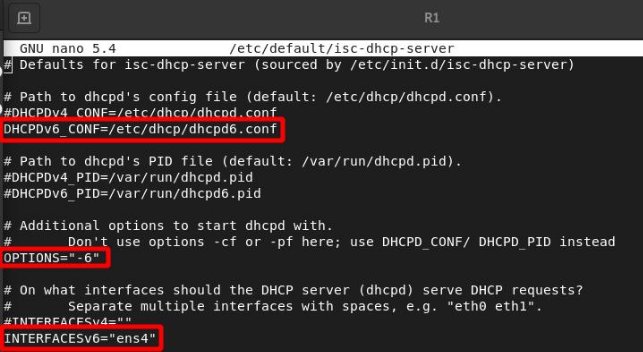
We edit the configuration file for IPV6 - > sudo nano /etc/dhcp/dhcpd6.conf:

In the /etc/default/isch-dhcp-server file we will indicate not only the interface we want to distribute addresses if we will not also specify that the server will work for IPV6:
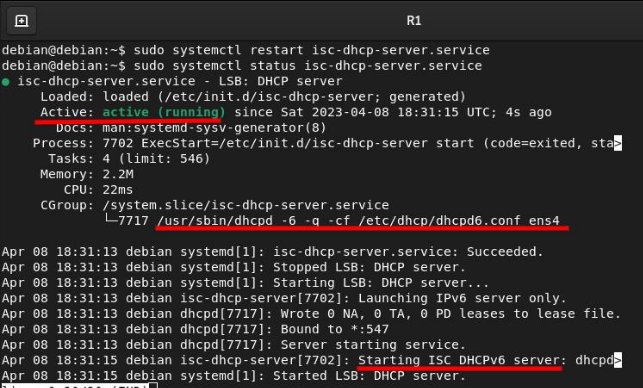
We restart the service and check that it is working with the parameters we have assigned to you in the set up:
Let’s check that customers were configured using ipv6, for which the configuration on the network interfaces is quite similar to IPV4:

We restart the networking.service and get the DHCP configuration on the card:

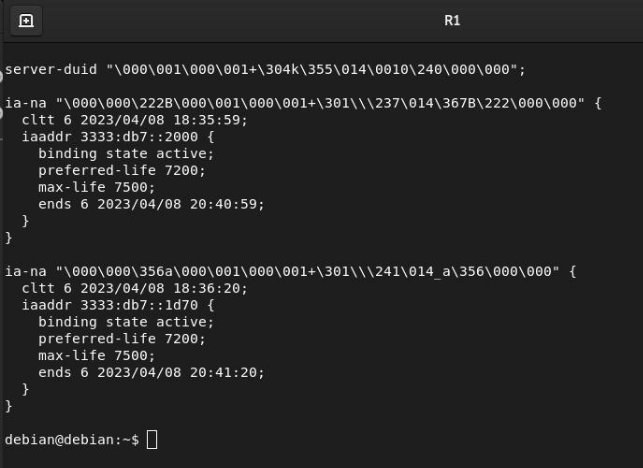
We can also see the concessions file on the server on the following route /var/lib/dhcp/dhcpd6.leases:
I haven’t mentioned it before, but in order for the configuration to occur, the client will obtain the parameters we have configured by DHCPv6, we will have to put this parameter to ON in the SLAAC configuration file:

As we can see the only parameter we have specified on the DHCP server to be the google DNS has been correctly configured on our client:

DHCPv6 messages with SLAAC
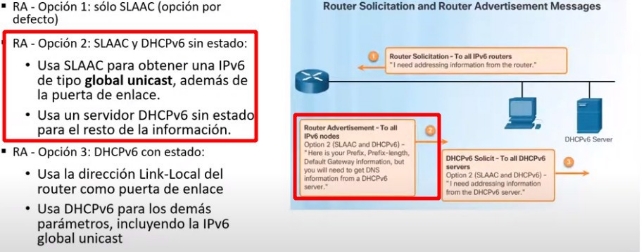
We just set up SLAAC and DHCPv6 without status, this means that:
- Use SLAAC to get a unique global IPV6 address, in addition to the link door.
- Use the status-free DHCPv6 server for the rest of our network configuration parameters.
That is, we have set the second option in the following image:

{< alert type = “info” >} The catches you will see below are NOT cut because they look pixelated. The communication messages are in order. {< / alert >}
If we look at the capture of Wireshark and compare it to the unique configuration of SLAAC:
SLAAC operations:
- We can see that the PC1 has requested an RS, to all the routers on the network (Multicast)

- R1 responds to PC1 with an RA (Indicates if you need to communicate with a DHCPv6 with or without a state)

- NS, to check that the assigned address is not duplicated

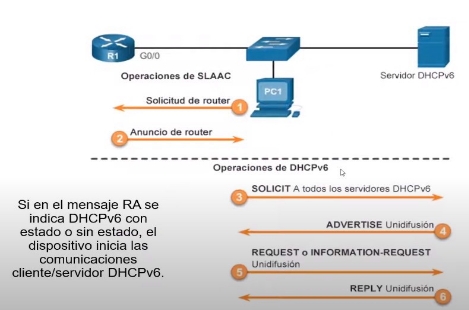
DHCPv6 operations:
- Request all DHCPv6 servers on the network (Multicast at ff02:: 1: 2) includes a CID client identifier.
- Warning: It is the DHCPv6 server response to a request, this includes the appropriate configuration options, including an IPv6. It also includes a CID and an XID (Id transaction).

- Request: The customer sends this message to all DHCPv6 servers to indicate that he wants the parameters offered in the Adverstide. They also include CID and XID.

- Reply: The DHCPv6 server responds and confirms that the address has been assigned as well as all additional configuration parameters. They also include CID and XID.
Here I leave you an image in which we observe the order of the messages we have received and a brief description of it, and it also tells us if the messages are unicast or multicast:
Apache on IPV6
For Apache versions above 2.X have support for IPV6 enabled by default so when installing the service we will already be listening for this protocol without any additional configuration in the service.
We can check if by installing it our server is listening through that port:

In the event that we create a virtualhost we can specify how we want you to work whether using both IPV6 and IPV4 protocols or just one of them. We see that ssh also uses ipv6 by default.
Access to the web server from within the network
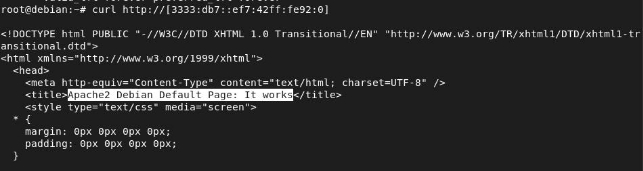
We will access from the machines of our network in my case I have mounted it on the router as it is the only one who has Internet access in this scenario.
I will connect to the one using the global address but we could use the local without problem as we belong to the same local network.
Access from PC2:

Access to the web server from outside the network
For this we must configure R1 and ‘PC3’ on the same network using IPV6:
PC3:

R1:

We will ask PC1 from PC3 to be outside that local network, as we see no need to do NAT.
I can even ping a host from another network:
 Si analizamos estas peticiones con Wireshark podemos ver que en ningún momento se produce
NAT:
Outside the network:

Within the network:

Of course a host of our local network can access the web server:

CISCO
Setting up a swan router in IPV6
The first thing we will do is calculate the IPV6 address that corresponds to the MACS:

F 0/0 –> CA:01:6C:FA:00:00 –> CA:01:6C:FF:FE:FA:00:00 –> C801:6CFF:FEFA:0
F 1/0 –> CA:01:6C:FA:00:1C-→ CA:01:6C:FF:FE:FA:00:1C –> C801:6CFF:FEFA:001C
So that our router is configured using SLACC and we do not have to do this manually we will enter the following commands for each of the interfaces that we want to be configured by SLAAC:

We will also have to indicate no shut for the interface to be lifted.
With the following command we will check that our router has been set up automatically using SLAAC:

With the local link addresses we will have connectivity with the router:

SLAAC
Now let’s get the router to configure the customers using SLAAC.
We will set a global address to our router in the interface that gives the network that we want to give this service, with the network prefix: 3333: db7:
We will use EUI-64 to configure our interfaces:
FastEthernet 0/0 –> 3333::C801:6CFF:FEFA:0/64

FastEthernet 1/0 –> 2222::C801:6CFF:FEFA:1C/64

We checked the IPV6 addresses have been “generated” correctly:

For the router to configure us to customers we will need to enter the following command this, will cause our router to command RA and respond to RS requests:

Once this has been done our customers will have been set up correctly:
PC1:

PC2:

The messages that have been produced when setting up the customers:
Router application(RS): The PC sends an RS message to all routers to indicate that it needs an RA, this message is sent if it does not receive any RA after a while.

Router Advertising(RA): Once the router receives the RS or regularly sends an RA in which the network prefix and its length are included. In case the router responds to a RS, it sends a specific RA to the host who requested it. In case it is a periodic RA message it is sent to the IPv6 address of multidissemination of all nodes, FF02:: 1, with the link-local address of the router as the original IPv6 address.

Needbor Application(NS): It is used to know the MAC direction of a device in your network, it is similar to the ARP protocol.

Neighbbor Advertising(NA): It is the response message of an NS.

DHCPv6 with SLAAC
Configure a status DHCPv6 server is similar to setting a status-free server. The most important difference is that a state server also includes IPv6 address information similar to a DHCPv4 server.
The first thing we’ll have to do will be to enable the IPv6 routing. This command is not necessary for the router to be a state-of-the-art DHCPv6 server, but is required for the router to originate the ICMPv6 RA messages.
ipv6 unicast-routing
We have it set in the previous section so we won’t do it again. We will set up a DHCPV6 pool:

With DHCPv6 with status, all steering parameters and other configuration parameters must be assigned by the DHCPv6 server. The address prefix command is used to indicate the set of addresses to be assigned by the server. The lifetime option indicates the valid and preferred lease time in seconds. As with non-state DHCPv6, the client uses the original IPv6 address of the package containing the RA message.
We indicate the network prefix and the life time of each address:

We now indicate DNS servers:

We can still set up more parameters like the domain name but in my case I’m only interested in this, so we’ll proceed to tell you where the interface has to work the service:

We will now check that the DHCP server, is working on our interface:

We’ll see how the DNS service has been assigned to the customer:

And the concession on the DHCP server:

SLAAC operations:
- We can see that the PC2 has requested an RS, to all the routers on the network (Multicast)

- R1 responds to PC1 with an RA (Indicates if you need to communicate with a DHCPv6 with or without a state)

DHCPv6 operations:
- Request all DHCPv6 servers on the network (Multicast at ff02:: 1: 2) includes a CID client identifier.

- Warning: It is the DHCPv6 server response to a request, this includes the appropriate configuration options, including an IPv6. It also includes a CID and an XID (Id transaction).

- Request: The customer sends this message to all DHCPv6 servers to indicate that he wants the parameters offered in the Adverstide. They also include CID and XID.

- Reply: The DHCPv6 server responds and confirms that the address has been assigned as well as all additional configuration parameters. They also include CID and XID.

Access to the web server from within the network
From our local network we can make the request to the web server using both the local link address and the global address:

Access to the web server from outside the network
SWEB –> 3333:db7::ef7:42ff:fe92:0
We see that with the previous configuration we had in Apache we can easily access the web server from a machine outside our network:

Basic Apache Settings for IPV6
As I said before, it is not necessary from version 2.X below to set anything further in apache for our server to work using the IPV6 protocol already by default this listener in IPV4 and IPV6.

However, we can set it up for this one only to listen for IPV6, for which we will have to make a simple configuration in the service. We will access the file - > /etc/apache2/ports.conf
We will comment on the Listen 80 line as it refers to IPV4 and we will add the reference to ipv6.
With this configuration we will listen to all requests from any IPV6 address, in the square brackets we can specify an address to answer requests only to this one.

We will now access our virtual host and change the statement of this, as we have done above by modifying the label that refers to all IPV4 addresses and we will change it for this to refer to all IPV6 addresses for port 80:

We will now restart apache service and check that the state of apache is successful:
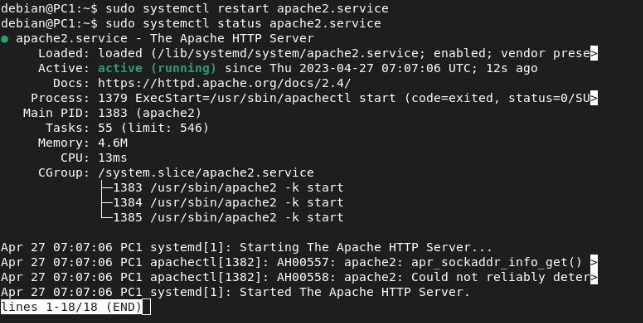
With this already our apache server would work only on IPV6:
