
Francisco Javier Cruces Doval
Friday, September 8, 2023 | 14 minutes
NAT Cisco and Linux Configuration
In this article, we will explore the configuration of SNAT (Source Network Address Translation) and DNAT (Destination Network Address Translation) in scenarios with public addresses, using routers in Linux environments and Cisco devices.
Scenario with debian machines
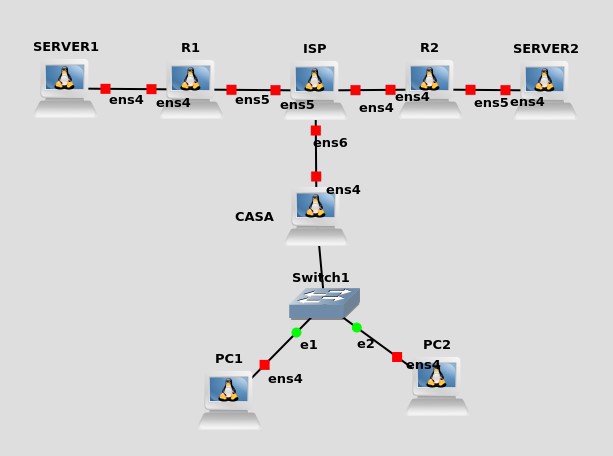
Preparation of the environment
Installation of packages
Once the machines are placed we must download Apache for the web servers, to do this we will connect both servers to a switch and this to the NAT cloud for Internet access.
We will now update the repositories by making an apt update:

Then we can download the packages, for the servers we will install apache:


And for the home router we will download the DHCP server:

When the installation is finished, a similar error code will jump, because there is no valid configuration in the service:
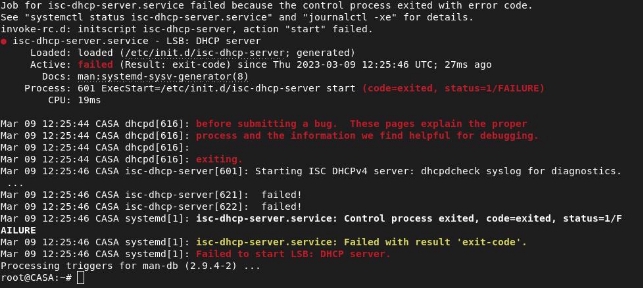
For now we will ignore this and then configure the DHCP server.
With this we would have installed all the packages needed to install the practice so we can mount the stage.
Network card configuration
We will find a small obstacle in making the stage as we need some routers to have more than one network card.
To add more than one card with the device off and without being connected to anyone, we do over the right click and click on configure > network, and we select the number of adapters we need to have on each, for example for the home router I need to have two adapters:
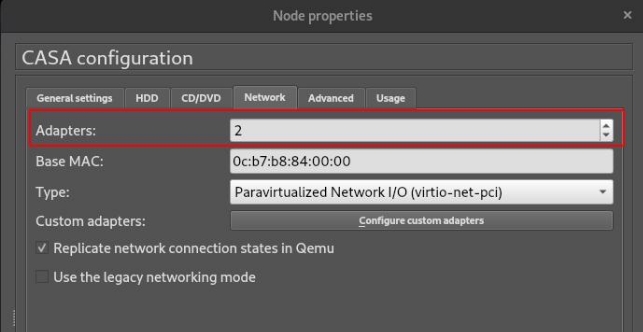
Once this is done with the machines that need more than one card, we will set up the stage and proceed to set up your cards.
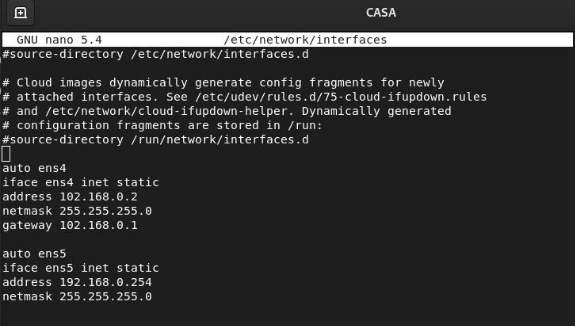
To modify the configuration of the network cards we will do it by editing the /etc/network/ interfaces file. To apply the configuration of the network cards we have made we have several options.
Up and down the card we have modified:

We can also save time and restart the networking service, this will work for all cards simultaneously so it will save us time:

Router CASA:
Router R1:

Router ISP:
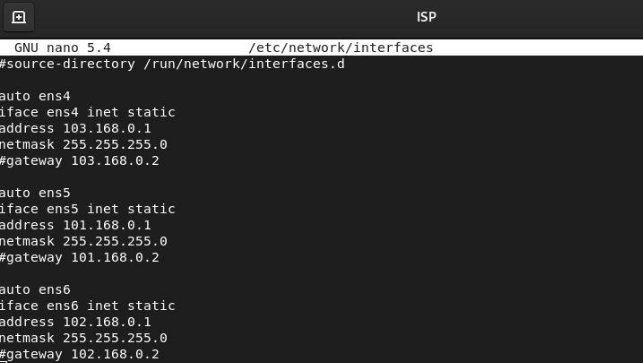
Router R2:
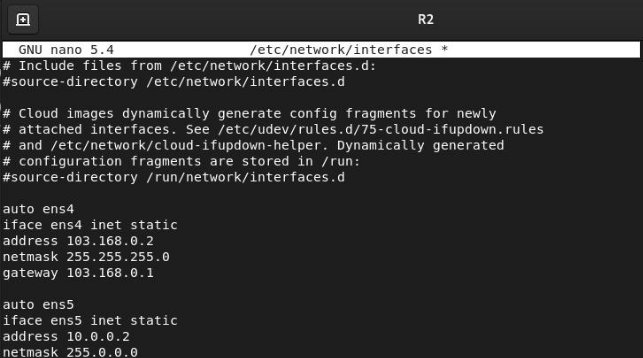
So it would be the relationship of ips that have the routers’ network cards. To apply this configuration to the network cards we will have to restart it as indicated at the beginning of this paragraph.
For the stage to work we must activate the forwarding bit for these 4 routers, in this case I will do it permanently for it we edit the / etc / sysctl.conf file and discomment this line:

necessary routes
For my current scheme the routes we need in the routers are:
Router R1:

Router ISP:

Router R2:

Router CASA:

Connectivity check
We will do ping from each of the routers to their “farthest” ends to make sure we have done the routing correctly.
Router R1 - > R2

Router R1 - > CASA

Router R2 - > R1

Router R2 - > CASA

Router CASA - > R1

Router CASA - > R2

We see that all devices that have public ips addresses have connectivity between themselves but what happens to those that have private addresses on our stage, they will not have connectivity as no private addresses are routed on the internet routers.
In other words, if we throw a ping into a private address that is from another network, for example from the service1 to the service2 it does not arrive, as there are no routes for private directions2 on the router tables of the ISP router.
So it will be impossible to reach a private network other than the one we belong to.
For example from home if we do ping a google we do it to the address PUBLIC 8.. 8.8.8 not to the private address that the server has, can be 172.22.1.2 15
DHCP service configuration in CASA router
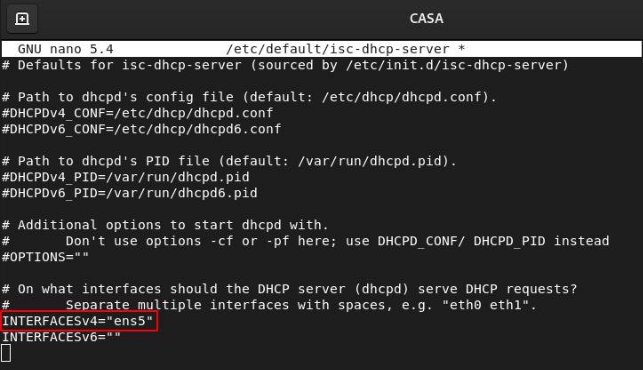
By taking back what we had previously done in the package installation section we have already downloaded the DHCP server for debian (isch-dhcp-server). So now let’s set it up.
The first thing we need to do is tell our server through which network card we want this to distribute directions ip, in our case is the ens5 card.
To do this we will edit the /etc/default/isch-dhcp-server file and add the card name in the IPV4 section:
Now let’s tell our DHCP server that we want to be assigned to our customers for this we edit the /etc/dhcp/dhcpd.conf file, we can take advantage of one of the examples that are commented on and apply our configuration:

This is a very simple example of a dhcp server but with this is enough for our stage.
The fields mean:
- subnet: network address from which we want to distribute ip addresses with this service.
- netmask: Network mask of the network which we want to set up the devices.
- range: range of addresses from which we want to distribute ips being the first the initial and the last the final.
- option routers: It would be the gateway of our network
- option broadcast-address: broadcast address of our network.
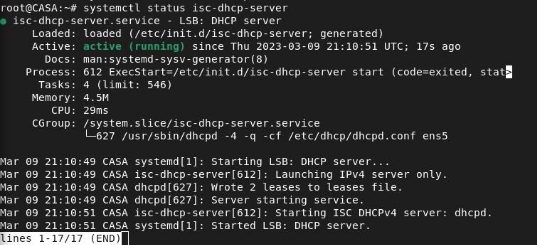
Once configured with the parameters of our network we will restart the service:

And we’ll check that the service is active:
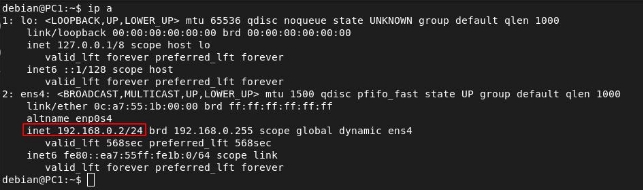
Now for customers to receive an address using this service, we will have to set the PC1 and PC2 network cards as follows:

We restart the service to be applied and the server automatically assign the network configuration to us:

We check that we have actually been assigned the network configuration:
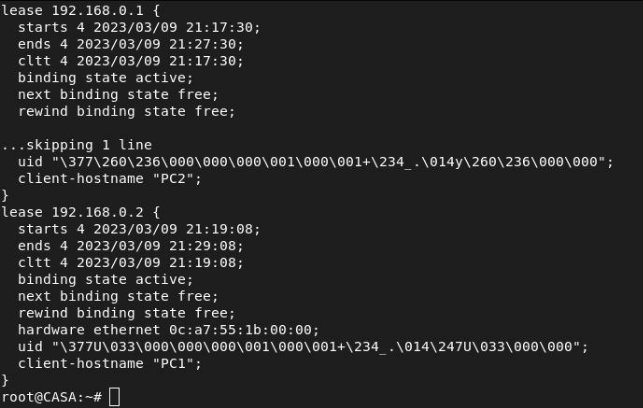
We can also track who we have assigned the ip through the server by viewing the following file /var/lib/dhcp/dhcpd.leases which saves the concessions we have made.

We can see when it starts as well as who has been assigned by looking at their MAC address.
NAT configuration
Router CASA
Let’s set up the SNAT in the home router seeing the current scheme the rule to do this is:

However this would be eliminated when the machine was reinitiated so in this case I will add it to /etc/network/interfaces:

So we can see that they have been applied after relaunching the network service:

Let’s check that the rule works by seeing if I launch a ping to another network (R1) if it changes my IP address:

We see that by doing the capture this has changed the private address of the machine to the public of the home router so the SNAT rule would be working properly.

Router R2
We will set up SNAT and DNAT to do this I will add the rules to /etc/network/interfaces:

We restart the network service and see if it has been applied:

We will check that the SNAT works by ping the server out to a public address:

We see that the SNAT rule is working correctly:

Since we have changed the private ip address to the post for the router. In the subsequent paragraphs, you will test the DNAT.
Router R1
For this router we will perform the creation of the rules in a different way, for it we will create a service to raise the rules of DNAT and SNAT when the machine is restarted to avoid adding them to the interface file.
The rules of DNAT and SNAT for this machine are:

The first thing we will have to do is create a script with our rules, so volcare with the iptables-save > /etc/iptables/rules.v4 command to flip the existing rules.
We will now create a script in which we will restore the rules we have overturned and create it on the following route /usr/local/bin/:

We’ll have to make sure you have execution permits:

We will create a Systemd service file, this file must have reading and writing permissions only for root, so you must run the following command as root:

Within this we will add the following content, you would only have to add the route where your iptable script is found that restores the rules:

We’ll tell the service to start automatically when the machine is restarted:

And we started it:

If we want to make sure you have done your job properly we will look at the state of the service:

We will see that the rules have been automatically added:

We will check that the SNAT has performed us correctly by launching a ping:

We see that our private address has been changed to the public.

Navigation and DNAT check
Now let’s check that from the home network we can access the web servers.
Debian client
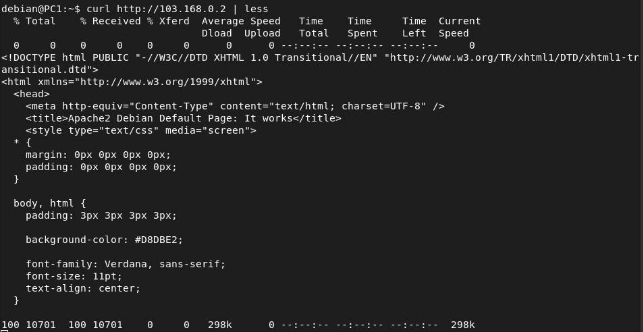
From the debian client we can make a curl to check the correct functioning of the DNAT in the Router R1:
From the debian client we can make a curl to check the correct functioning of the DNAT in the Router R2:

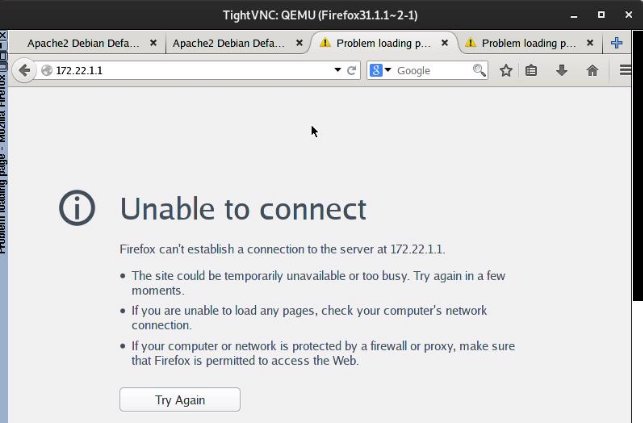
Now let’s check what happens if we put the private address of the different web servers:


We see that we cannot reach that network because the Internet routers are unable to move us to this private network as there may be thousands of devices with the same ip:

We would not be answered if we made a web request.
If we intercept a request http we see that the SNAT is done correctly, changing the applicant’s private ip to the publication of your router:

Now I’m going to intercept a request in which DNAT is made to check that this is done correctly:

We can see that the origin is a public ip address while the destination is a private ip address we can see that the DNAT has been performed correctly.
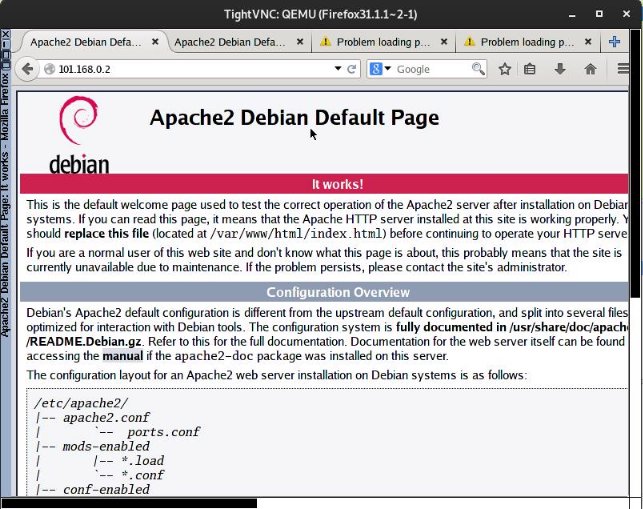
Now I’m going to press a Firefox and I’ll check again that we can access the web servers just using their public ip address:
Server 1:
Server 2:

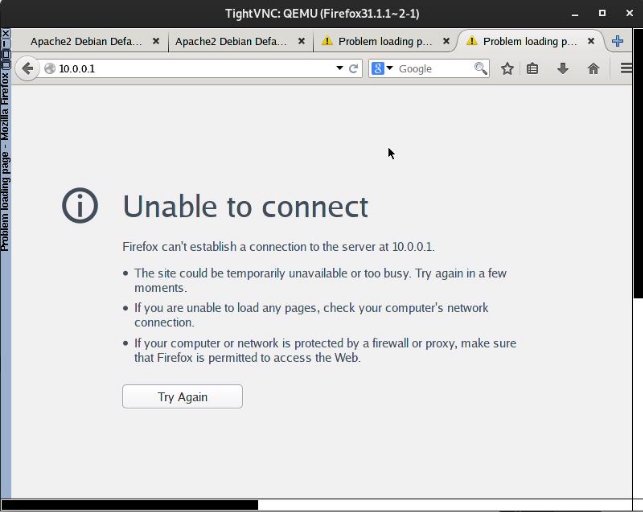
We see that using public ip address we can connect, however we cannot use the private ips addresses of the machines:
Server 1:
Server 2:
It works properly as we have managed to get our Linux routers to be able to make SNAT and DNAT by making them “use” the Internet and access the resources of other networks. Since private addresses are not routed in them, so if we check using them, we won’t get any results.
NAT Debugging
To see how many hits you have had a rule or to see how much information you have “used” each rule will use the following command:
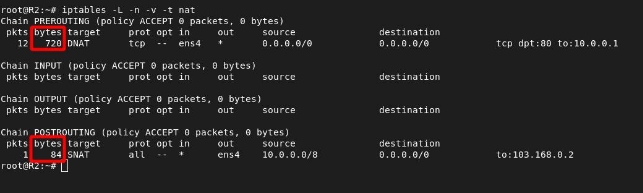
To delete the counters from all the chains and rules we will use iptables -Z:

If our chain has hits the rule will be working properly if on the contrary it is kept in 0, the rule is not being applied so we will have to review it.
Scenario with Cisco routers
We will repeat the same scenario as with the Linux routers but now using cisco routers 7200.
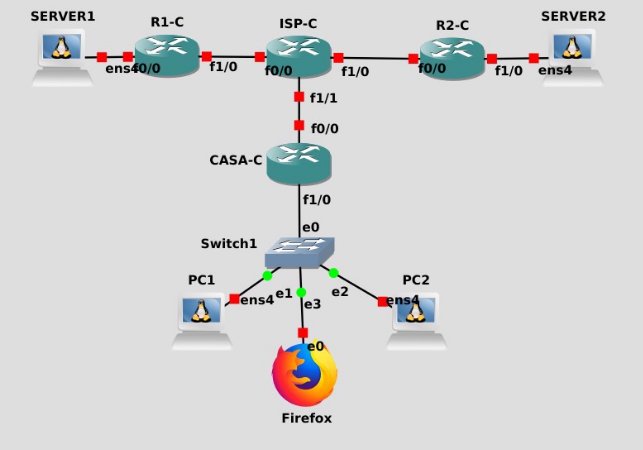
Preparation of the environment
Network card configuration
The first thing we will do is add the necessary slots to our routers as we need 2 network cards in R1, R2 and CASA. Exams of 3 for the ISP router.
For the former we will add the PA-FE-TX slot, which will add a FastEthernet interface:

While for the ISP router we will add PA-2FE-TX that will add two FastEthernet network interfaces.

Now we can start the routers and start with the network card settings. I’ll use the same directions as in the previous scenario.
Router CASA
We set the network cards:


So we have our interfaces:

Router R1
We set the network cards:


So we have our interfaces:

Router R2
We set the network cards:


So we have our interfaces:

Router ISP
We set the network cards:


So we have our interfaces:

necessary routes
ISP routes:

CASA Routes:


Rocks R2:


Rites R1:


It would only be necessary to add the default routes to Reters R1, R2 and CASA.
Connectivity test
R1 - > R2

R1 - > CASA

R2- → R1

R2 - > CASA

CASA - > R1

CASA - > R2

We see that all devices that have public ips addresses have connectivity between themselves but what happens to those that have private addresses on our stage, they will not have connectivity as no private addresses are routed on the internet routers.

DHCP service configuration in CASA router
The first thing we will do is to establish the range of IP’s excluded from the set (pool) of addresses that the service can assign indicating the initial and final ip of the range, both including:

We name the DHCP service range:

We define the network to which DHCP will serve:

We include the link door that the service will offer:

With this the DHCP server of the CASA router would already be configured, we went out and saved the changes. We will now turn on our machines and see that they are will automatically receive their DHCP configuration, with the following command we can see the service statistics:

We can also see the concessions with the following command:

This will be useful for us to track who has assigned each IP without having to go individually home machine.
NAT configuration
Router CASA
The first thing we will do is create an acl to allow the traffic we want to do SNAT:

We will assign to the internal interface of our network this rule:

Now we will create a pool with public ips, the command would be this does not come full in the terminal:
ip nat pool ip_publica 102.168.0.2 102.168.0.2 netmask 255.255.255.0

We activate the NAT:

We indicate that interface is “inside”:

We indicate the “out” interface:

The SNAT would be working, so let’s check it out:

We see that it changes the private ip of our host to the public of the home router.
Router R1
The first thing we will do is create an acl to allow the traffic we want to do SNAT:

We will assign to the internal interface of our network this rule:

Now we will create a pool with public ips, the command would be this does not come full in the terminal:
ip nat pool ip_publica 101.168.0.2 101.168.0.2 netmask 255.255.255.0

We activate the NAT:

We indicate that interface is “inside”:

We indicate the “out” interface:

And we’ll check that it’s being done correctly:

We change the ip 172.22.1.1 to the 101.168.0.2 which is published by the router when performing a ping, so the SNAT is working properly.
We will now set the DNAT rule, the syntax is as follows:
ip nat inside source static tcp ip_privada puerto ip_publica puerto

- We will then check that the DNAT works properly.
Router R2
The first thing we will do is create an acl to allow the traffic we want to do SNAT:

We will assign to the internal interface of our network this rule:


Now we will create a pool with public ips, the command would be this does not come full in the terminal:
ip nat pool ip_publica 103.168.0.2 103.168.0.2 netmask 255.255.255.0

We activate the NAT:

We indicate that interface is “inside”:

We indicate the “out” interface:

And we’ll check that it’s being done correctly:

- We change the ip 10.0.0.1 to the 103.168.0.2 which is published by the router when performing a ping, so the SNAT is working properly.
We will now set the DNAT rule, the syntax is as follows:
ip nat inside source static tcp ip_privada puerto ip_publica puerto

- We will then check that the DNAT works properly.
Navigation and DNAT check
Now let’s check that from the home network we can access the web servers.
I’ll access using curl from a home network host. First I’ll connect to server 1:

We see that it responds correctly and the DNAT is applied, as it has changed the public ip of the router to the private web server:

Now we’ll check server 2:

We see that it responds correctly and the DNAT is applied, as it has changed the public ip of the router to the private web server:

We will now check that I can access both servers from a Tiny Core with Firefox:
To server 1:
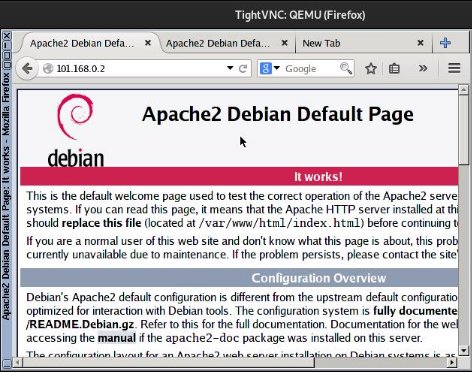
To server 2:
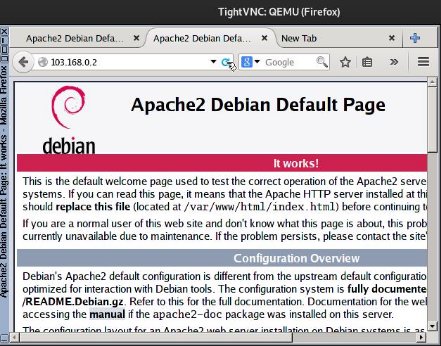
We see that we can also connect as NAT rules are working properly.
Let’s check what happens if we request the web through your private ip addresses:


Well, obviously we don’t get an answer because in our stage we’re simulating the Internet and in this one can’t routtle private ips directions as they are can be repeated in infinity of networks.
Debugging NAT rules
Also to make sure NAT rules are working.
The first command allows us to view the DNAT address translation table:

With this command we can see how many hits have our rules, if it has none, it’s not working unless we have initialized this:

If we want to put the counters to zero we will use the clear command ip nat statistics.
If we want to see in real time the packages that show information about each package that translates the router:

When decode the result of this command, observe the meanings of the following symbols and values:
-*: the asterisk next to NAT indicates that the translation is done on the fast switching route. The first package in a conversation always applies process switching, which is slower. If there is a cache input, the rest of the packages cross the fast switching route. -S: This symbol refers to the original IPv4 address. -a.b.c.d → w.x.y.z: this value indicates that the address of origin a.b.c.d is translated to w.x.y.z. -d: = This symbol refers to the target IPv4 address. -[xxxx]= The value in square brackets is the IPv4 identification number. This information may be useful for debugging, as it enables correlation with other package follow-up by protocol analysers.