Francisco Javier Cruces Doval
Thursday, March 28, 2024 | 10 minutes
Implementation of a perimeter firewall with Fortinet I
Before you start the practice, the scenario you see in the practice is as similar as I can ride to the original practice. I have used version 7.0.9-1 of FortiGate, as the higher versions bring some restrictions. You can download the image from this [link](https://drive.google.com/drive/folders/ 1VGmeLN5inkWNNNUsIvq9ewGUzJLTLkiM).
Firewall start-up
FortiGate devices are made with the IP 192.168.1.99 / 24, as I am from GNS3 do not need to connect to this interface with a device and change the configuration. Since I can do it from the console.
By default through that port is enabled the administration by http, https, ssh and telnet.
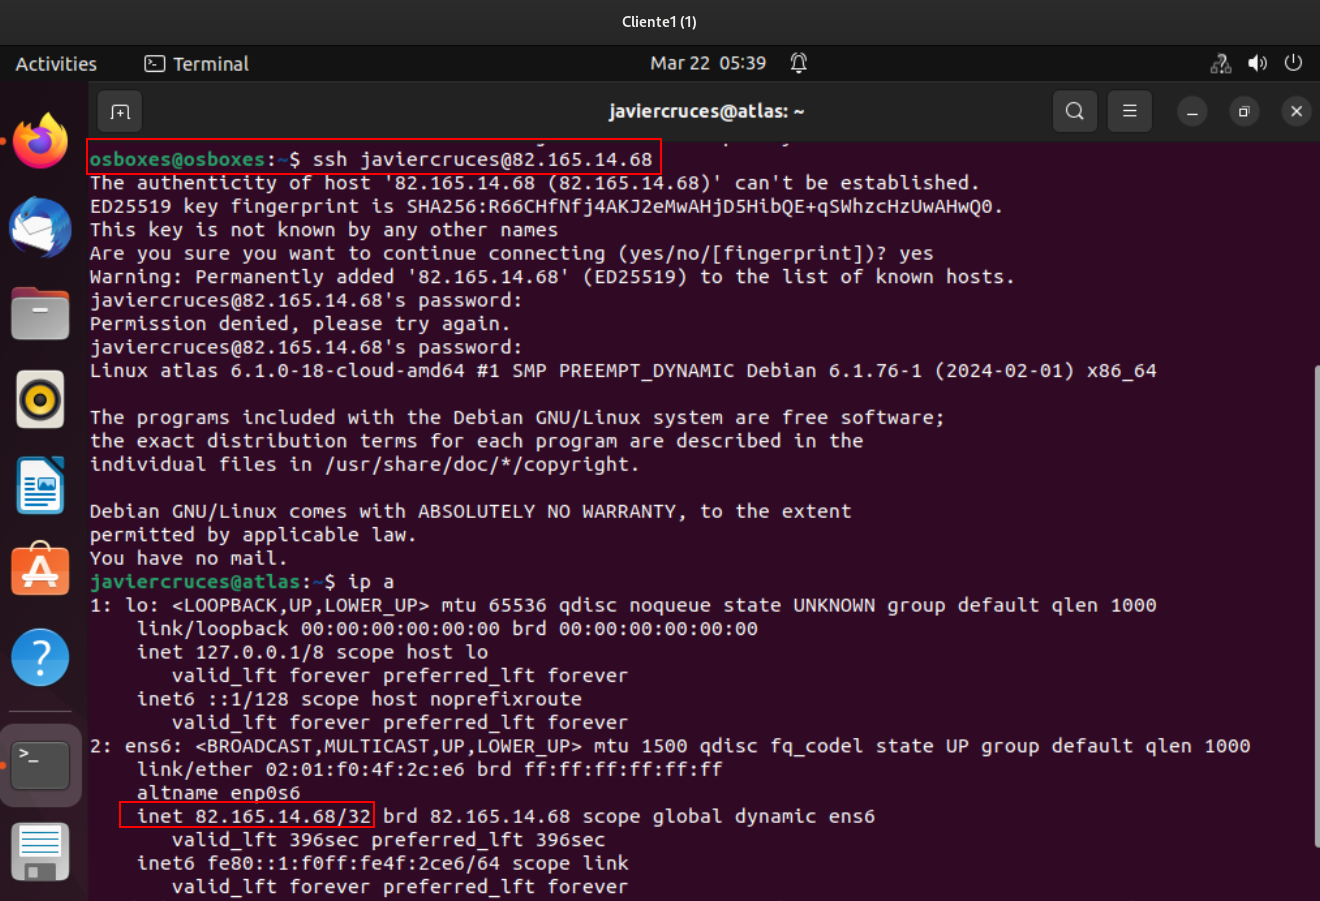
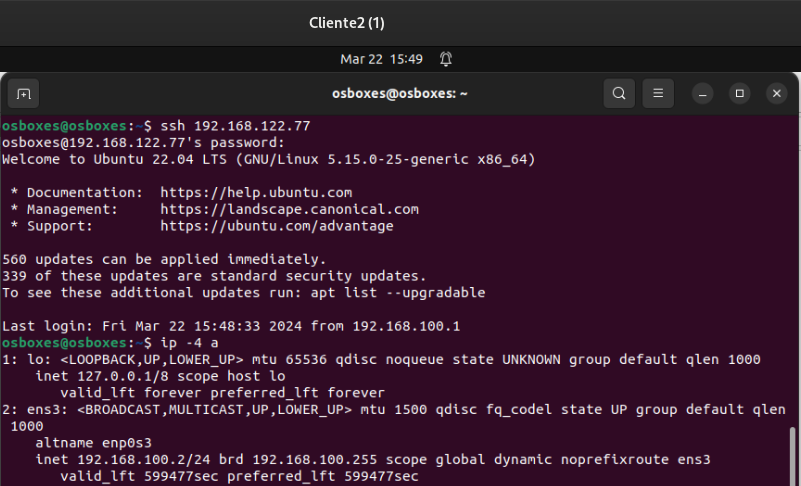
In my case I will connect from the console, change your hostname and configure port 1 to take IP for DHCP.
The default user is admin and the blank password. When we first log in, it will force us to change it:
FortiGate-VM64-KVM login: admin
Password:
You are forced to change your password. Please input a new password.
New Password:
Confirm Password:
Welcome!
The first thing I’ll do is change your hostname, as you see it is similar to swan as we have a configuration mode:
FortiGate-VM64-KVM # conf sys global
FortiGate-VM64-KVM (global) # set hostname FGT
FortiGate-VM64-KVM (global) # end
Now we’re going to set up port 1 by DHCP so that from client 2 you can set it up without having to manually change the IP of it. In addition I will set up the access by http and https to be able to configure it from a browser:
FGT # show system interface port1
config system interface
    edit "port1"
        set vdom "root"
        set mode dhcp
        set allowaccess ping https ssh http fgfm
        set type physical
        set snmp-index 1
    next
end
Now let’s see the IP that the DHCP has assigned you with the following command:
FGT # get system interface
== [ port1 ]
name: port1   mode: dhcp    ip: 192.168.122.77 255.255.255.0   status: up    netbios-forward: disable    type: physical   ring-rx: 0   ring-tx: 0   netflow-sampler: disable    sflow-sampler: disable    src-check: enable    explicit-web-proxy: disable    explicit-ftp-proxy: disable    proxy-captive-portal: disable    mtu-override: disable    wccp: disable    drop-overlapped-fragment: disable    drop-fragment: disable
Now from any machine that has access to the ’external’ network we can connect to the FW:

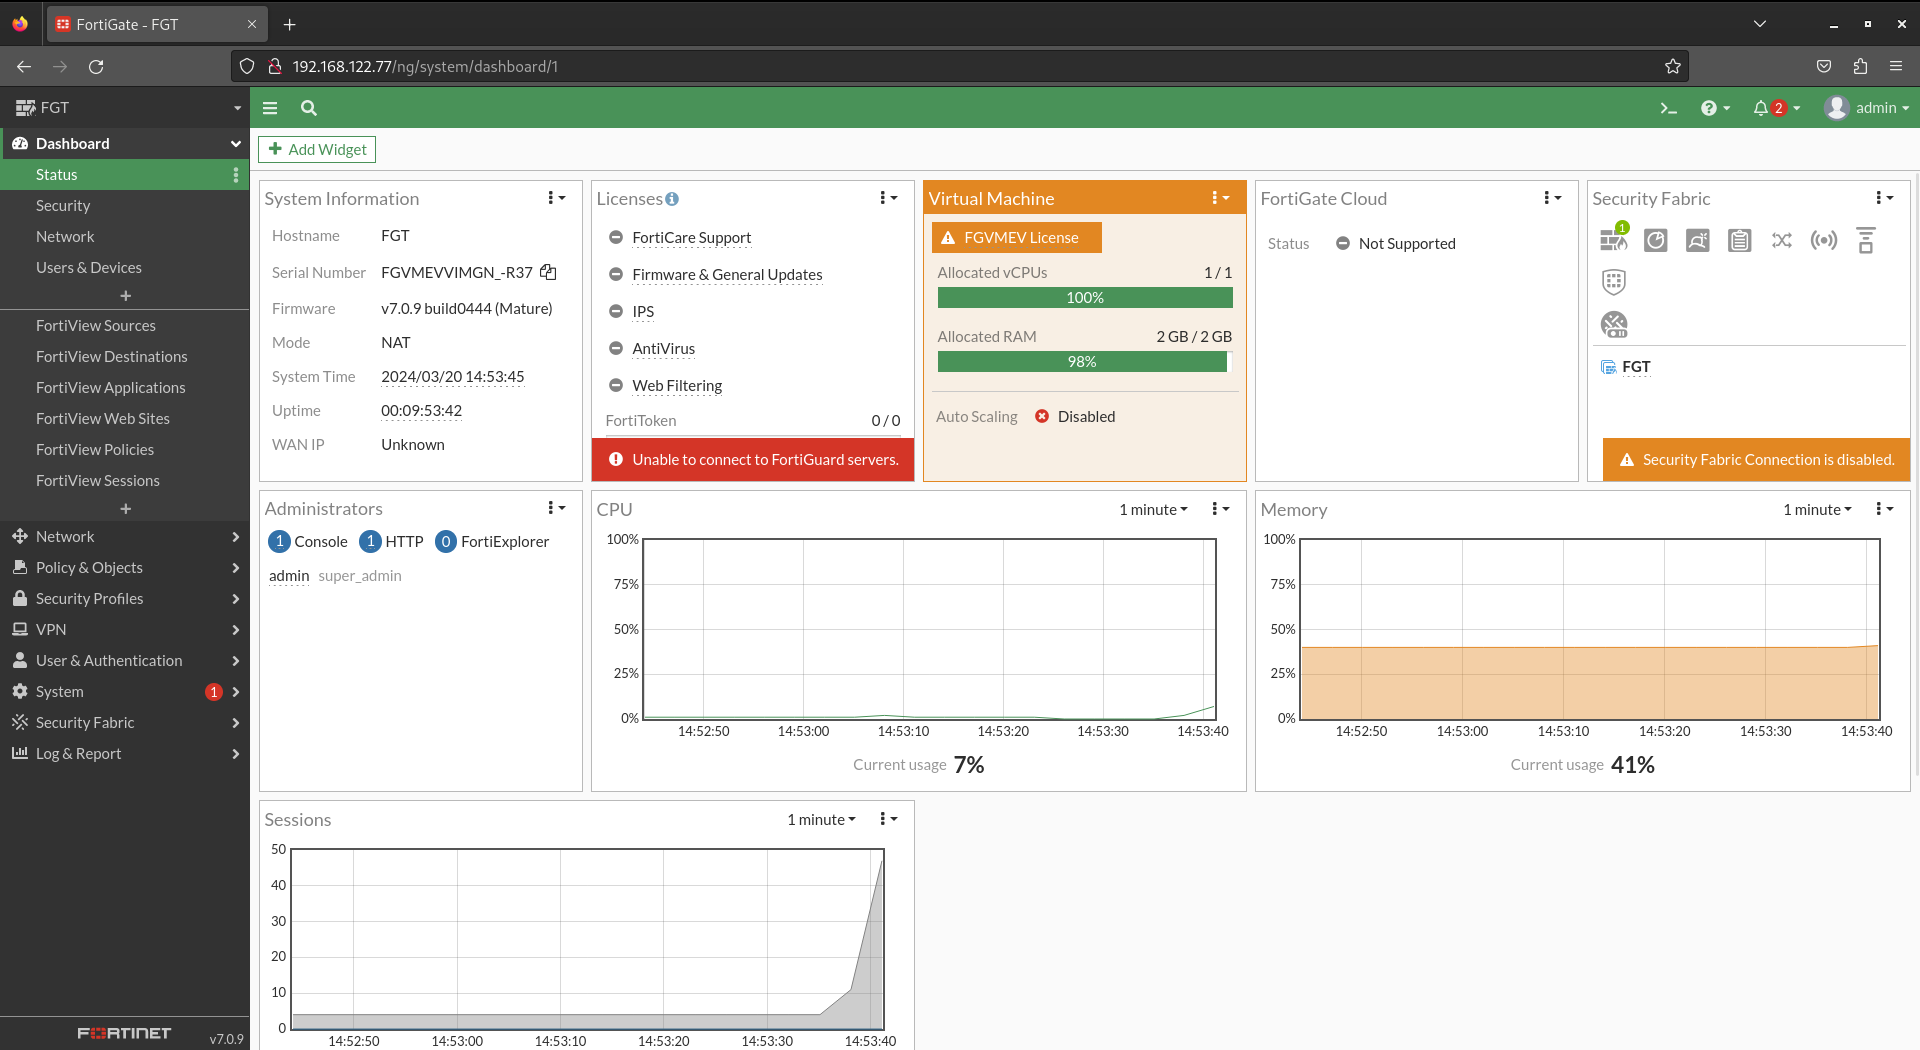
When you log in you will see a panel with general information about the device status:
LAN Network Configuration
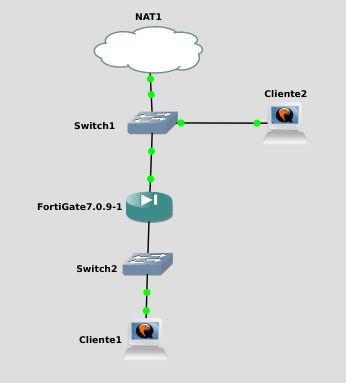
As you have seen in the topology image, the LAN network is connected to port 2. We will therefore proceed to set it up.
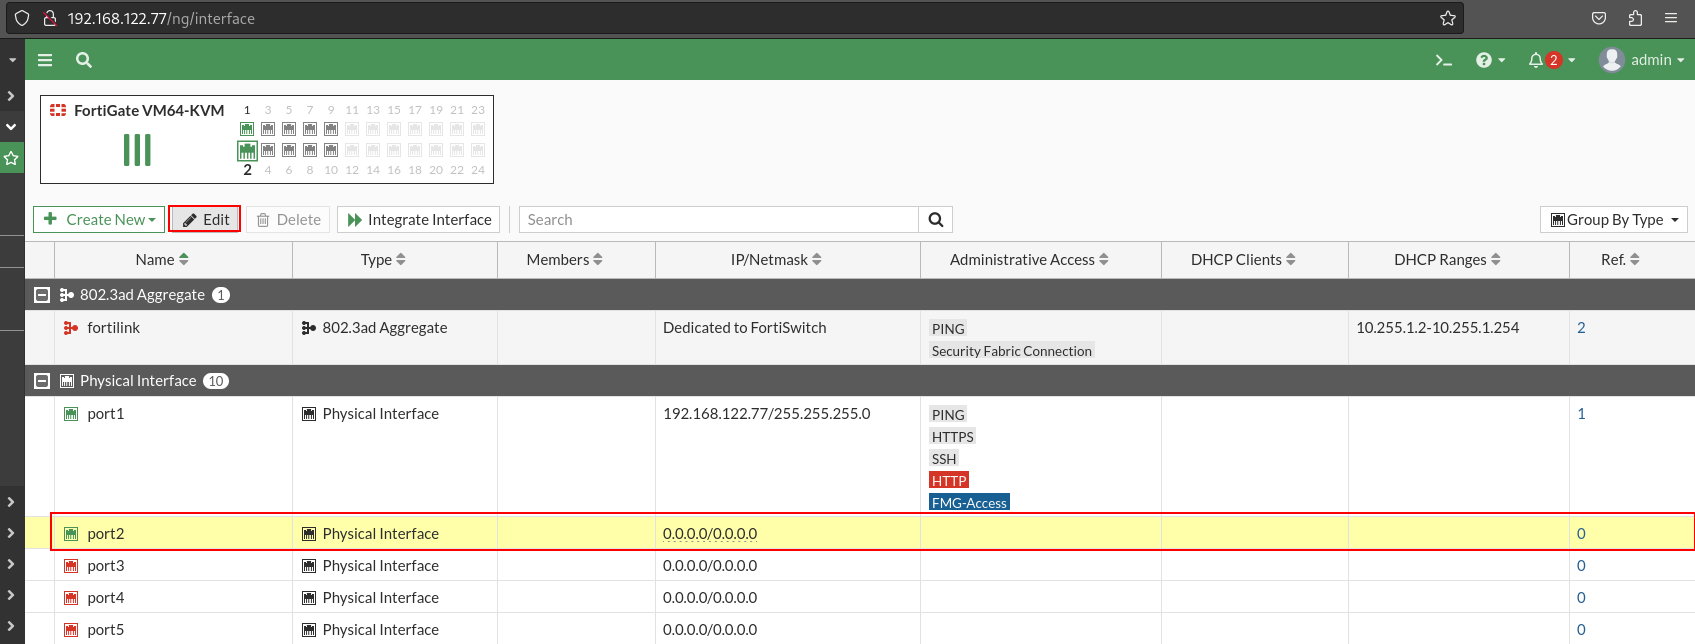
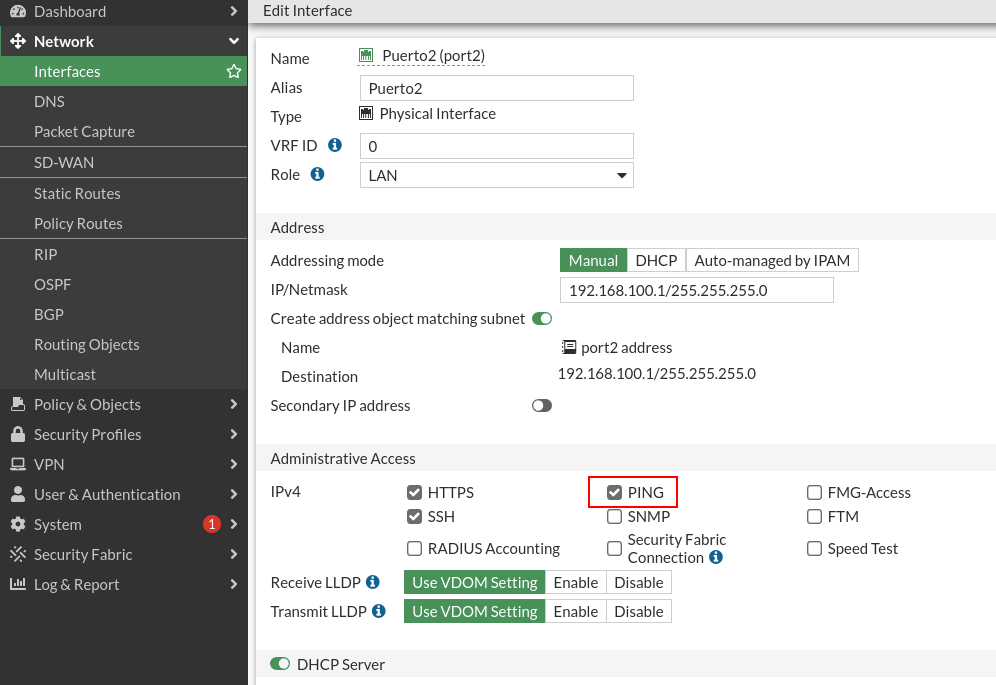
Let’s go to Network > Interfaces, select port 2 and click to edit in the top bar:
Once inside the interface configuration screen, you can customize the port by assigning an alias. In addition, to facilitate future management, I have assigned the LAN role to the port2, indicating that it will be used for a local network. I have subsequently configured the IP address of it, assigning it to the 192.168.100.1 / 24. In addition, I have created an object with that IP, which will facilitate the reference to this IP address in future settings, eliminating the need to remember the IP.
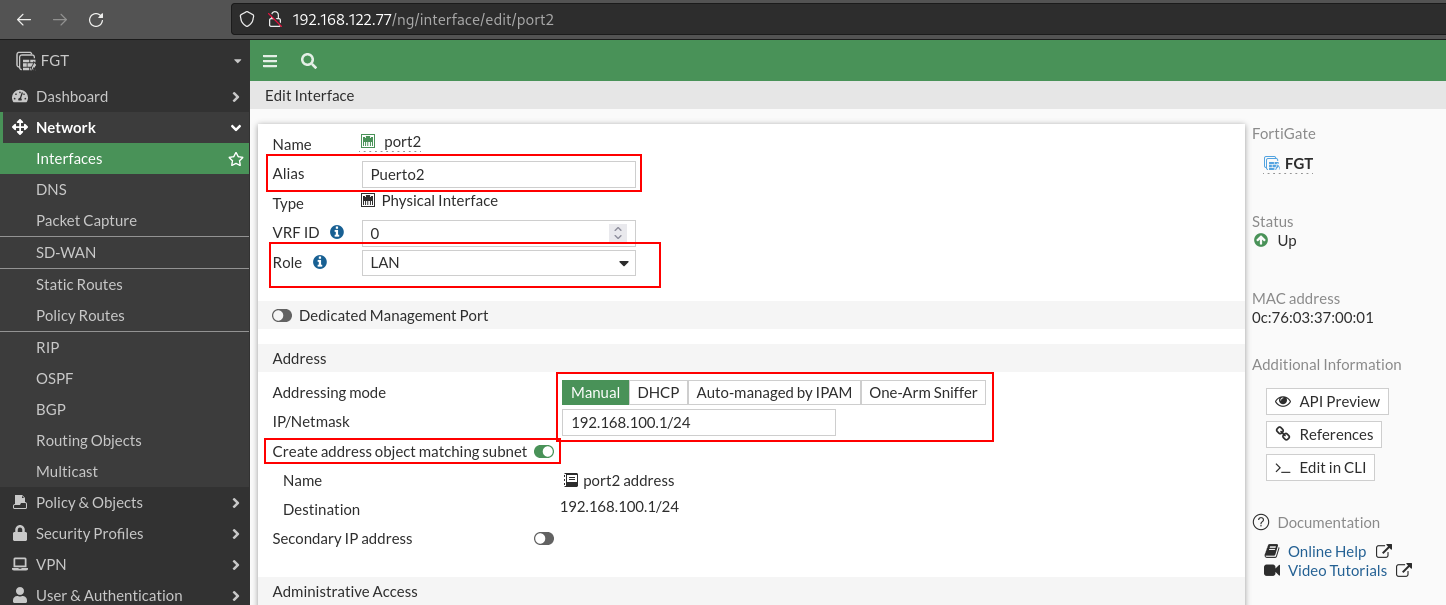
Let’s continue with the interface configuration. From the LAN network, where we will be most of the time, I will allow access via HTTPS and SSH to configure the FortiGate. I’ll also let you respond to the pings to ensure connectivity with it. In addition, each interface can be a DHCP server, so I will set you one for the LAN. Finally, I will activate the option to detect devices, so I will have control over who is connected to the network.

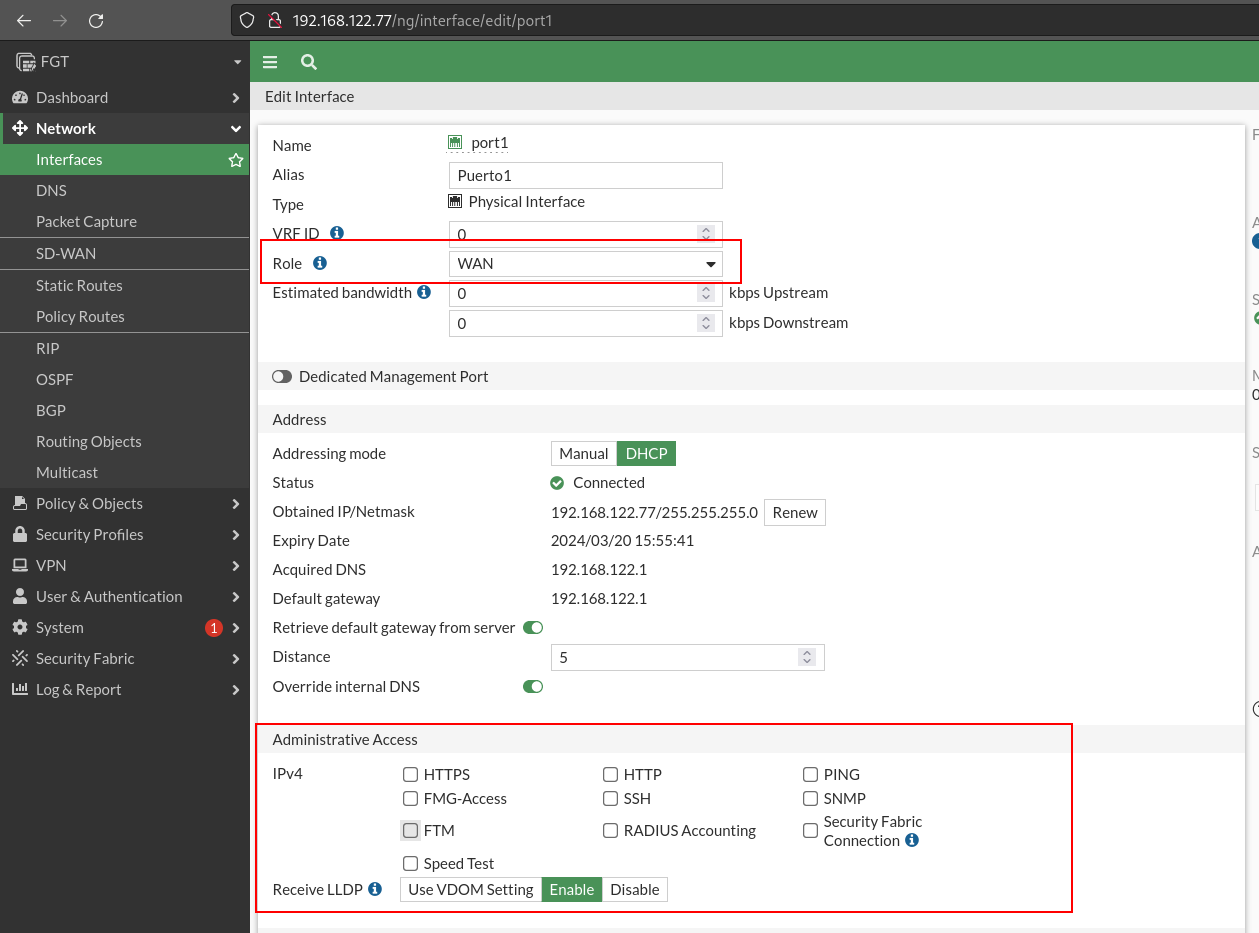
Once you set up the administrative access from the LAN, I will remove the administrative access from the port 1 interface as this serious Internet (WAN).
So I’ll change the ROL to WAN and take away administrative access:
If you remember earlier we marked the Device connection box in the LAN interface, if we want to see the devices connected to this network we access Security Fabric > Asset Identify Center:
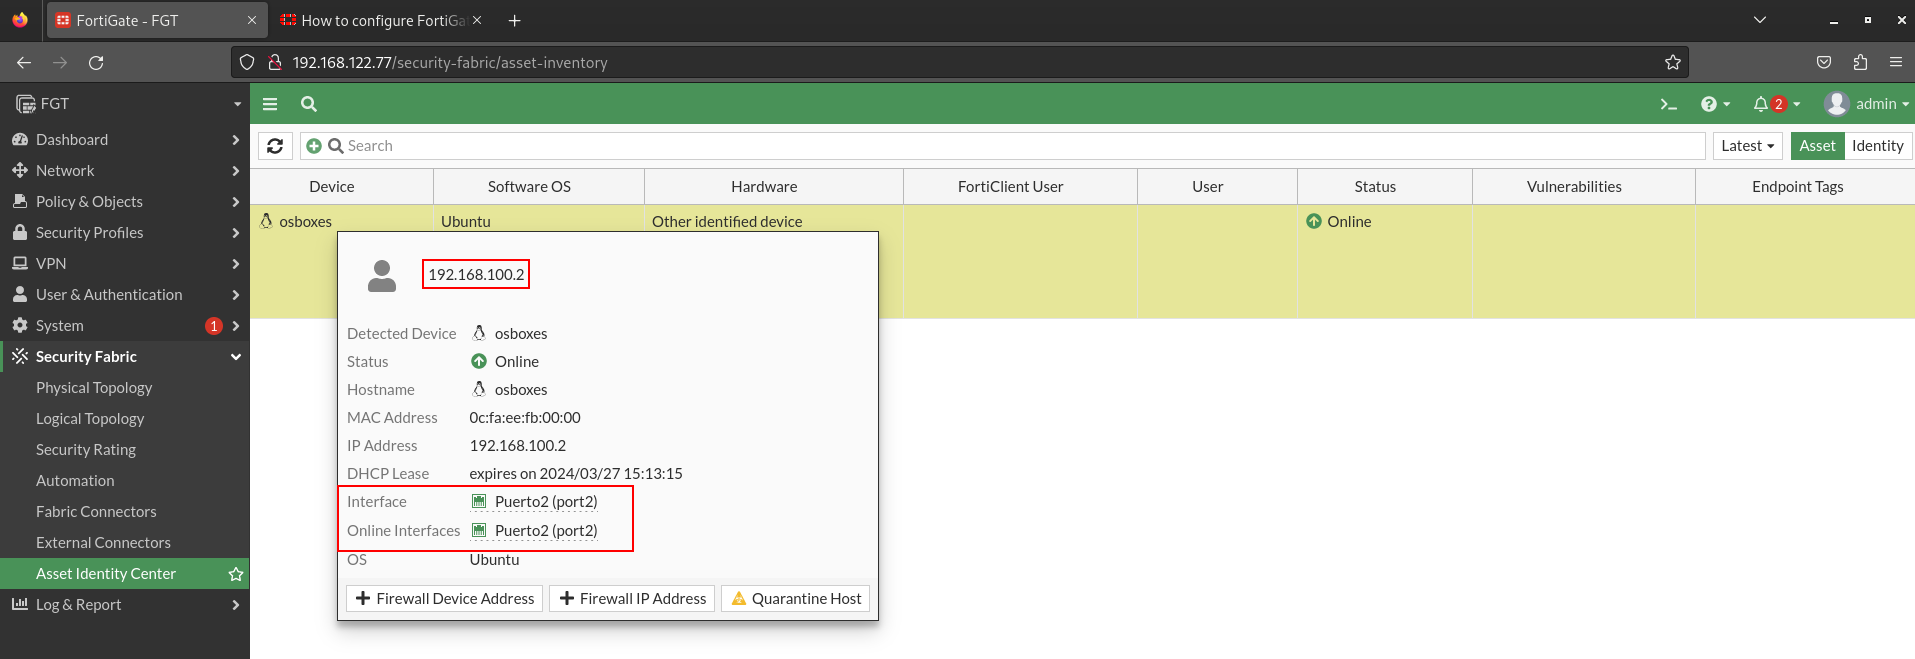
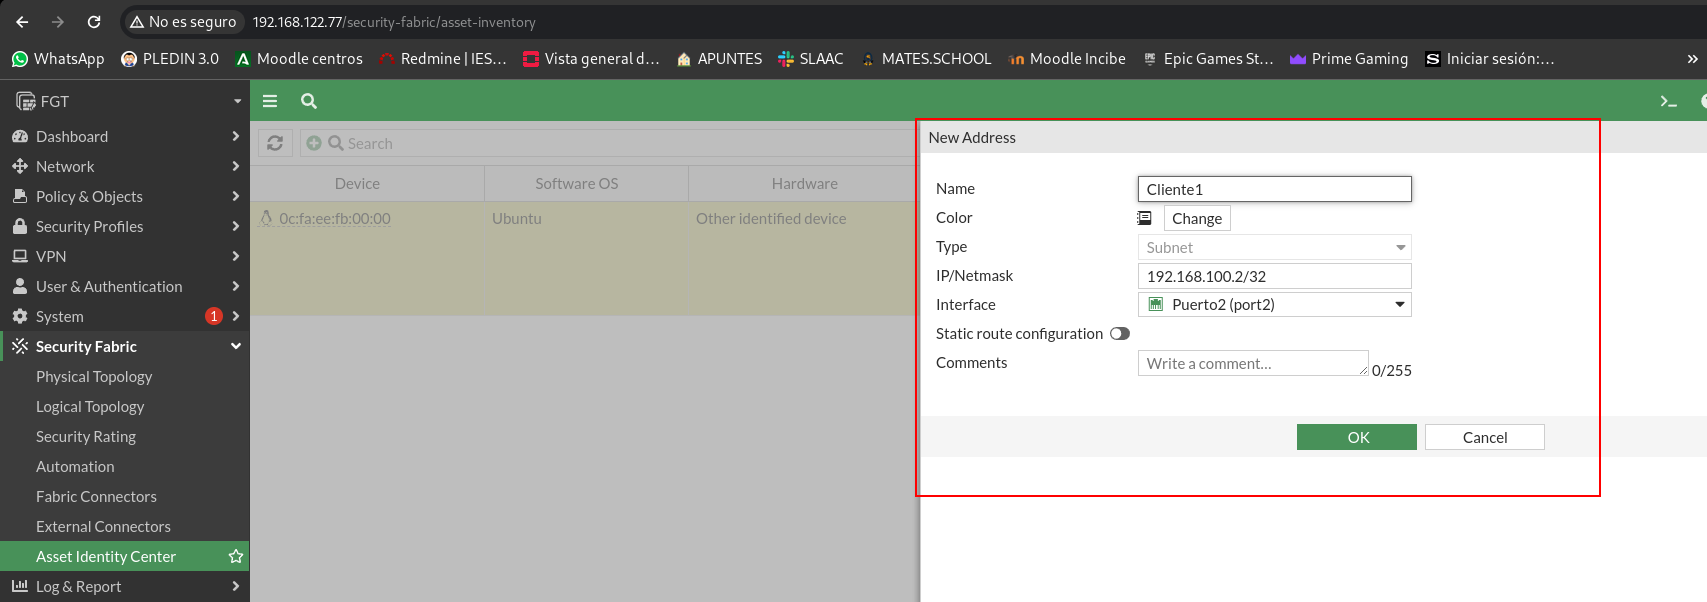
For later sections, as I will perform the practice of node firewall, it is interesting to create an object with that host. So you don’t need to remember your IP:
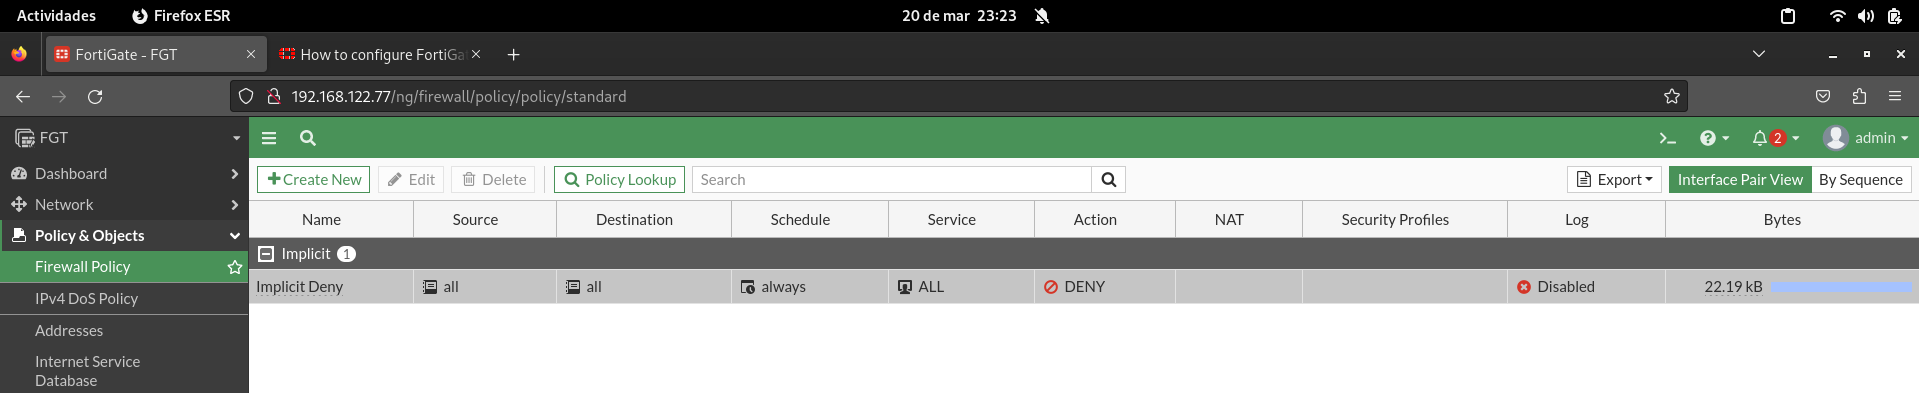
Although I have not mentioned anything above, the default policy of these devices is DROP in all directions:
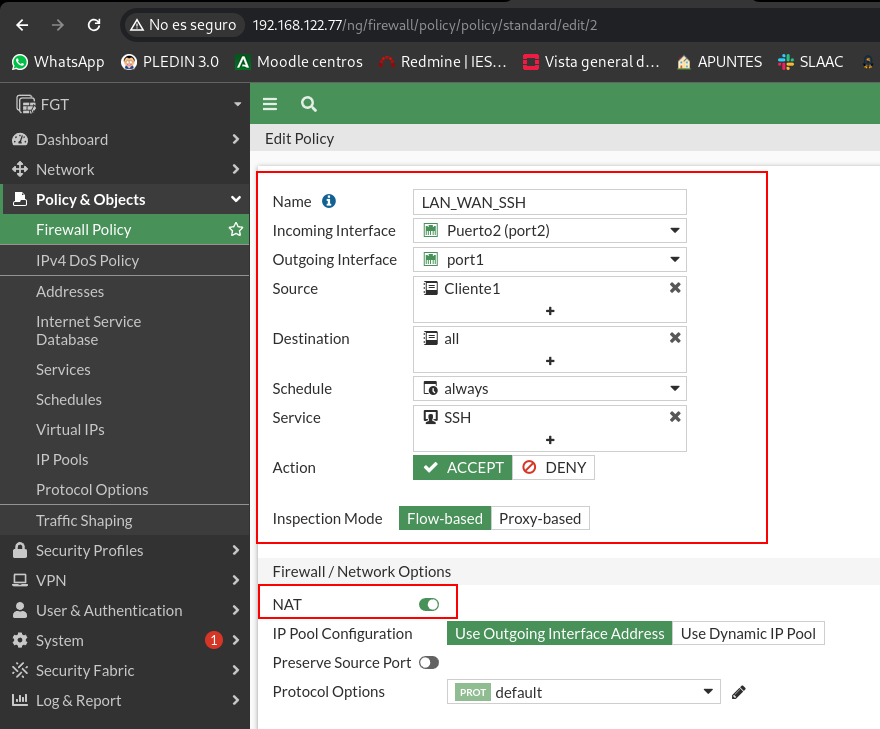
Now we are going to create a new policy that allows for the traffic from the LAN to the Internet (WAN) in any direction. This policy would be similar to those we have at home, where we can access any website. In addition, from here we can say that you do SNAT, which will allow us to navigate the Internet. We can also configure to which interface this SNAT will be made.

To end the initial configuration, we will create the default route to get out on the Internet. For this we will go to Network > Static Routes:

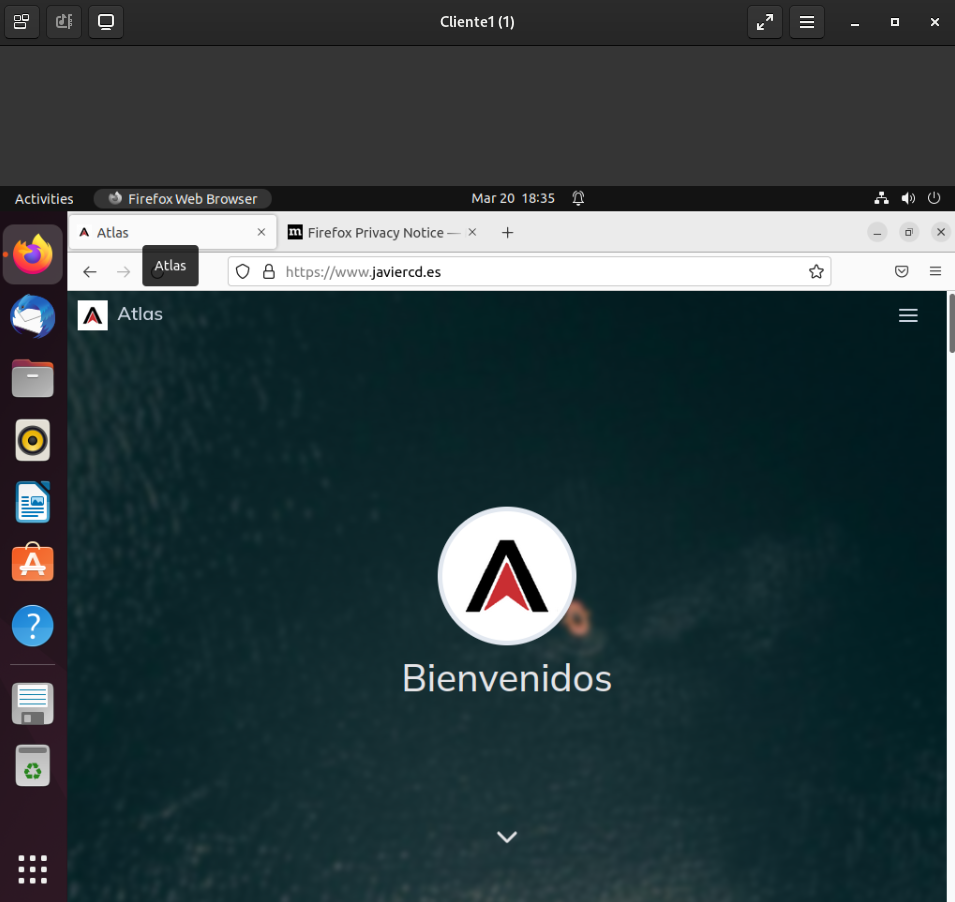
Once this policy has been implemented, we can start the practice, we can also access the Internet from customer 1:
Firewall rules
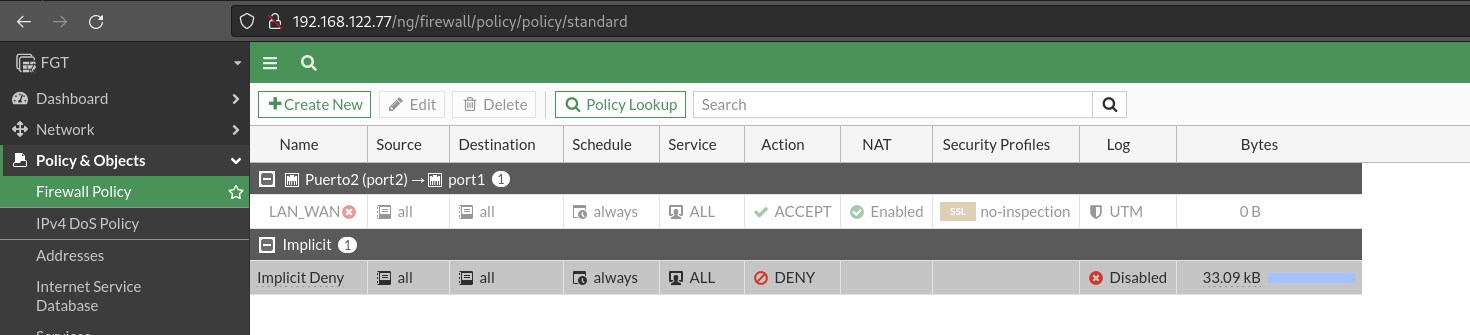
To begin with, I will deactivate the previous policy, and at the end of it will remove the tic that activates it:
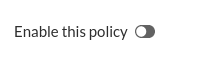
It is thus inactive:
Local network equipment should be able to have an external connection.
To configure the SNAT on FortiGate devices, it is a little different since in every rule we will allow we will have to mark the box if we want to do NAT.
We can also specify all possible options that we can think of, in my case I will leave this section unactivated and I will do it in the following rules. The image you see below is to indicate where it would be activated. We can also indicate why we want the traffic out. This is useful if we have two or more Internet outputs to make a load rocker.
Once here within the interface configuration we tell you that the interface is NAT type, we can also tell you not to do PAT.

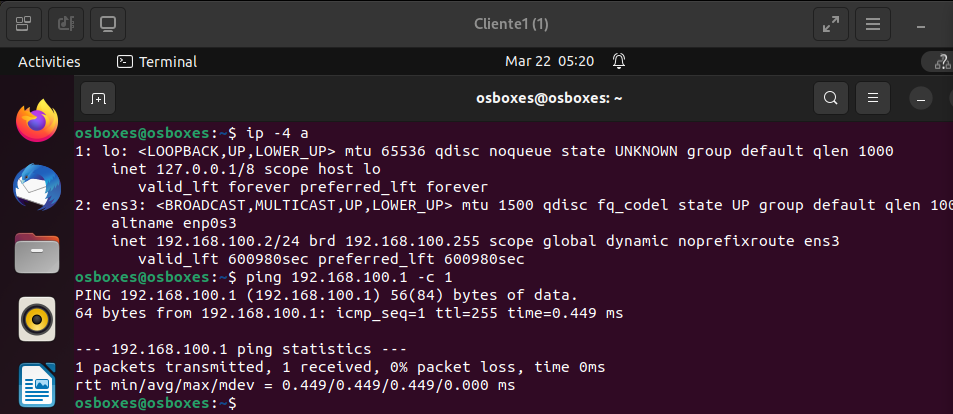
We allowed to do ping from the LAN to the firewall machine.
In these devices it would not be a rule as such, but this particular option is indicated from the administrative access option of the interface:
Once applied, if we go to client 1 we can do ping to the firewall:
Allows to make ssh connections from LAN equipment
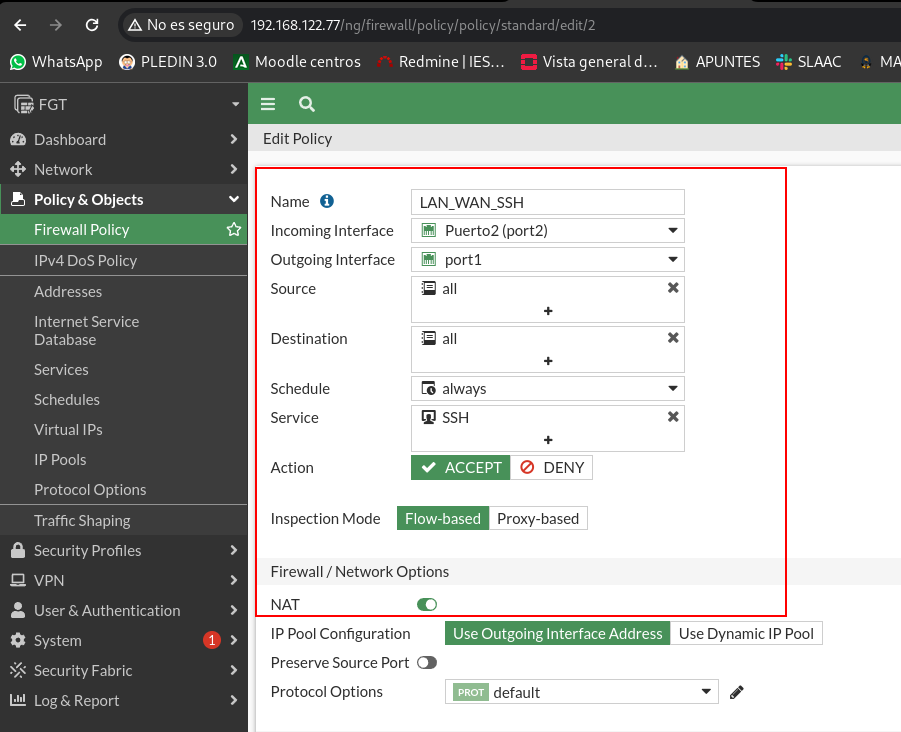
We will create the rule that allows SSH traffic, here at the source we can put either the cliente1 (we create the object in the preparation of the stage) or directly put all at the origin:
Although I currently have only one client in my scheme, stick to the statement if I want ALL LAN customers to make ssh at source I have to allow all:
As I explained in paragraph a of the practice, in this type of device we have to tell you whether we want the rule to be NAT-type to do SNAT or not.
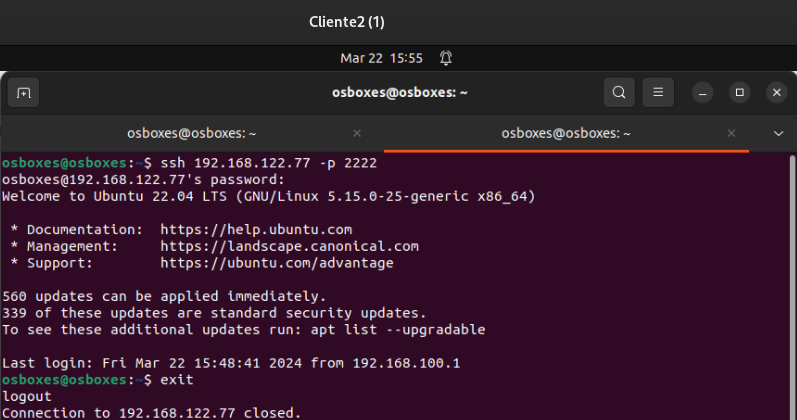
Once the rule is applied, we can connect by ssh from the cliente1:
Let’s make sure the rule has hits:

Allows navigation on LAN network
For this we will create 2 rules for the LAN network. One that allows DNS and another to allow HTTPS and HTTP traffic, in addition to both rules it will be necessary to indicate that it is done NAT.

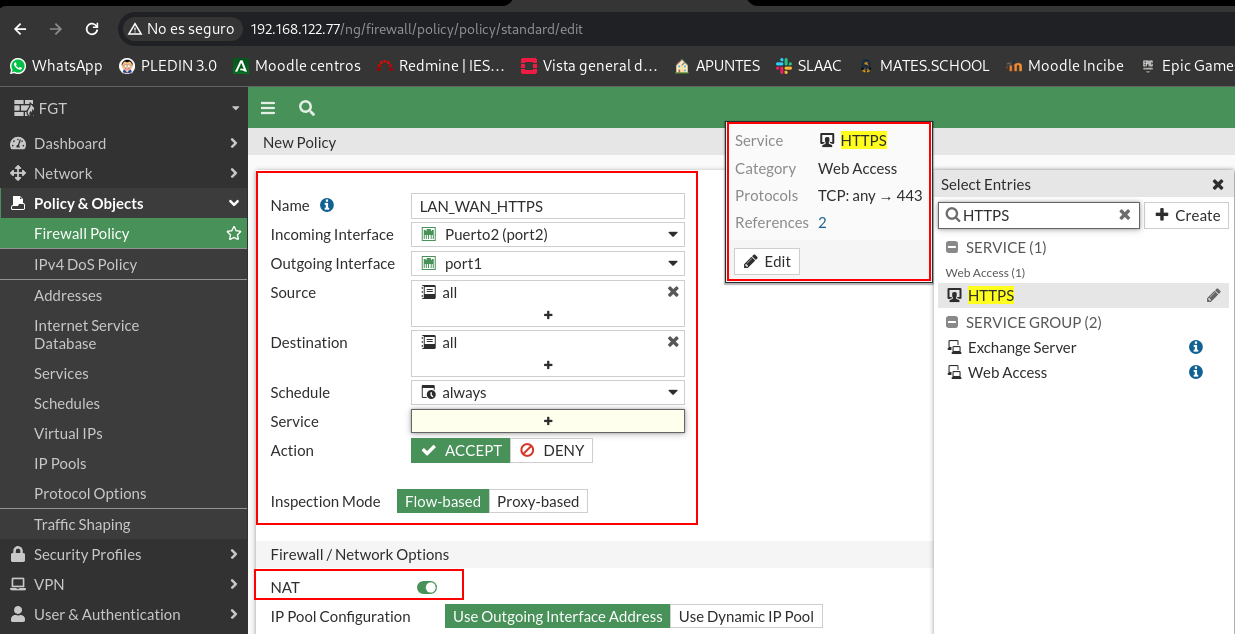
As you have fixed, I have not indicated the port number, but that these devices have objects called services in which the port numbers of these are stored. We can create the objects we want and customize the existing ones according to our needs.
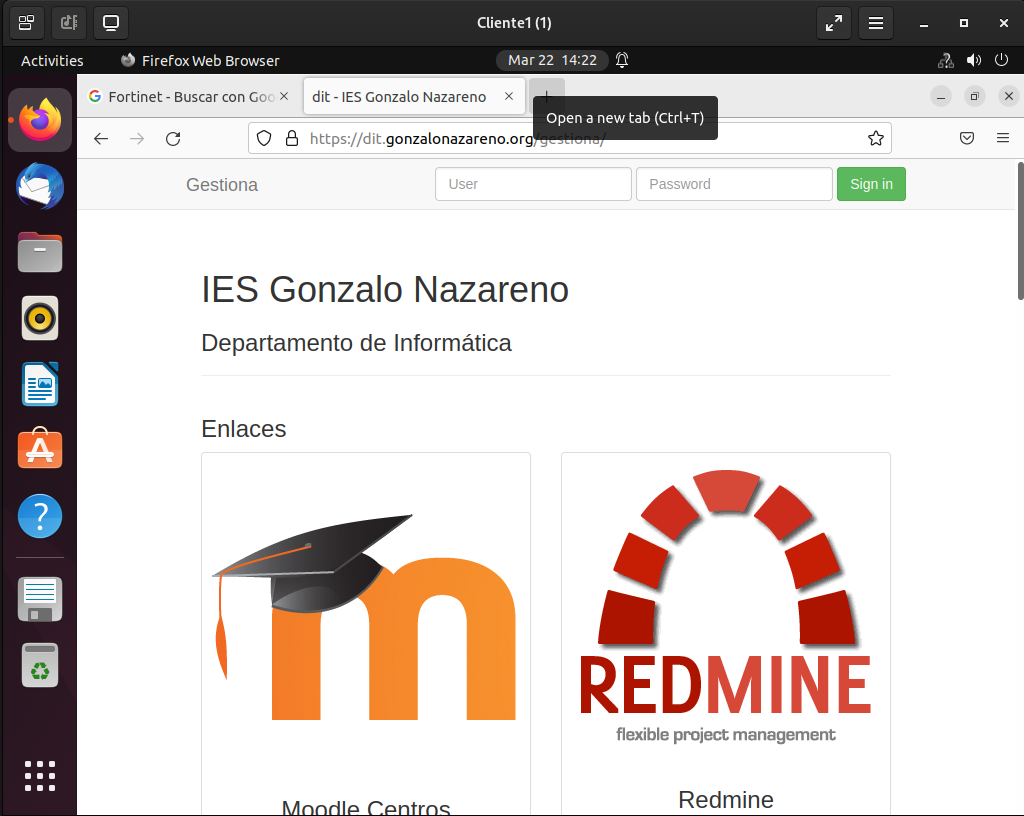
Let’s check that we can navigate on client 1:
Needless to say, of course we can do a dig, with the current rule we can do it to any DNS server:

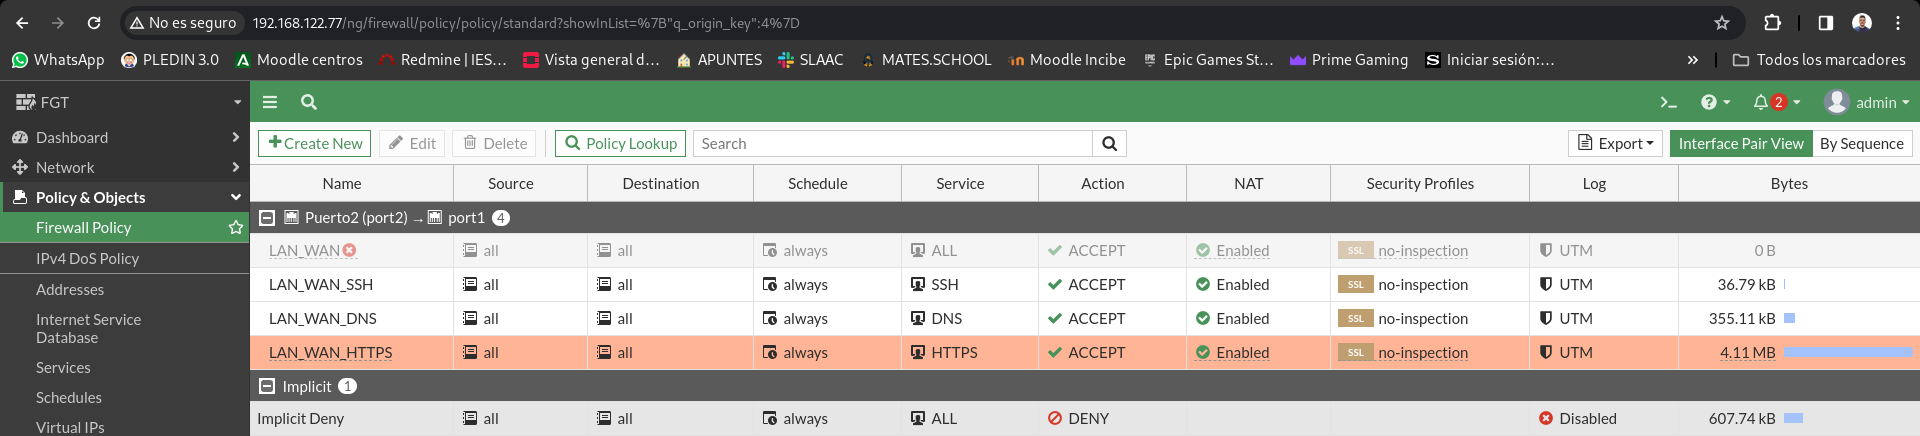
Let’s check that we have hits in the rules:
Install a post server on the LAN machine. It allows access from the outside and from the firewall to the post server. To prove it you can run a telnet to port 25 tcp.
As we are currently allowed to navigation only by https it is essential that the machine repositories are configured we can install packages on our client, so we will install postfix:
sudo apt update && sudo apt install postfix -y
Now we’re gonna set up the first DNAT rule we’re gonna have on stage. To do this we will have to create a virtual IP and tell you which is the external IP (WAN) and the IP where we are going to do the DNAT (LAN).
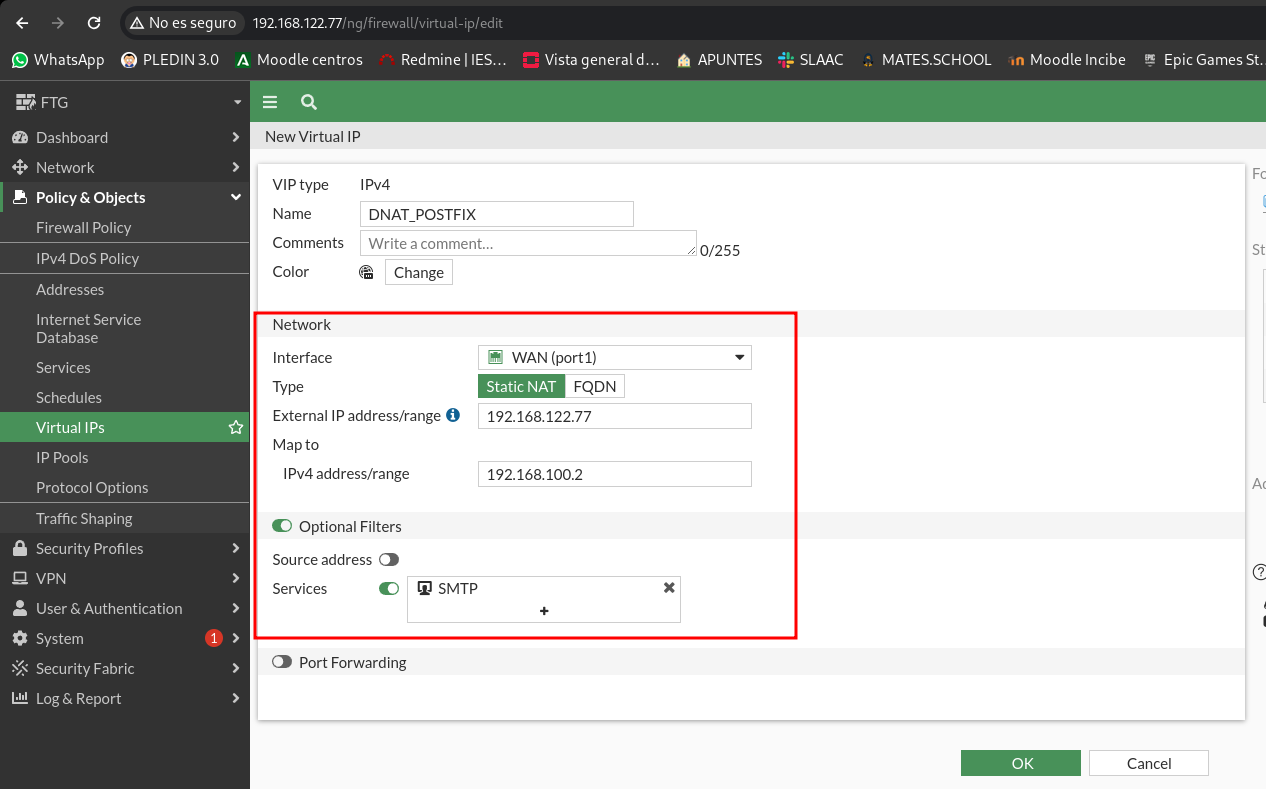
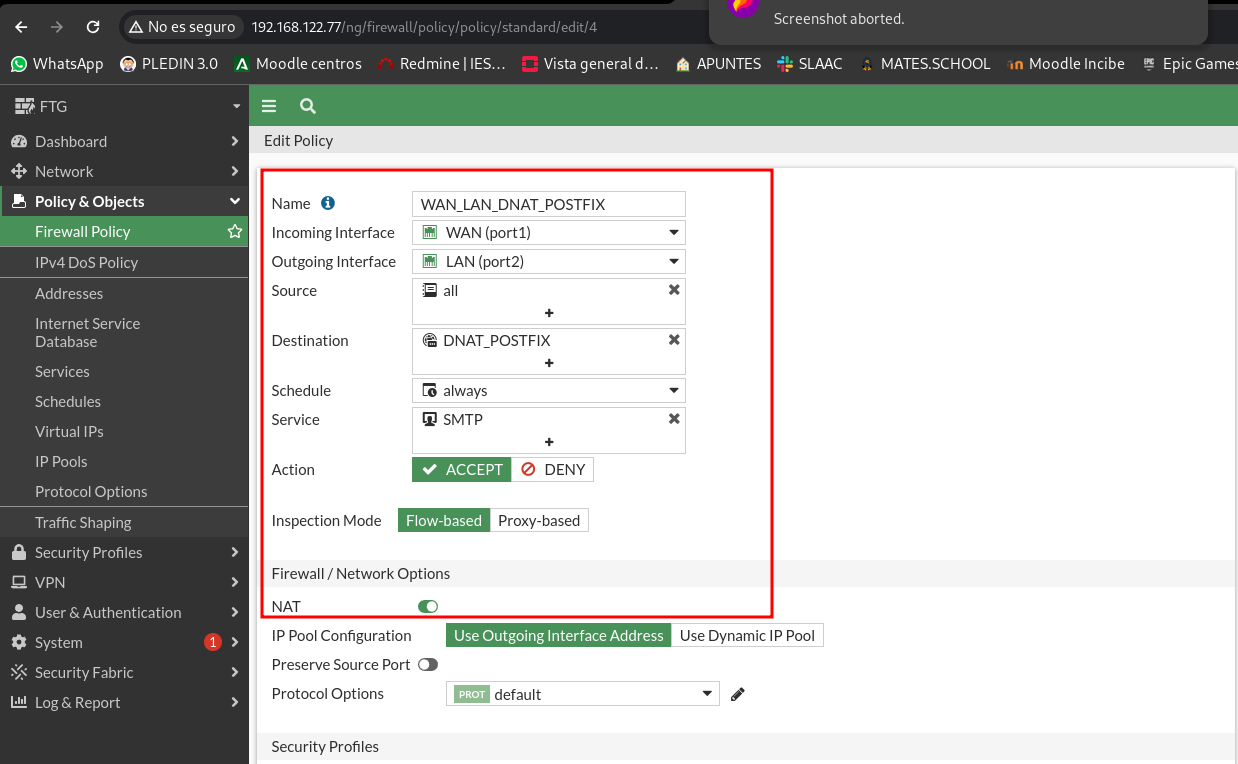
Now let’s add the rule in our policy, in the destination of the rule we will indicate the virtual IP that we just created and we indicate the SMTP service that has the 25 TCP port configured:
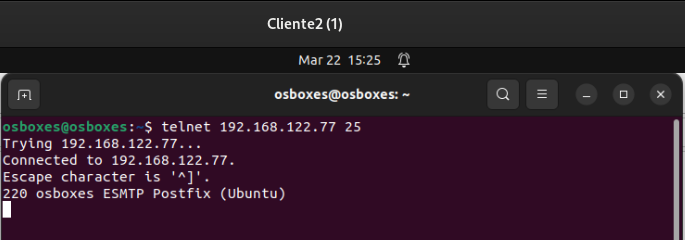
And let’s check that from an external client, as is Client 2 we can access Customer 1:
Let’s check that the rule we just created has hits:

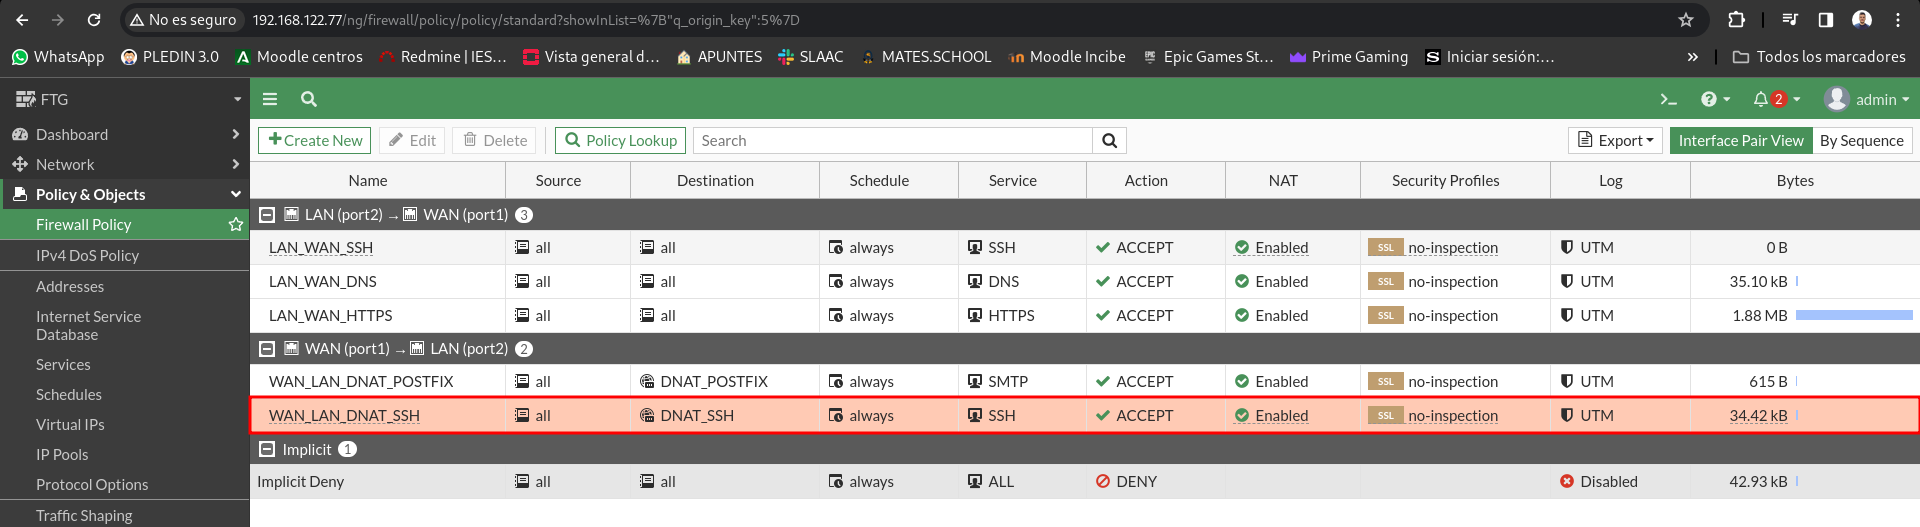
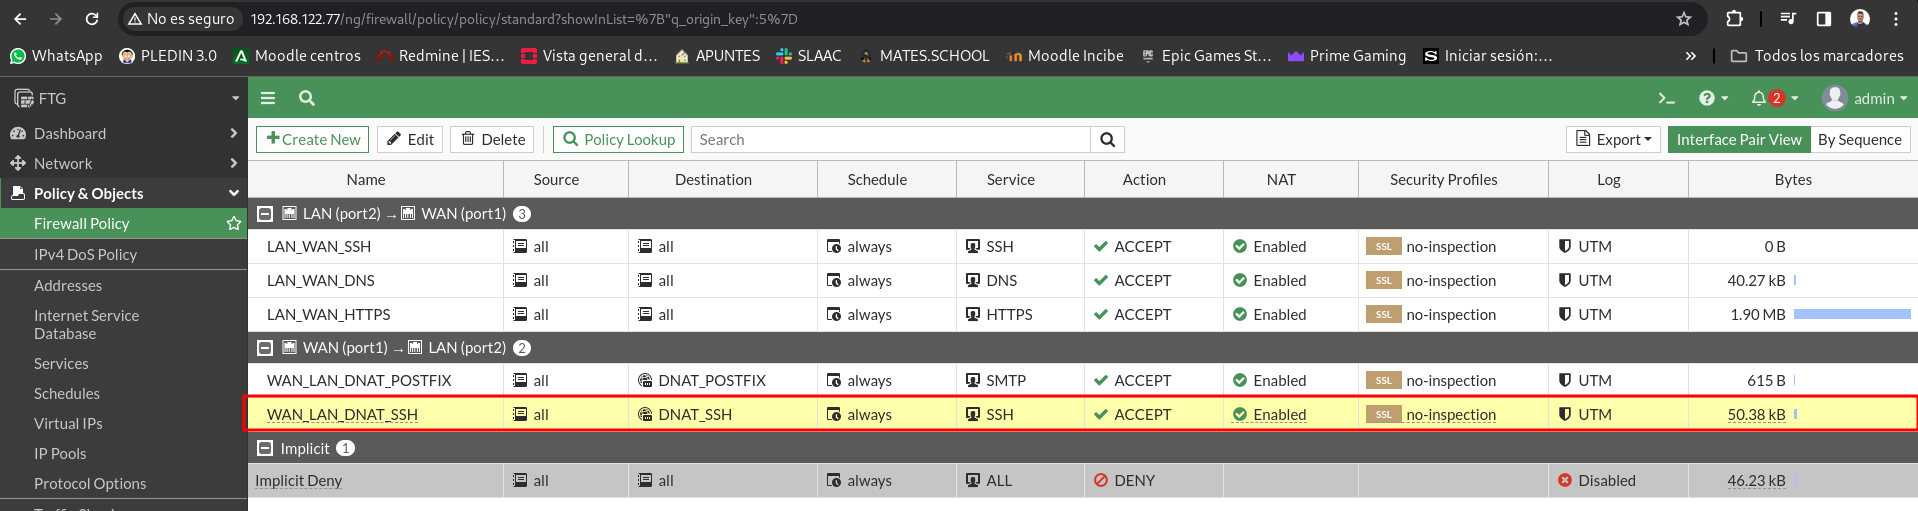
Allows to make ssh connections from outside to the LAN
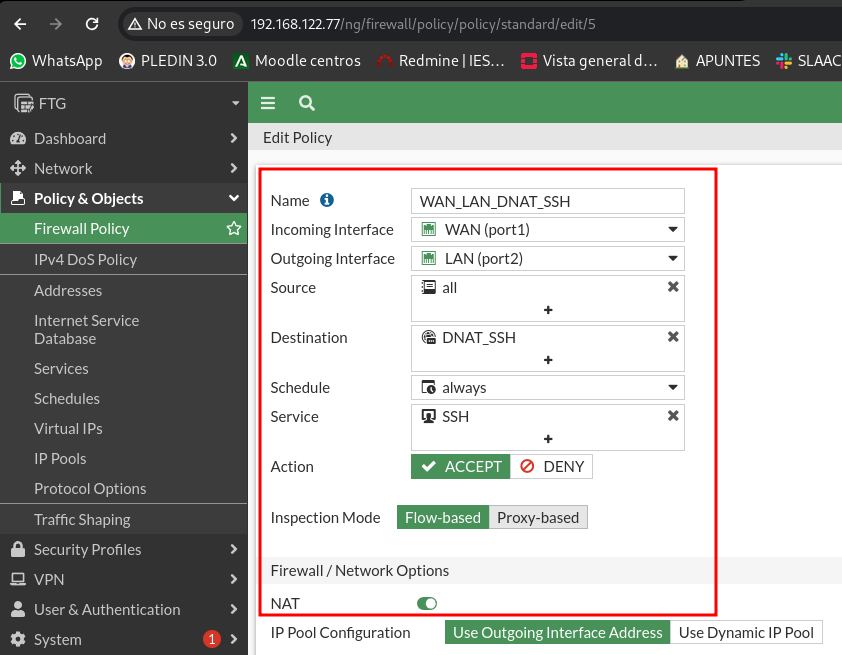
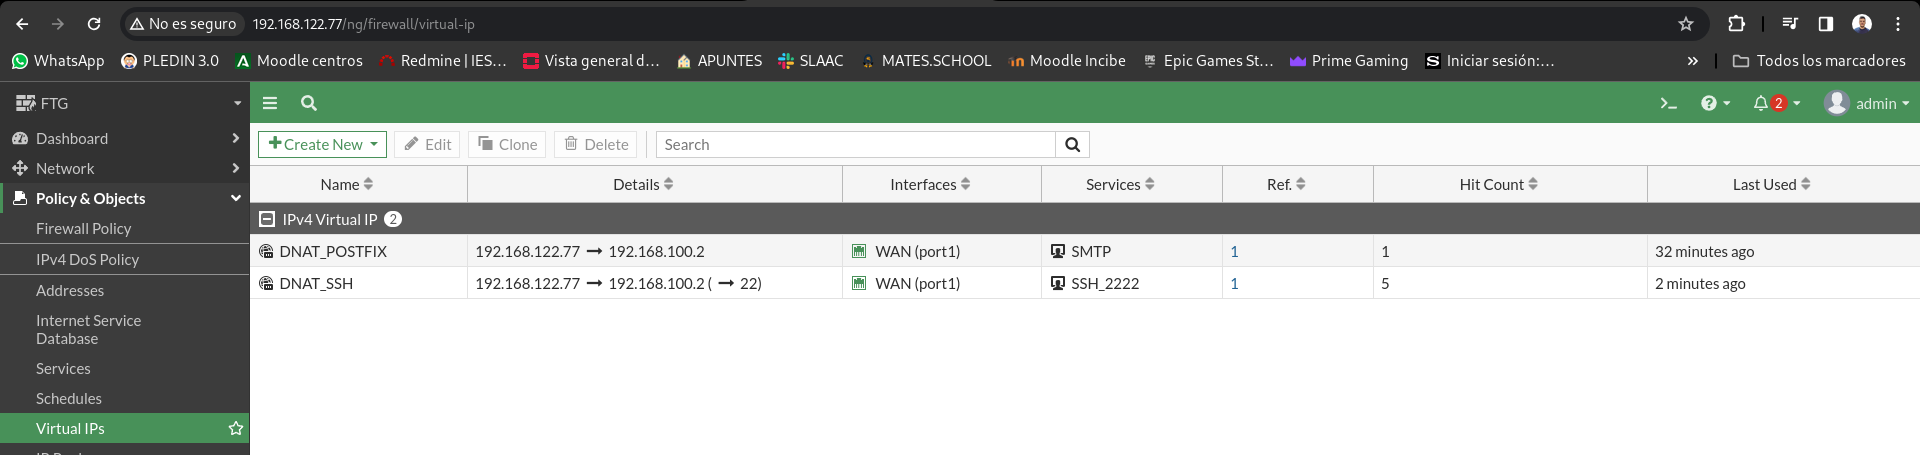
To do this, we will have to recreate a new virtual IP as it previously specified that this IP was only used for the SMTP protocol. So I’m gonna create a new one:

Once the new virtual IP is created for the ssh, we will create the DNAT rule:
Let’s try our new rule from client 2:
Let’s check the hits of our new rule:
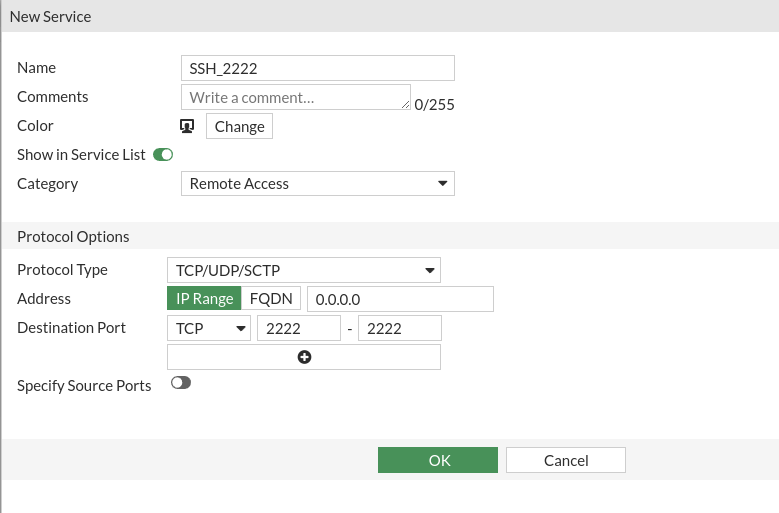
# # Modifies the previous rule, so that when we access from the outside by ssh we have to connect to port 2222, although the ssh server is configured to access by port 22.
To do this we will have to generate a new service that is in port 2222:
Now we are going to modify our virtual IP by modifying the service by the new one we have created with the 2222 port and we will make a port forweding to the 22 port:
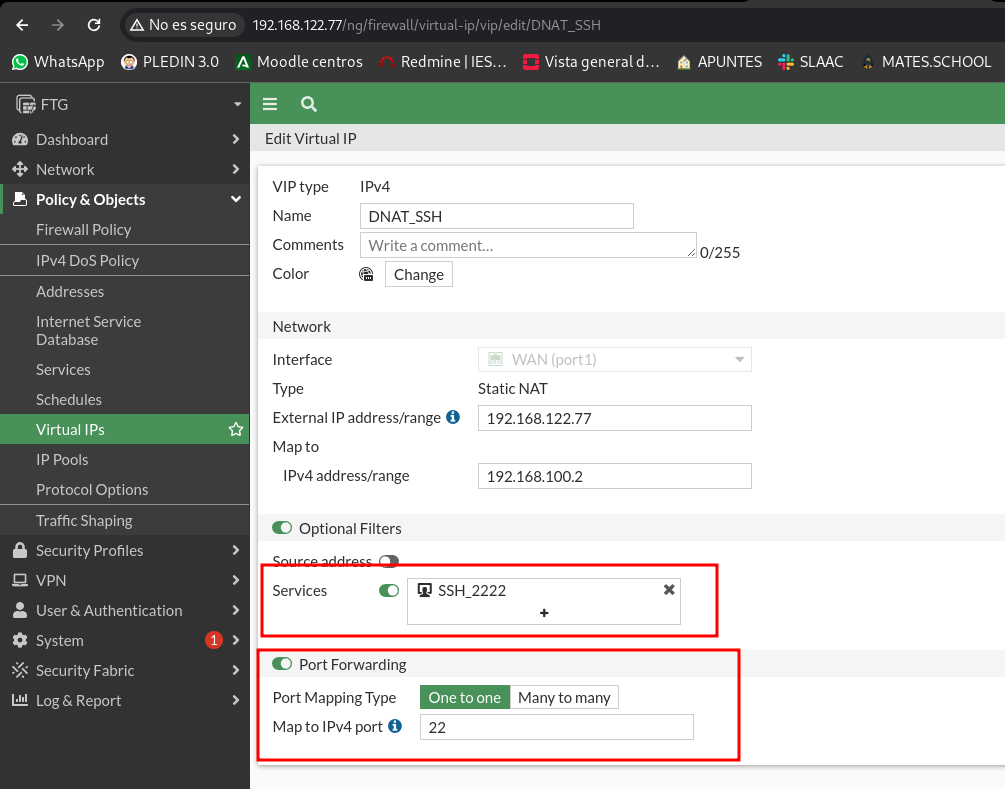
Once this has been done, we can access ssh using the 2222 port and redirect us to 22. We don’t need to change the rules, only with this we can access:
We will check the hits of the rules, plus in the Virtual IP section we also have a hit counter:
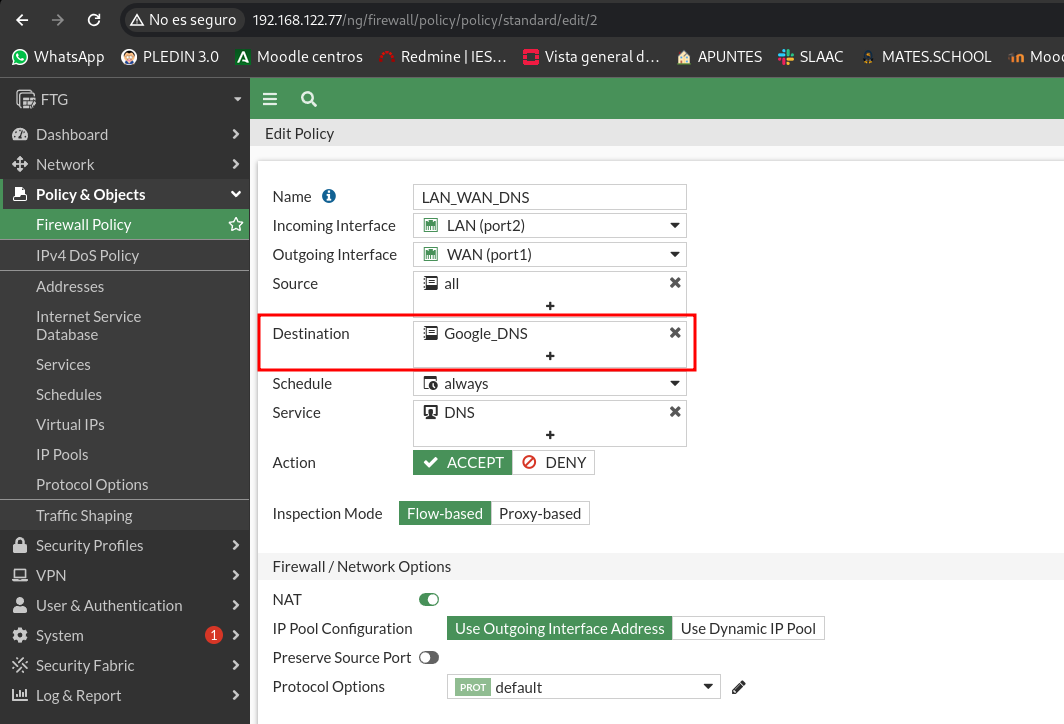
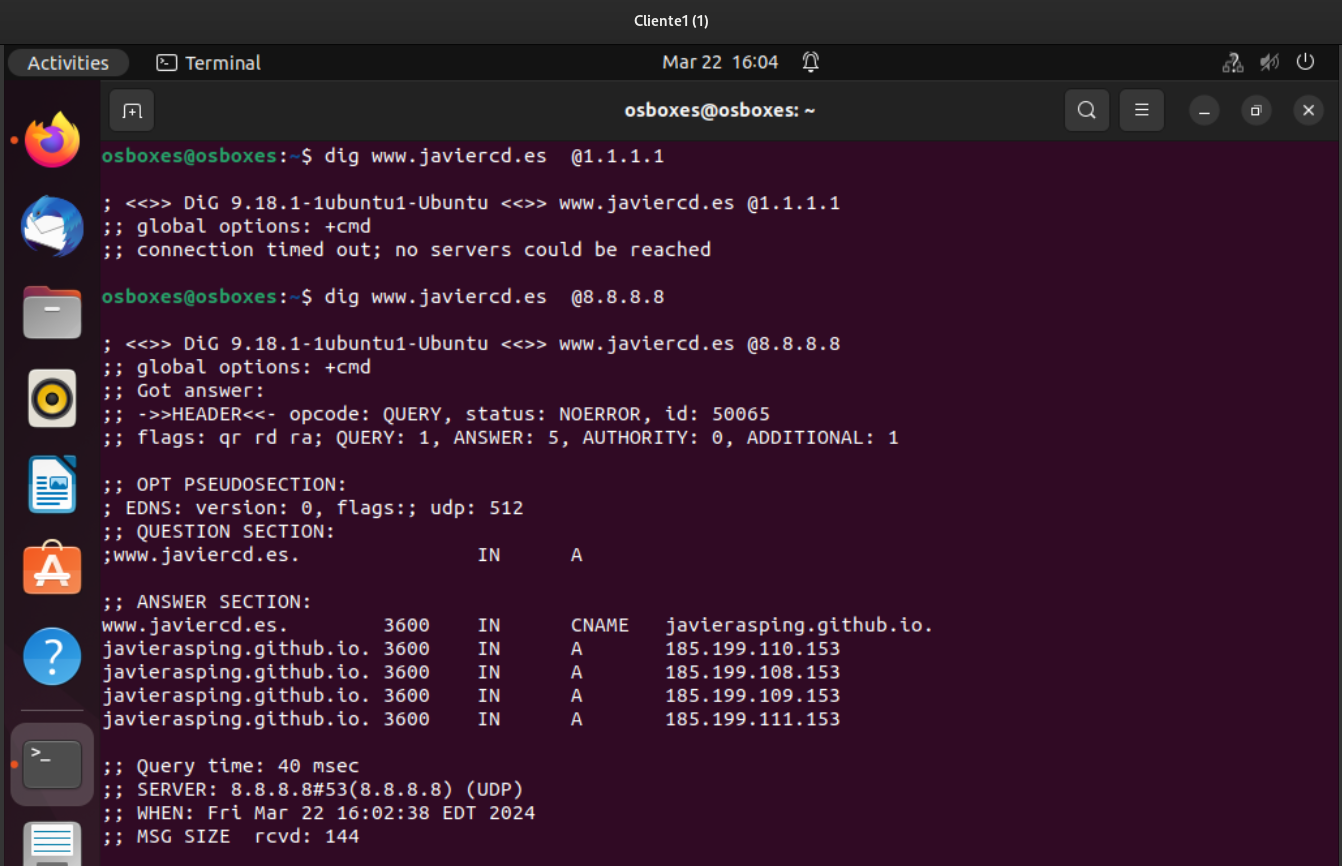
It allows DNS queries from the LAN only to the 8.8.8.8 server. Check that you can’t make a dig @ 1.1.1.1.
For this we will modify the rule that allows DNS queries and we will indicate that the destination is only 8.8.8.8.
First we will need to create a new object with the Google DNS server IP:
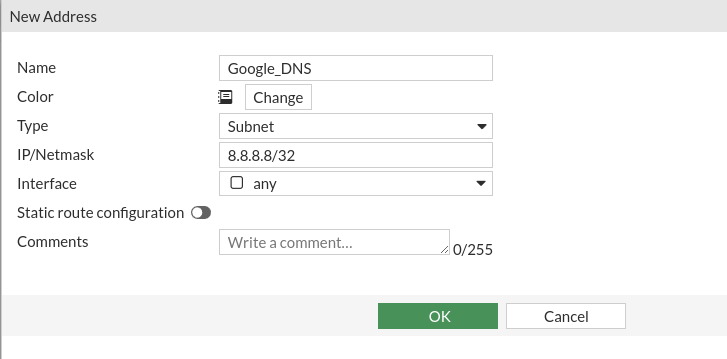
Now we change the rule and put this object as a destination:
Let’s check the change of the rule, so we can only do dns consultations at 8.8.8.8:
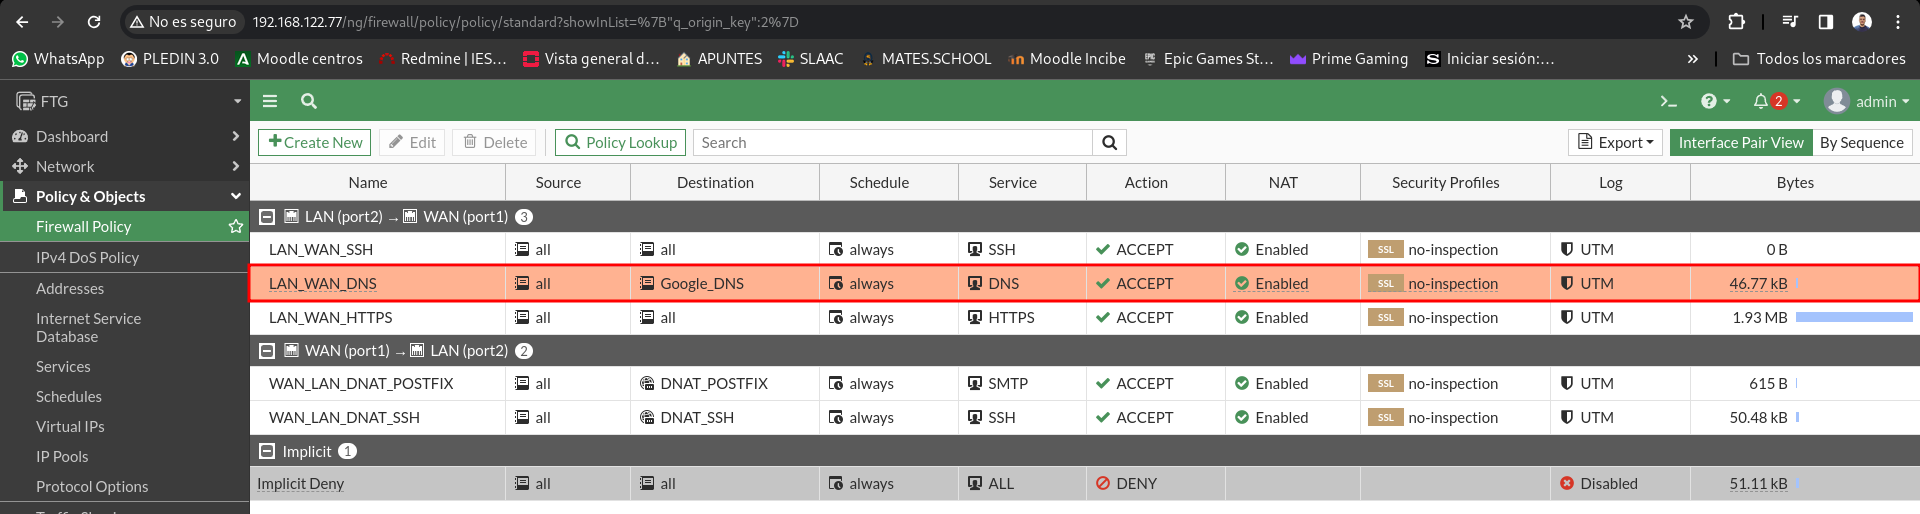
We can check that the hits have gone up:
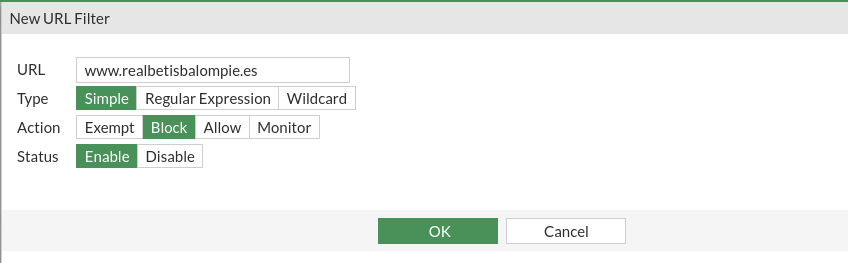
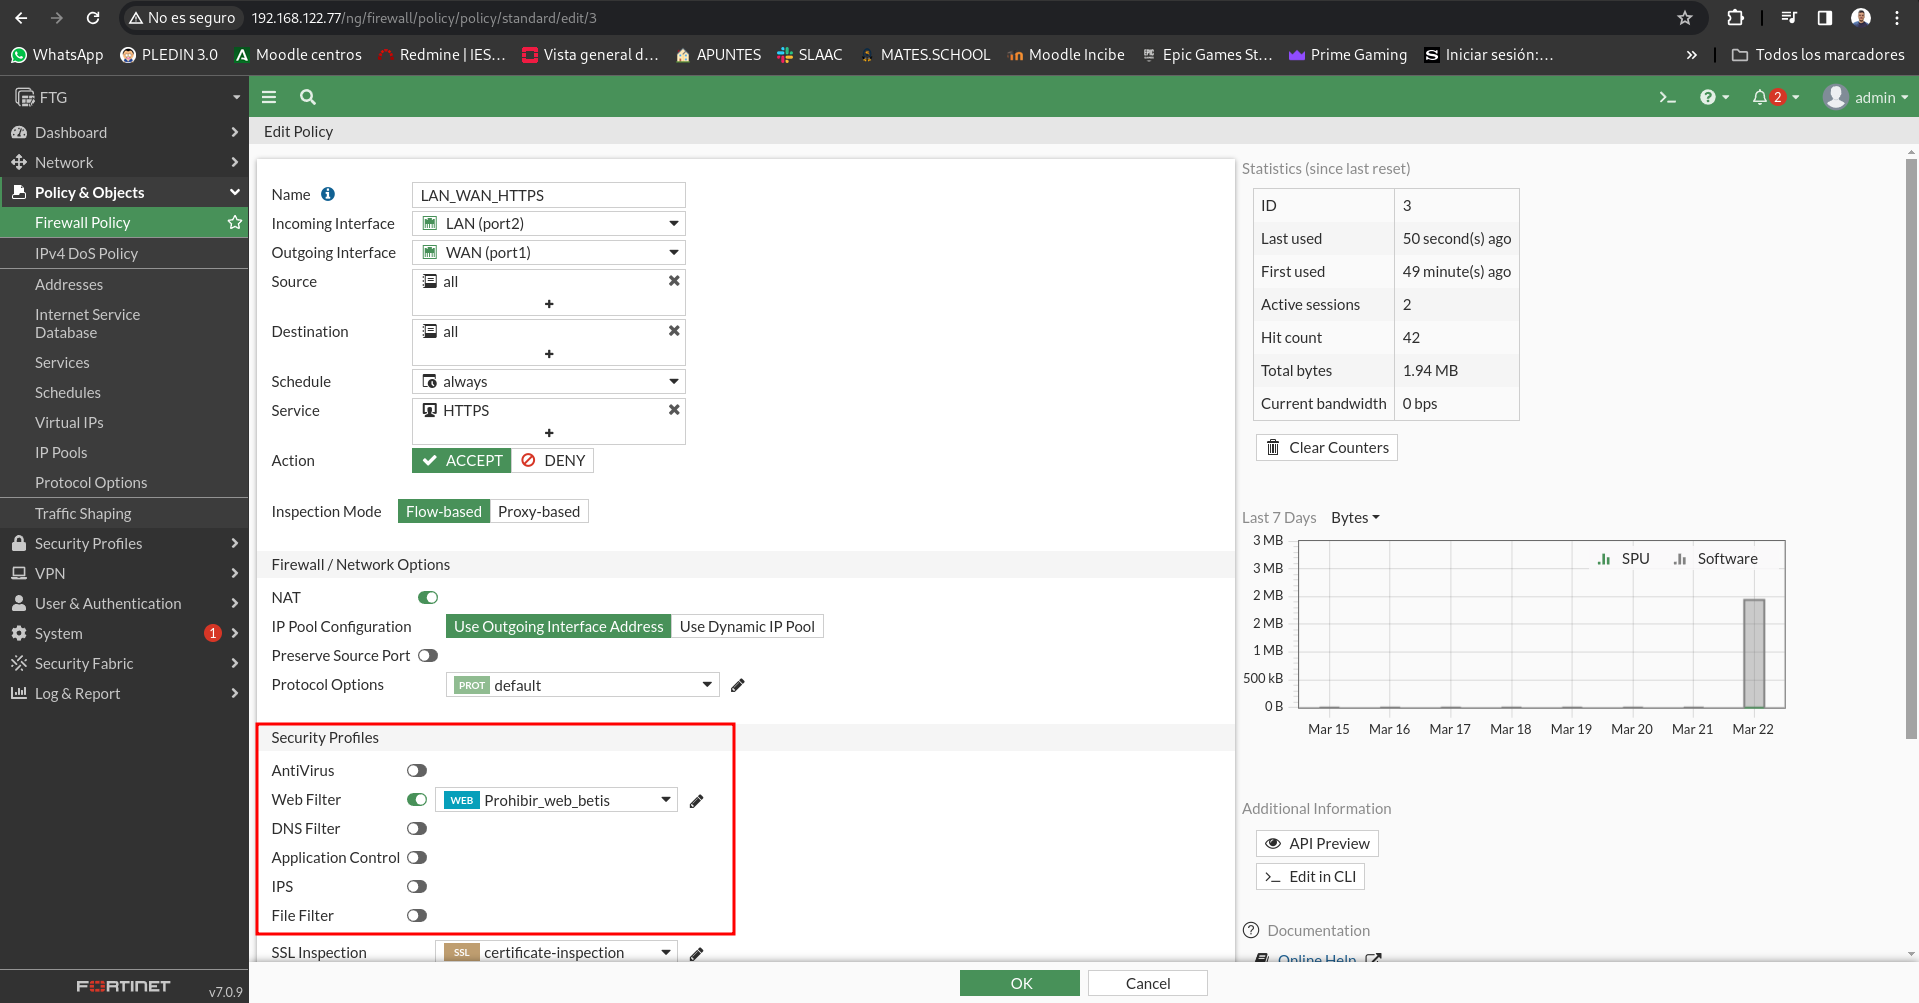
Allows LAN equipment to browse the Internet, except for the www.realbetisbalompie.es page
These new generation firewalls bring a series of services that filter us at the application level that allows us to detect key words to filter the content (drugs, pornography, weapons…), in this firewall the filtering by key words is a payment service, you have to pay a license. It also allows us to create filters to block certain web pages, which in this case is free.
The first thing is to create our web _ filter policy:

And we add in it a new filter per URL:
We now turn to the rule that allows us to traffic https and in security we add the web filter we have just created:
To the left I will access from the browser of my physical machine and I can access the page of the evil one, however if I access from client 1 the firewall does not let us access:

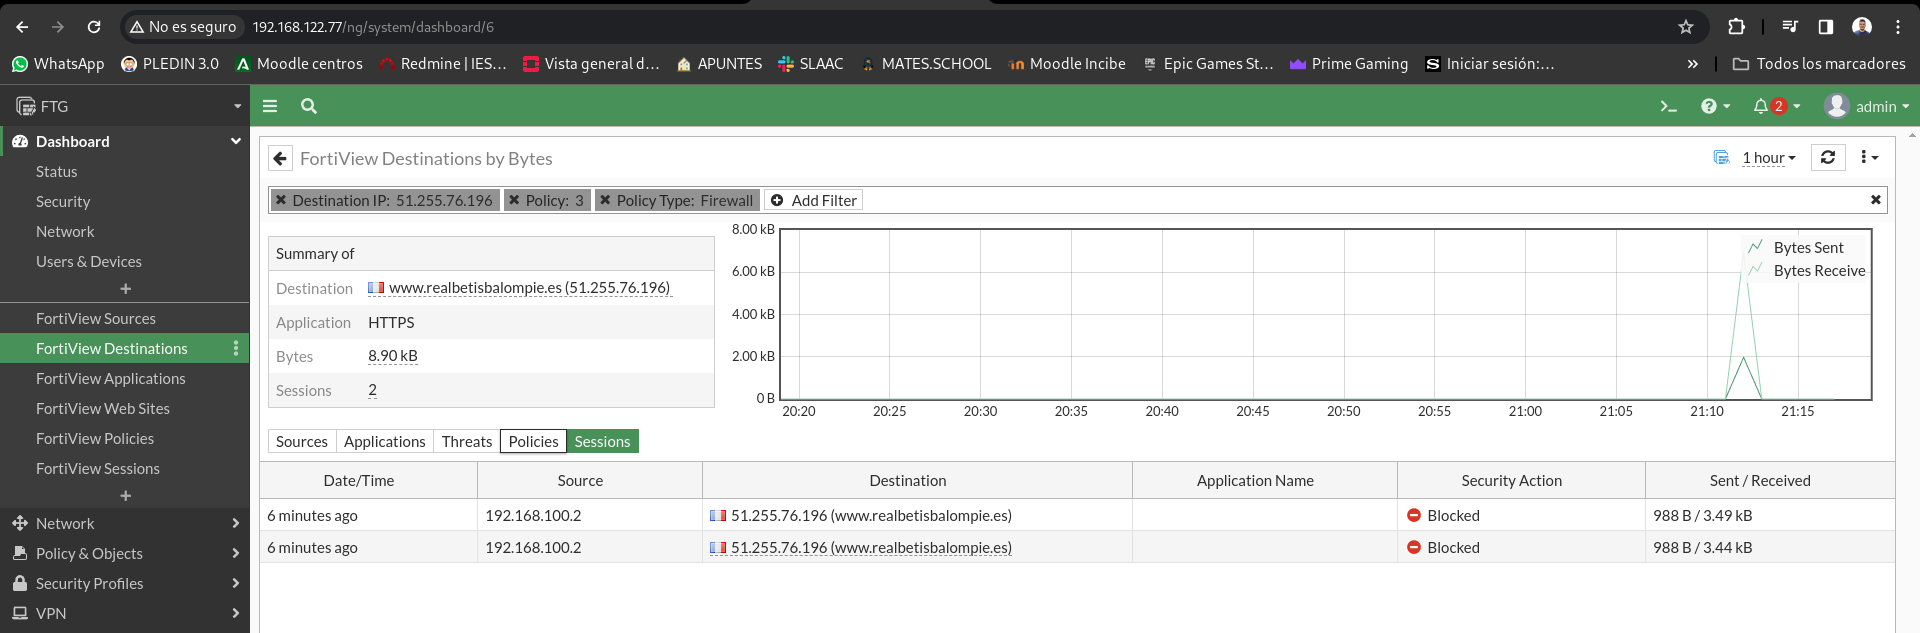
If we access FortiView Destinations we can see the pages that our filter has blocked: