Francisco Javier Cruces Doval
Thursday, March 28, 2024 | 16 minutes
Implementation of a perimeter firewall with Fortinet II
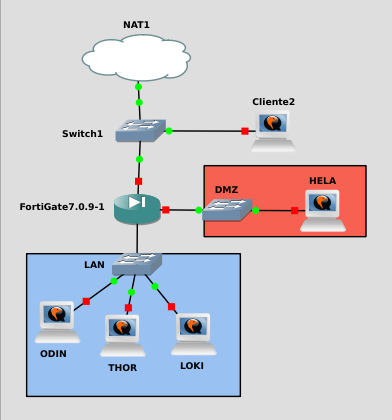
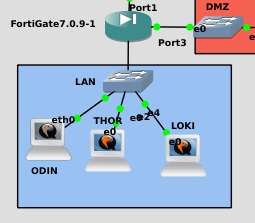
Now let’s emulate firewall practice II, but on GNS3. To this end, I have transformed client 1 into Odin, and added Thor and Loki as virtual machines instead of containers on the LAN network. I have also created a new network called DMZ, in which will be the Hela machine.
Since I have transformed the previous scenario into this new one, we have some rules created earlier. Therefore, I will remove from the statement those that are already created, such as making SSH to Odin from port 2222, but with the service listening in the 22.
In addition, we are now going to make DHCP reservations to have the IP of the new machines controlled.
In addition to not counting on the services mounted on the old stage in Opsentack and for the rules of the enunciation I will mount the minimum to make the rules work.
Throughout this practice I will explain to you that by how the topology of the network is mounted, all of the LAN network can communicate with each other without the need to pass through the firewall. So in some exercises I’ll skip the part about making Loki and Thor communicate with Odin. In addition I will not mount the DNS or LDAP server as the rules of DNAT are quite simple and along the practice several exercises of doing DNAT between the different networks appear. Instead I will add VPN at the end of it as I see it more interesting than repeating the same rules by changing the service.
Stage preparation
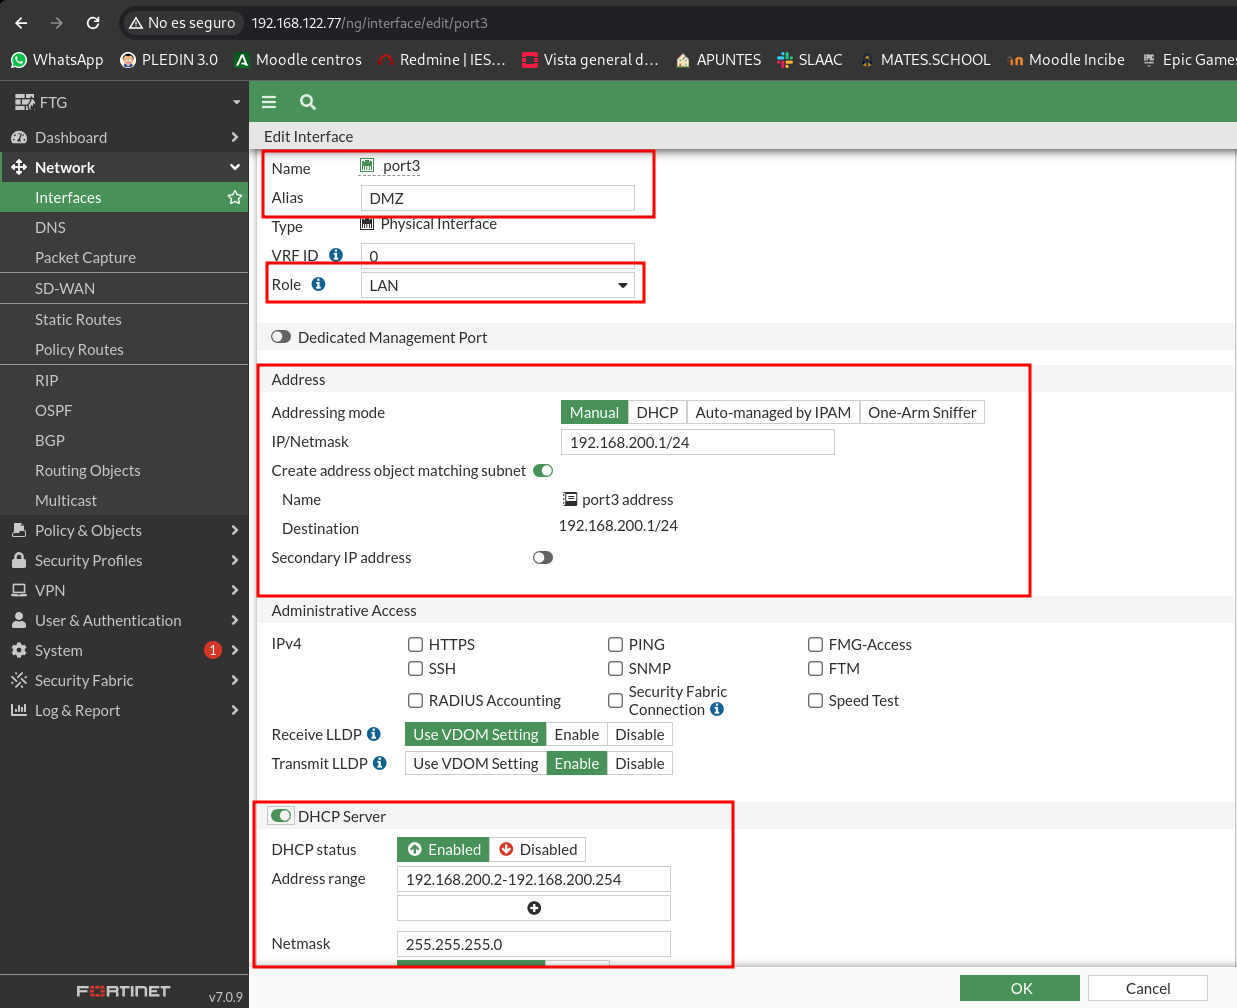
The first thing I will do is create a new network in port 3, which corresponds to the DMZ network.
As you will see in the image below I have selected the role to be LAN, to allow me to have a DHCP server on that network. As it is a network in which the services are housed, I don’t want you to be able to access the firewall from this one, so I’ll leave the administration off.
Now I’ll go access the new customers and change their machine name and set them up by DHCP.
Odin machine, this was previously client machine 1, you just need to change the FQDN and the hostel:
osboxes@odin:~$ hostname -f
odin.javiercd.gonzalonazareno.org
osboxes@odin:~$ ip -4 a
1: lo: <LOOPBACK,UP,LOWER_UP> mtu 65536 qdisc noqueue state UNKNOWN group default qlen 1000
    inet 127.0.0.1/8 scope host lo
       valid_lft forever preferred_lft forever
2: ens3: <BROADCAST,MULTICAST,UP,LOWER_UP> mtu 1500 qdisc fq_codel state UP group default qlen 1000
    altname enp0s3
    inet 192.168.100.2/24 brd 192.168.100.255 scope global dynamic noprefixroute ens3
       valid_lft 604790sec preferred_lft 604790sec
Thor machine:
debian@thor:~$ hostname -f
thor.javiercd.gonzalonazareno.org
debian@thor:~$ ip -4 a
1: lo: <LOOPBACK,UP,LOWER_UP> mtu 65536 qdisc noqueue state UNKNOWN group default qlen 1000
    inet 127.0.0.1/8 scope host lo
       valid_lft forever preferred_lft forever
2: ens3: <BROADCAST,MULTICAST,UP,LOWER_UP> mtu 1500 qdisc fq_codel state UP group default qlen 1000
    altname enp0s3
    inet 192.168.100.4/24 brd 192.168.100.255 scope global dynamic ens3
       valid_lft 604791sec preferred_lft 604791sec
debian@thor:~$
Loki machine:
debian@loki:~$ hostname -f
loki.javiercd.gonzalonazareno.org
debian@loki:~$ ip -4 a
1: lo: <LOOPBACK,UP,LOWER_UP> mtu 65536 qdisc noqueue state UNKNOWN group default qlen 1000
    inet 127.0.0.1/8 scope host lo
       valid_lft forever preferred_lft forever
2: ens3: <BROADCAST,MULTICAST,UP,LOWER_UP> mtu 1500 qdisc fq_codel state UP group default qlen 1000
    altname enp0s3
    inet 192.168.100.3/24 brd 192.168.100.255 scope global dynamic ens3
       valid_lft 604724sec preferred_lft 604724sec
Hela machine:
debian@hela:~$ hostname -f
hela.javiercd.gonzalonazareno.org
debian@hela:~$ ip -4 a
1: lo: <LOOPBACK,UP,LOWER_UP> mtu 65536 qdisc noqueue state UNKNOWN group default qlen 1000
    inet 127.0.0.1/8 scope host lo
       valid_lft forever preferred_lft forever
2: ens3: <BROADCAST,MULTICAST,UP,LOWER_UP> mtu 1500 qdisc fq_codel state UP group default qlen 1000
    altname enp0s3
    inet 192.168.200.2/24 brd 192.168.200.255 scope global dynamic ens3
       valid_lft 604795sec preferred_lft 604795sec
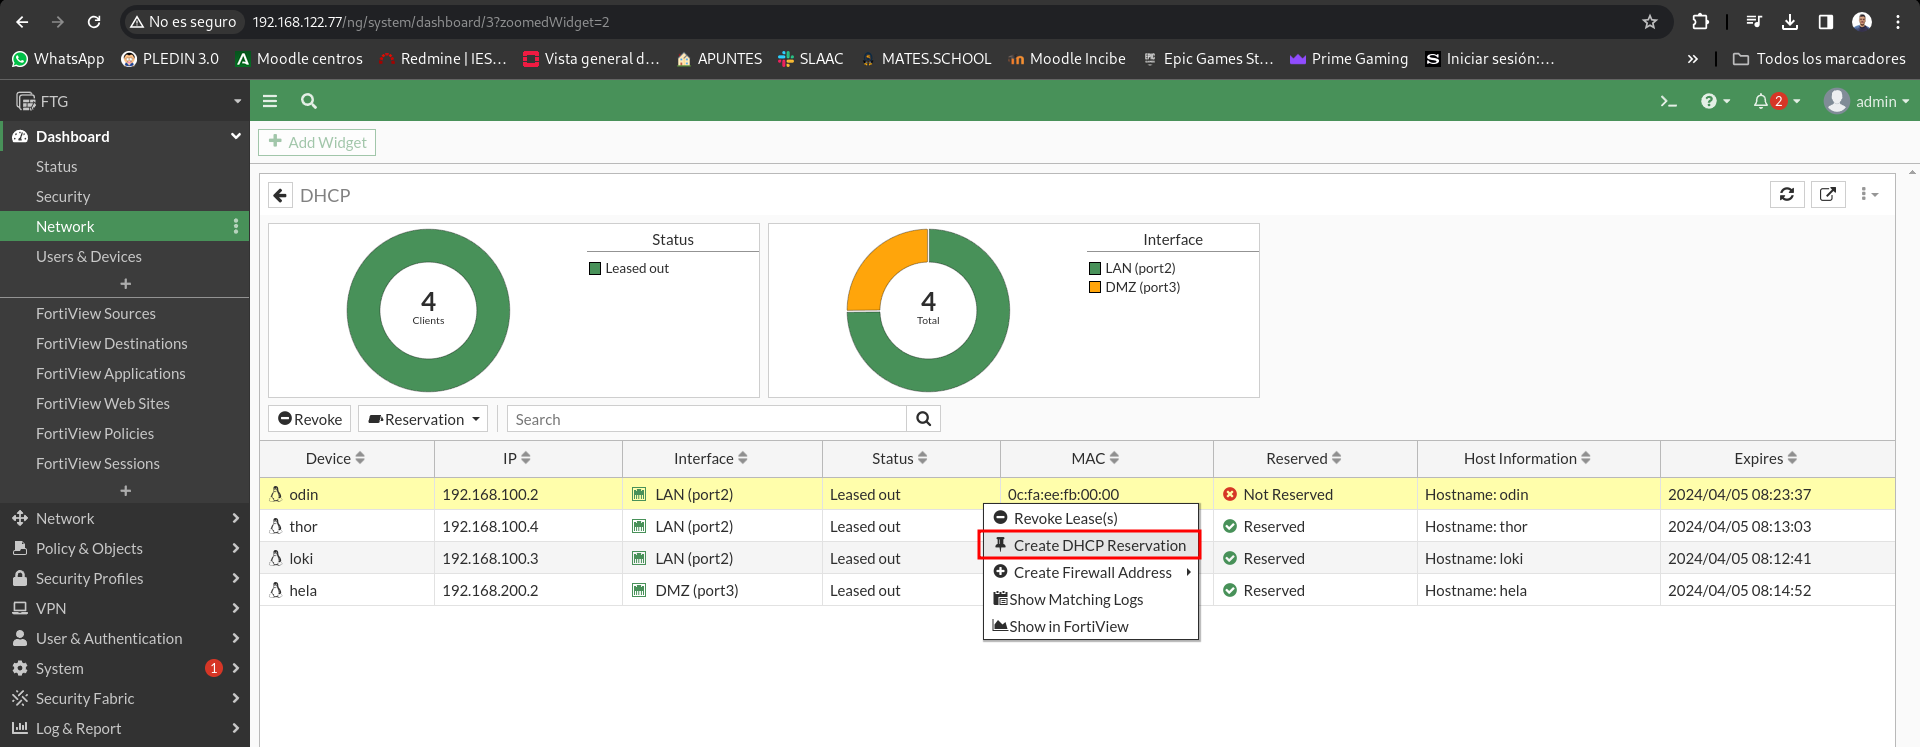
Now we will make a reservation on the DHCP server, we will access Dashborad > Networks > DHCP, once here we will right click on each client of the 4 we have on the stage and create a reservation:
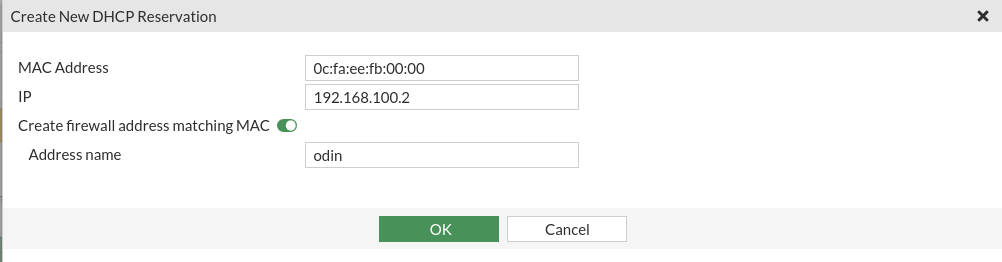
We will have a similar menu to this to link the MAC address to the IP:
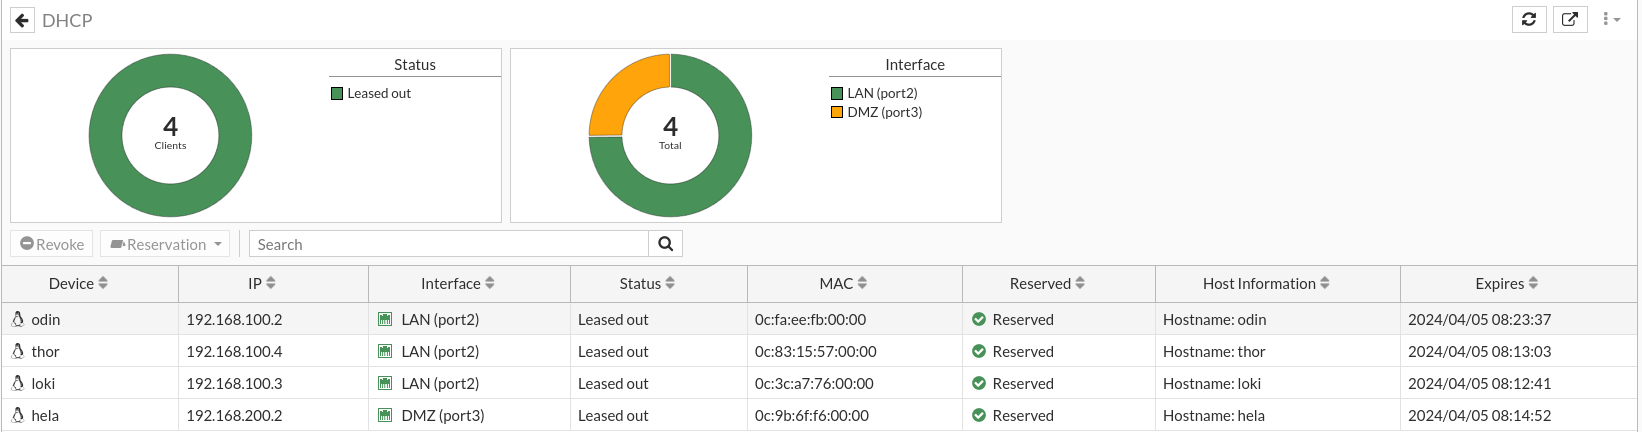
Once we do this with our customers will tell us that we have the reservation made:
Firewall rules
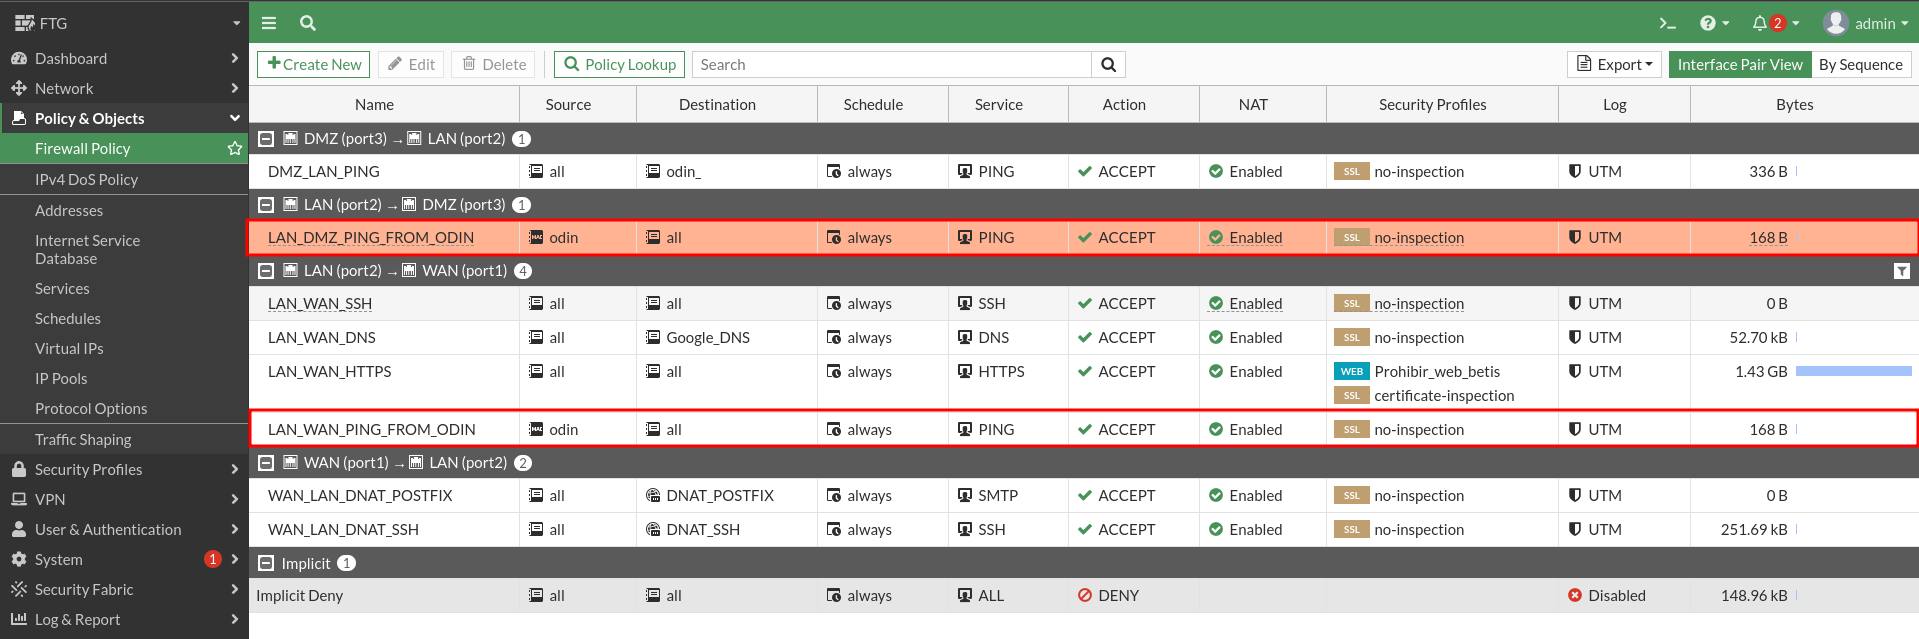
We’re going to start creating the rules, as I said earlier we started from the previous stage, so some rules for the minimum operation of the network are created.
I’ll leave you a capture of how the rules stayed, so you can see the state we’re going to:

Some of the following rules are already set from the previous exercise, such as the following rule – > * The Odin machine has a ssh server listening to port 22, but when you access from the outside you will have to connect to port 2222 *
javiercruces@HPOMEN15:~$ ssh osboxes@192.168.122.77 -p 2222
osboxes@192.168.122.77's password:
Welcome to Ubuntu 22.04 LTS (GNU/Linux 5.15.0-25-generic x86_64)

 * Documentation:  https://help.ubuntu.com
 * Management:     https://landscape.canonical.com
 * Support:        https://ubuntu.com/advantage

560 updates can be applied immediately.
339 of these updates are standard security updates.
To see these additional updates run: apt list --upgradable

Last login: Fri Mar 29 11:23:44 2024 from 192.168.100.1
osboxes@odin:~$ hostname -f
odin.javiercd.gonzalonazareno.org
Next you will see that there are some rules that I have removed or modified, as in the current scenario they cannot be done either by topology or because previously the Odin machine was the firewall. In any case I have maintained and explained some additional things.
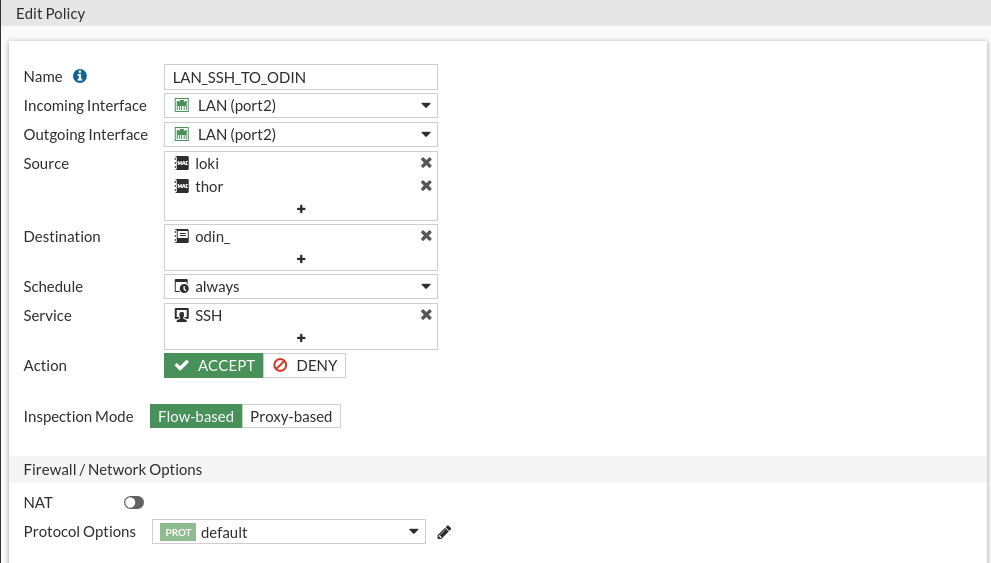
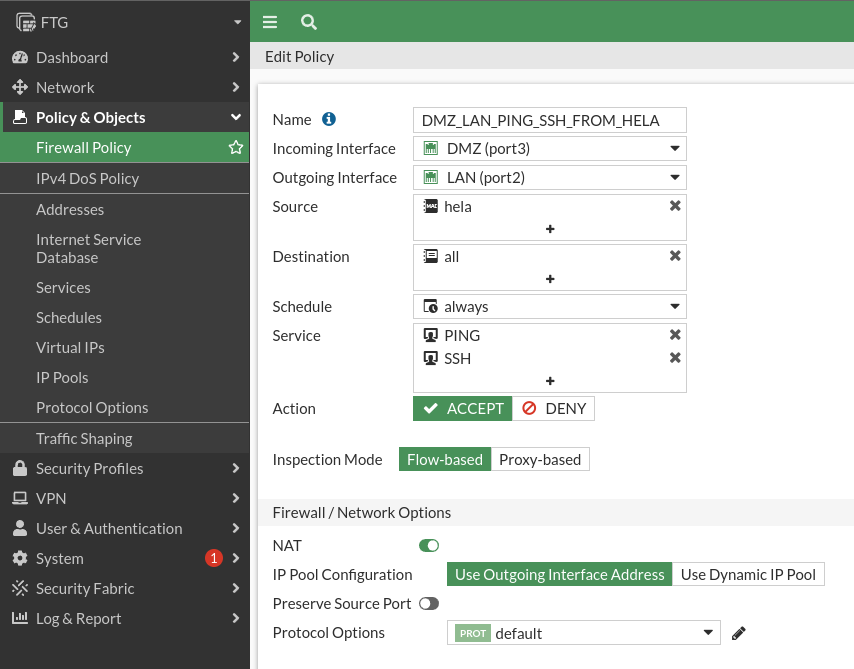
From Thor and Hela you should allow the ssh connection by port 22 to the Odin machine.
This rule cannot be realized because by having a switch by interconnecting the devices, the traffic does not pass through the firewall so we cannot apply rules in the firewall to prevent local traffic.
You see, even if he believes the rule, in the firewall, this one will not be immutated:
You see that for example if I connect from loki or thor I can get to odin:
debian@loki:~$ ssh osboxes@192.168.100.2
osboxes@192.168.100.2's password:
Welcome to Ubuntu 22.04 LTS (GNU/Linux 5.15.0-25-generic x86_64)

 * Documentation:  https://help.ubuntu.com
 * Management:     https://landscape.canonical.com
 * Support:        https://ubuntu.com/advantage

560 updates can be applied immediately.
339 of these updates are standard security updates.
To see these additional updates run: apt list --upgradable

Last login: Fri Mar 29 11:42:43 2024 from 192.168.100.3
osboxes@odin:~$
But I don’t get it by the rule I’ve created if not by the topology of the network itself, the rule has no hits:

The whole traffic is in charge of redirecting the swicht.
The Odin machine can be ping from the DMZ, but from the LAN the connection (REJECT) must be rejected and from the outside will be rejected silently.
To allow the DMZ network to do ping to Odin we will create the following rule:
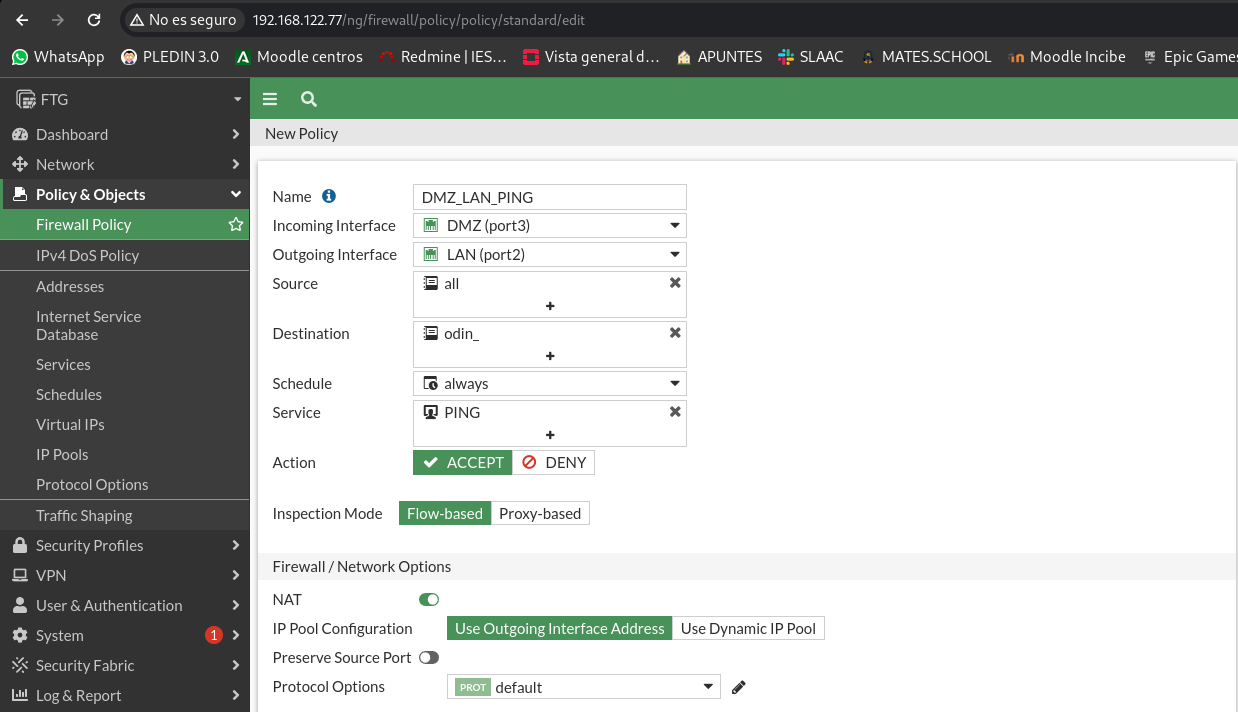
Let’s check that from the DMZ we can do the ping to Odin:
debian@hela:~$ ping 192.168.100.2 -c 1
PING 192.168.100.2 (192.168.100.2) 56(84) bytes of data.
64 bytes from 192.168.100.2: icmp_seq=1 ttl=63 time=2.38 ms

--- 192.168.100.2 ping statistics ---
1 packets transmitted, 1 received, 0% packet loss, time 0ms
rtt min/avg/max/mdev = 2.379/2.379/2.379/0.000 ms
As we see the rule is working, so let’s check the hits:

For the same reason as in the previous exercise, from the LAN network we cannot limit the ping to Odin as it does not pass through the firewall but through the switch.
Something similar happened to us from the WAN, as it is a ping directed to the IP of the interface this is disabled from the configuration of the interface, it is always rejected silently but does not give choice to choose it:

Once removed
javiercruces@HPOMEN15:~$ ping 192.168.122.77 -c 1
PING 192.168.122.77 (192.168.122.77) 56(84) bytes of data.

--- 192.168.122.77 ping statistics ---
1 packets transmitted, 0 received, 100% packet loss, time 0ms
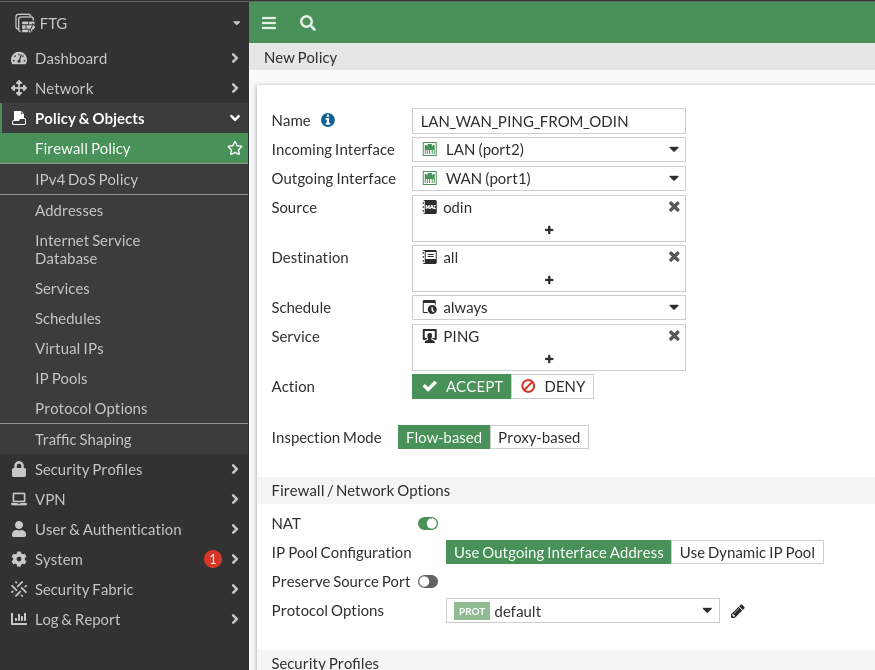
The Odin machine can do ping to the LAN, the DMZ and the outside.
The Odin machine by the topology itself can do ping to all the machines on the LAN as the traffic to this network passes through the swicht.
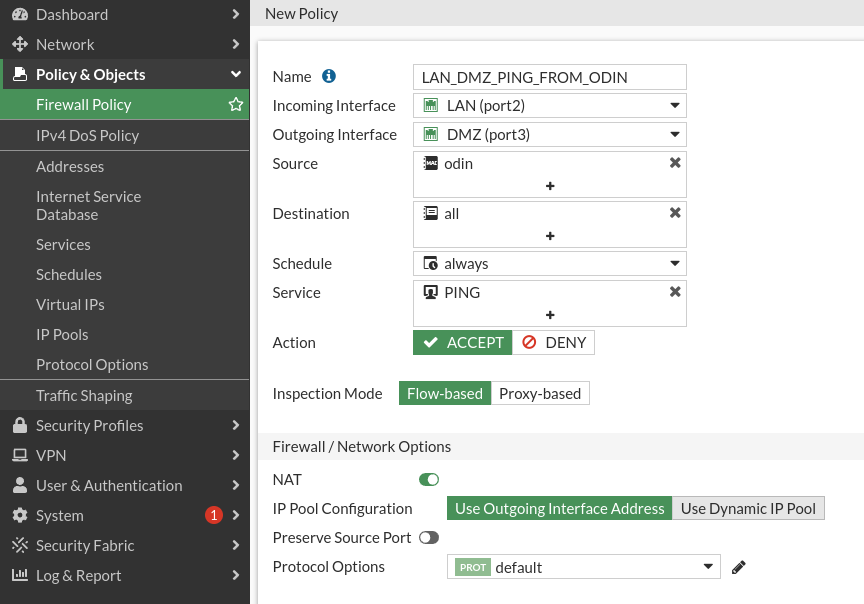
So that I can do ping to the DMZ and the WAN we’ll create two rules:
The rule for the WAN:
The rule for DMZ:
#LAN --> WAN
osboxes@odin:~$ ping 8.8.8.8 -c 1
PING 8.8.8.8 (8.8.8.8) 56(84) bytes of data.
64 bytes from 8.8.8.8: icmp_seq=1 ttl=114 time=10.1 ms

--- 8.8.8.8 ping statistics ---
1 packets transmitted, 1 received, 0% packet loss, time 0ms
rtt min/avg/max/mdev = 10.088/10.088/10.088/0.000 ms

#LAN --> DMZ
osboxes@odin:~$ ping 192.168.200.2 -c 1
PING 192.168.200.2 (192.168.200.2) 56(84) bytes of data.
64 bytes from 192.168.200.2: icmp_seq=1 ttl=63 time=0.804 ms

--- 192.168.200.2 ping statistics ---
1 packets transmitted, 1 received, 0% packet loss, time 0ms
rtt min/avg/max/mdev = 0.804/0.804/0.804/0.000 ms

#LAN --> LAN (No interviene el cortafuegos)
osboxes@odin:~$ ping 192.168.100.3 -c 1
PING 192.168.100.3 (192.168.100.3) 56(84) bytes of data.
64 bytes from 192.168.100.3: icmp_seq=1 ttl=64 time=0.503 ms

--- 192.168.100.3 ping statistics ---
1 packets transmitted, 1 received, 0% packet loss, time 0ms
rtt min/avg/max/mdev = 0.503/0.503/0.503/0.000 ms
Let’s check the hits of the two rules we just created:
From the Hela machine you can make ping and ssh connection to LAN machines.
To achieve this I will create the following rule. We could separate it into 2 separate rules to have the counters separately, but in this case it is not important to distinguish traffic.
We will check the rule, doing a ping to the different machines of the LAN network, since previously there was a rule to allow all pings to Odin:
#HELA --> ODIN
debian@hela:~$ ping 192.168.100.2 -c 1
PING 192.168.100.2 (192.168.100.2) 56(84) bytes of data.
64 bytes from 192.168.100.2: icmp_seq=1 ttl=63 time=1.10 ms

--- 192.168.100.2 ping statistics ---
1 packets transmitted, 1 received, 0% packet loss, time 0ms
rtt min/avg/max/mdev = 1.101/1.101/1.101/0.000 ms

#HELA --> LOKI
debian@hela:~$ ping 192.168.100.3 -c 1
PING 192.168.100.3 (192.168.100.3) 56(84) bytes of data.
64 bytes from 192.168.100.3: icmp_seq=1 ttl=63 time=1.73 ms

--- 192.168.100.3 ping statistics ---
1 packets transmitted, 1 received, 0% packet loss, time 0ms
rtt min/avg/max/mdev = 1.730/1.730/1.730/0.000 ms

#HELA --> THOR
debian@hela:~$ ping 192.168.100.4 -c 1
PING 192.168.100.4 (192.168.100.4) 56(84) bytes of data.
64 bytes from 192.168.100.4: icmp_seq=1 ttl=63 time=0.998 ms

--- 192.168.100.4 ping statistics ---
1 packets transmitted, 1 received, 0% packet loss, time 0ms
rtt min/avg/max/mdev = 0.998/0.998/0.998/0.000 ms
Now let’s check that we can connect by ssh from Hela to the LAN:
debian@hela:~$ ssh osboxes@192.168.100.2 'hostname -f'
osboxes@192.168.100.2's password:
odin.javiercd.gonzalonazareno.org

debian@hela:~$ ssh 192.168.100.3 'hostname -f'
debian@192.168.100.3's password:
loki.javiercd.gonzalonazareno.org

debian@hela:~$ ssh 192.168.100.4 'hostname -f'
debian@192.168.100.4's password:
thor.javiercd.gonzalonazareno.org
The rule works properly, let’s check that you’ve uploaded the hits:

From any LAN machine you can connect ssh to the hela machine.
For this we will create the following rule:
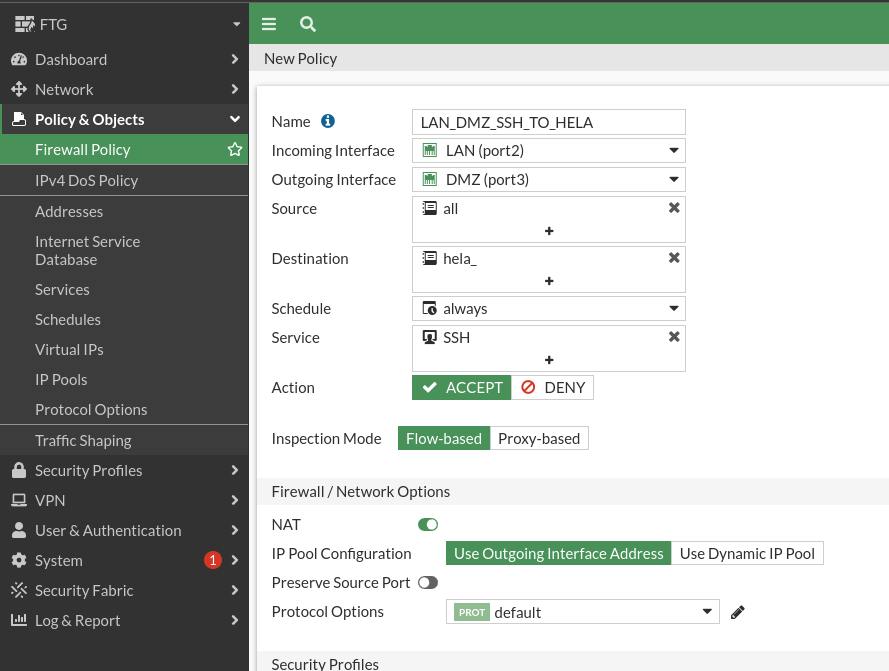
Now let’s check the rule we just created:
osboxes@odin:~$ ssh debian@192.168.200.2 'hostname -f'
debian@192.168.200.2's password:
hela.javiercd.gonzalonazareno.org

debian@loki:~$ ssh 192.168.200.2 'hostname -f'
debian@192.168.200.2's password:
hela.javiercd.gonzalonazareno.org

debian@thor:~$ ssh 192.168.200.2 'hostname -f'
debian@192.168.200.2's password:
hela.javiercd.gonzalonazareno.org
Let’s check that the rule hits have gone up:

Configure the Odin machine so that LAN and DMZ machines can access the outside.
The SNAT on this device can choose to activate it for each rule and not in general. If you have noticed throughout the practice all the rules that involve taking an interface jump I have marked the NAT box:
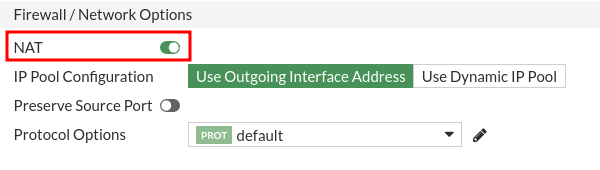
So this section is going to be done throughout practice as we create the rules.
LAN machines can do ping outside and navigate.
We’re gonna have to create 3 rules:
- Allow HTTP / HTTPS traffic
- Allow DNS queries
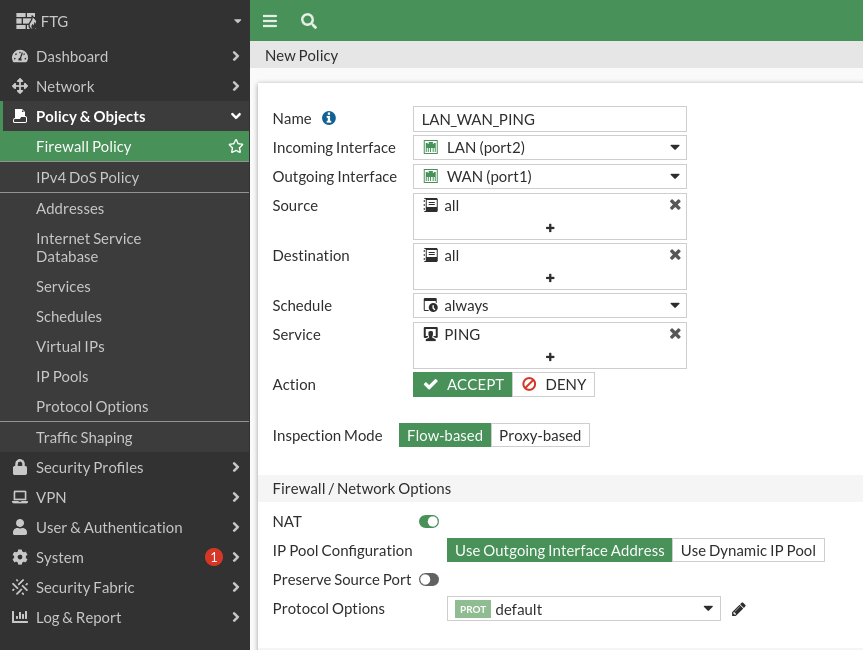
- Allow to do ping
Of these three rules the first two are previously created:

So we only have to add the ping rule, which would be the following:
Since I have a trial version I can have at most 10 entries, so I’m going to remove the one that just lets Odin go outside.
Let’s check the rules, from a LAN client:
osboxes@odin:~$ dig @8.8.8.8 www.javiercd.es

; <<>> DiG 9.18.1-1ubuntu1-Ubuntu <<>> @8.8.8.8 www.javiercd.es
; (1 server found)
;; global options: +cmd
;; Got answer:
;; ->>HEADER<<- opcode: QUERY, status: NOERROR, id: 25764
;; flags: qr rd ra; QUERY: 1, ANSWER: 5, AUTHORITY: 0, ADDITIONAL: 1

;; OPT PSEUDOSECTION:
; EDNS: version: 0, flags:; udp: 512
;; QUESTION SECTION:
;www.javiercd.es.		IN	A

;; ANSWER SECTION:
www.javiercd.es.	3600	IN	CNAME	javierasping.github.io.
javierasping.github.io.	3600	IN	A	185.199.108.153
javierasping.github.io.	3600	IN	A	185.199.109.153
javierasping.github.io.	3600	IN	A	185.199.110.153
javierasping.github.io.	3600	IN	A	185.199.111.153

;; Query time: 60 msec
;; SERVER: 8.8.8.8#53(8.8.8.8) (UDP)
;; WHEN: Fri Mar 29 13:44:50 EDT 2024
;; MSG SIZE  rcvd: 144

osboxes@odin:~$ ping -c 1 www.javiercd.es
PING javierasping.github.io (185.199.108.153) 56(84) bytes of data.
64 bytes from cdn-185-199-108-153.github.com (185.199.108.153): icmp_seq=1 ttl=55 time=11.1 ms

--- javierasping.github.io ping statistics ---
1 packets transmitted, 1 received, 0% packet loss, time 0ms
rtt min/avg/max/mdev = 11.111/11.111/11.111/0.000 ms

osboxes@odin:~$ curl -I  https://www.javiercd.es/
HTTP/2 200
server: GitHub.com
content-type: text/html; charset=utf-8
last-modified: Mon, 11 Mar 2024 23:21:37 GMT
access-control-allow-origin: *
strict-transport-security: max-age=31556952
etag: "65ef9201-6878"
expires: Fri, 29 Mar 2024 17:56:01 GMT
cache-control: max-age=600
x-proxy-cache: MISS
x-github-request-id: AE88:3308D5:438AA74:448F970:6606FE58
accept-ranges: bytes
date: Fri, 29 Mar 2024 17:46:01 GMT
via: 1.1 varnish
age: 0
x-served-by: cache-mad2200143-MAD
x-cache: MISS
x-cache-hits: 0
x-timer: S1711734362.862201,VS0,VE134
vary: Accept-Encoding
x-fastly-request-id: 16b6048f2b032ef4b4293c52f0ae36d19b0e0da0
content-length: 26744
So would our three rules, we’ll see that we have hits on them:

The hela machine can sail. Install a web server, a ftp server and a post server if you don’t have them yet.
To do this it is necessary to have allowed DNS and navigation. To this end, I have created the following rule:
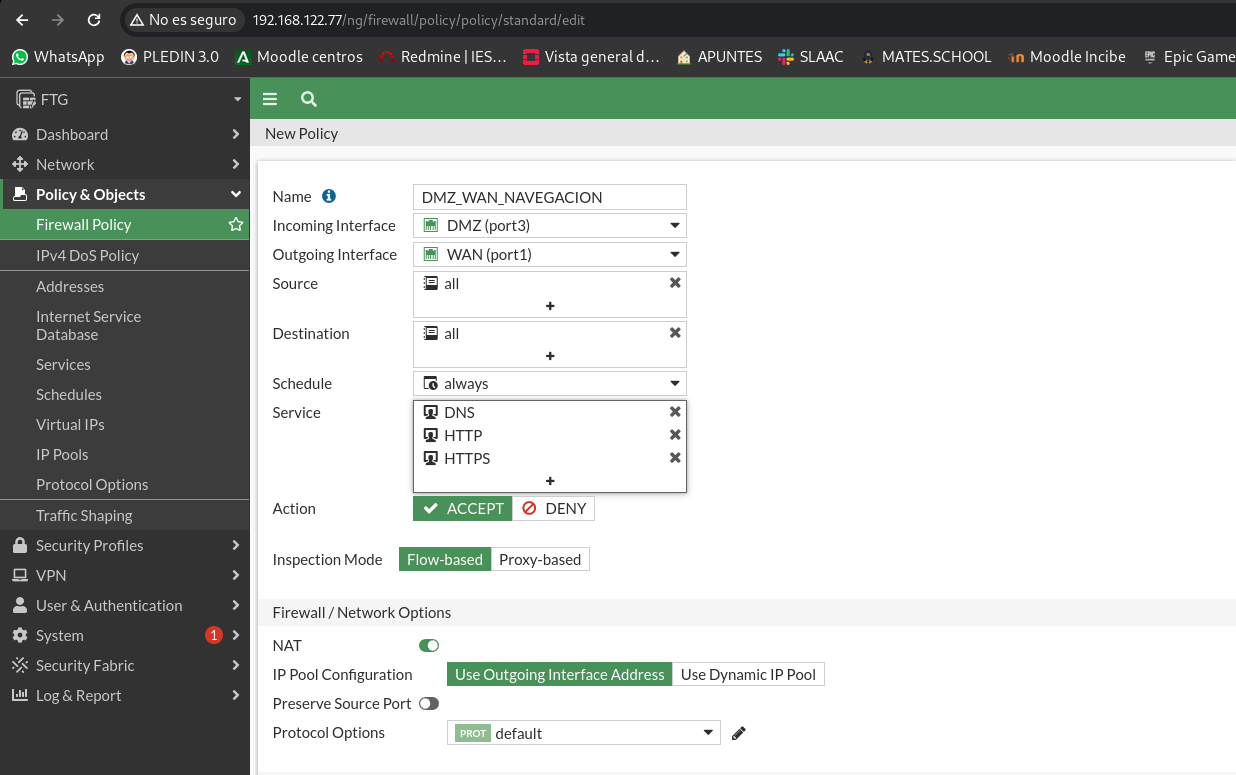
I have created it in a single rule to save on the number of them, I have deleted those that allowed ping from DMZ to LAN from previous exercises.
debian@hela:~$ sudo apt install proftpd postfix apache2 -y
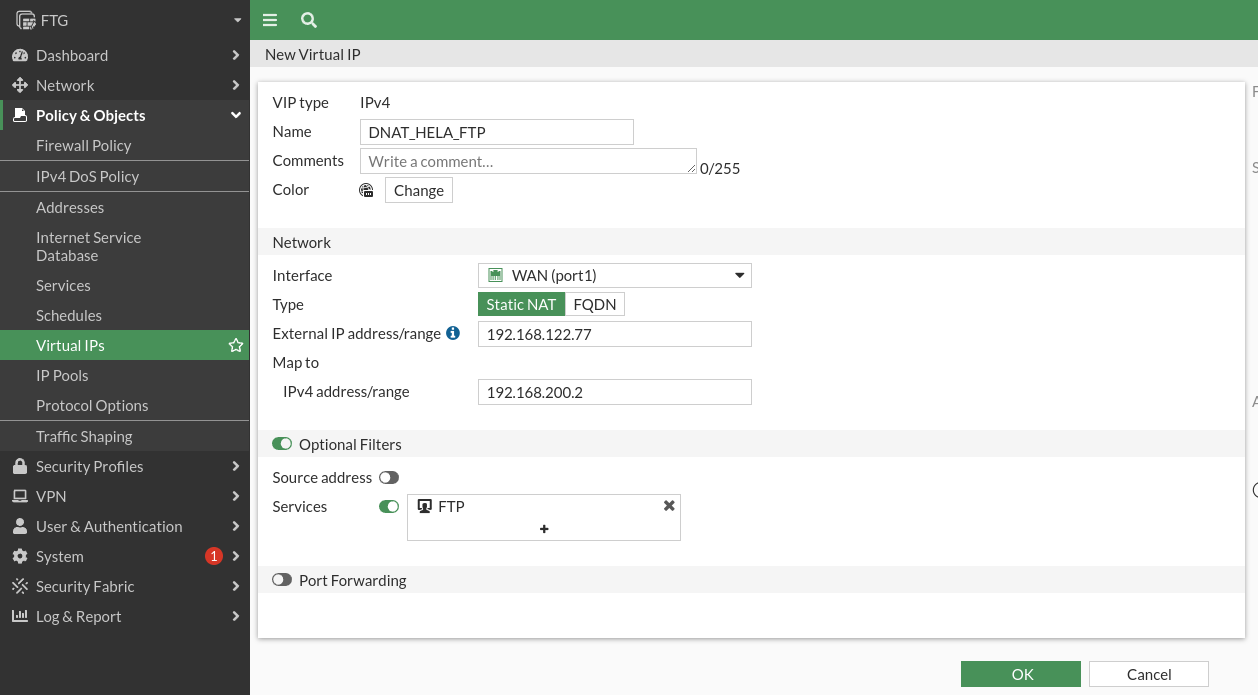
Configure the Odin machine to make web and ftp services accessible from the outside.
To do the DNAT we must create 2 virtual PIs, as we did in firewalls I.
One for every service we want to do a DNAT. For the web server:

And for the FTP server:
Now we are going to create the very DNAT rule for the web server, in which as a destination we indicate the virtual IP that we just created:
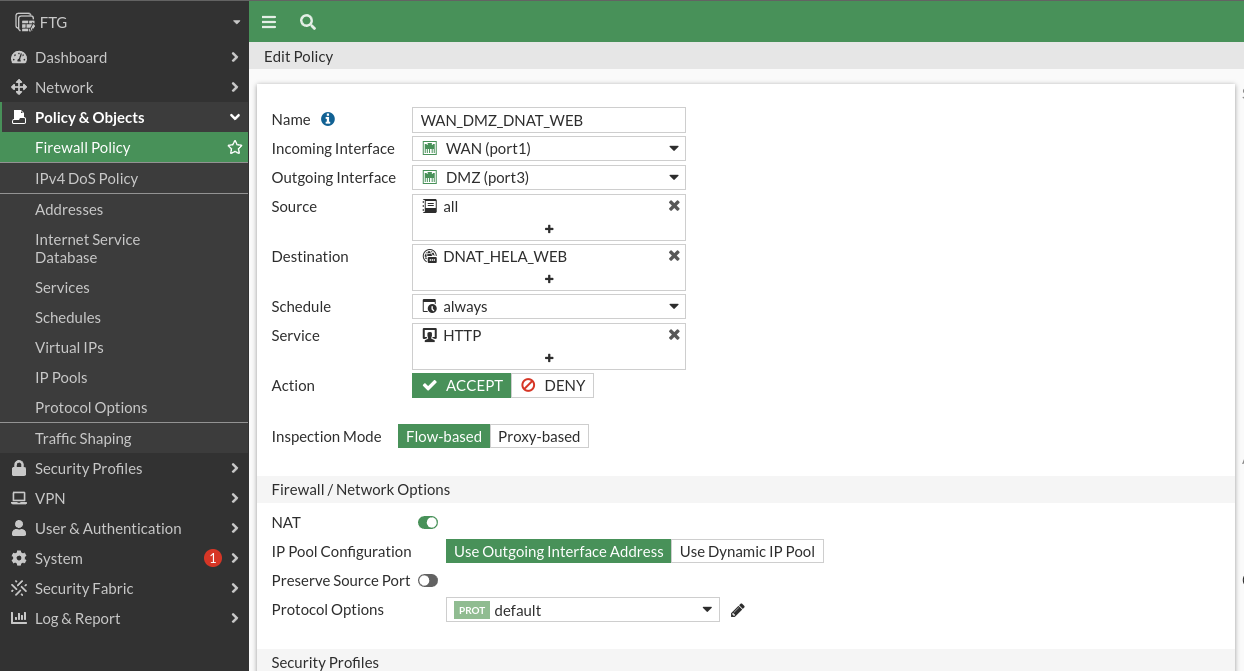
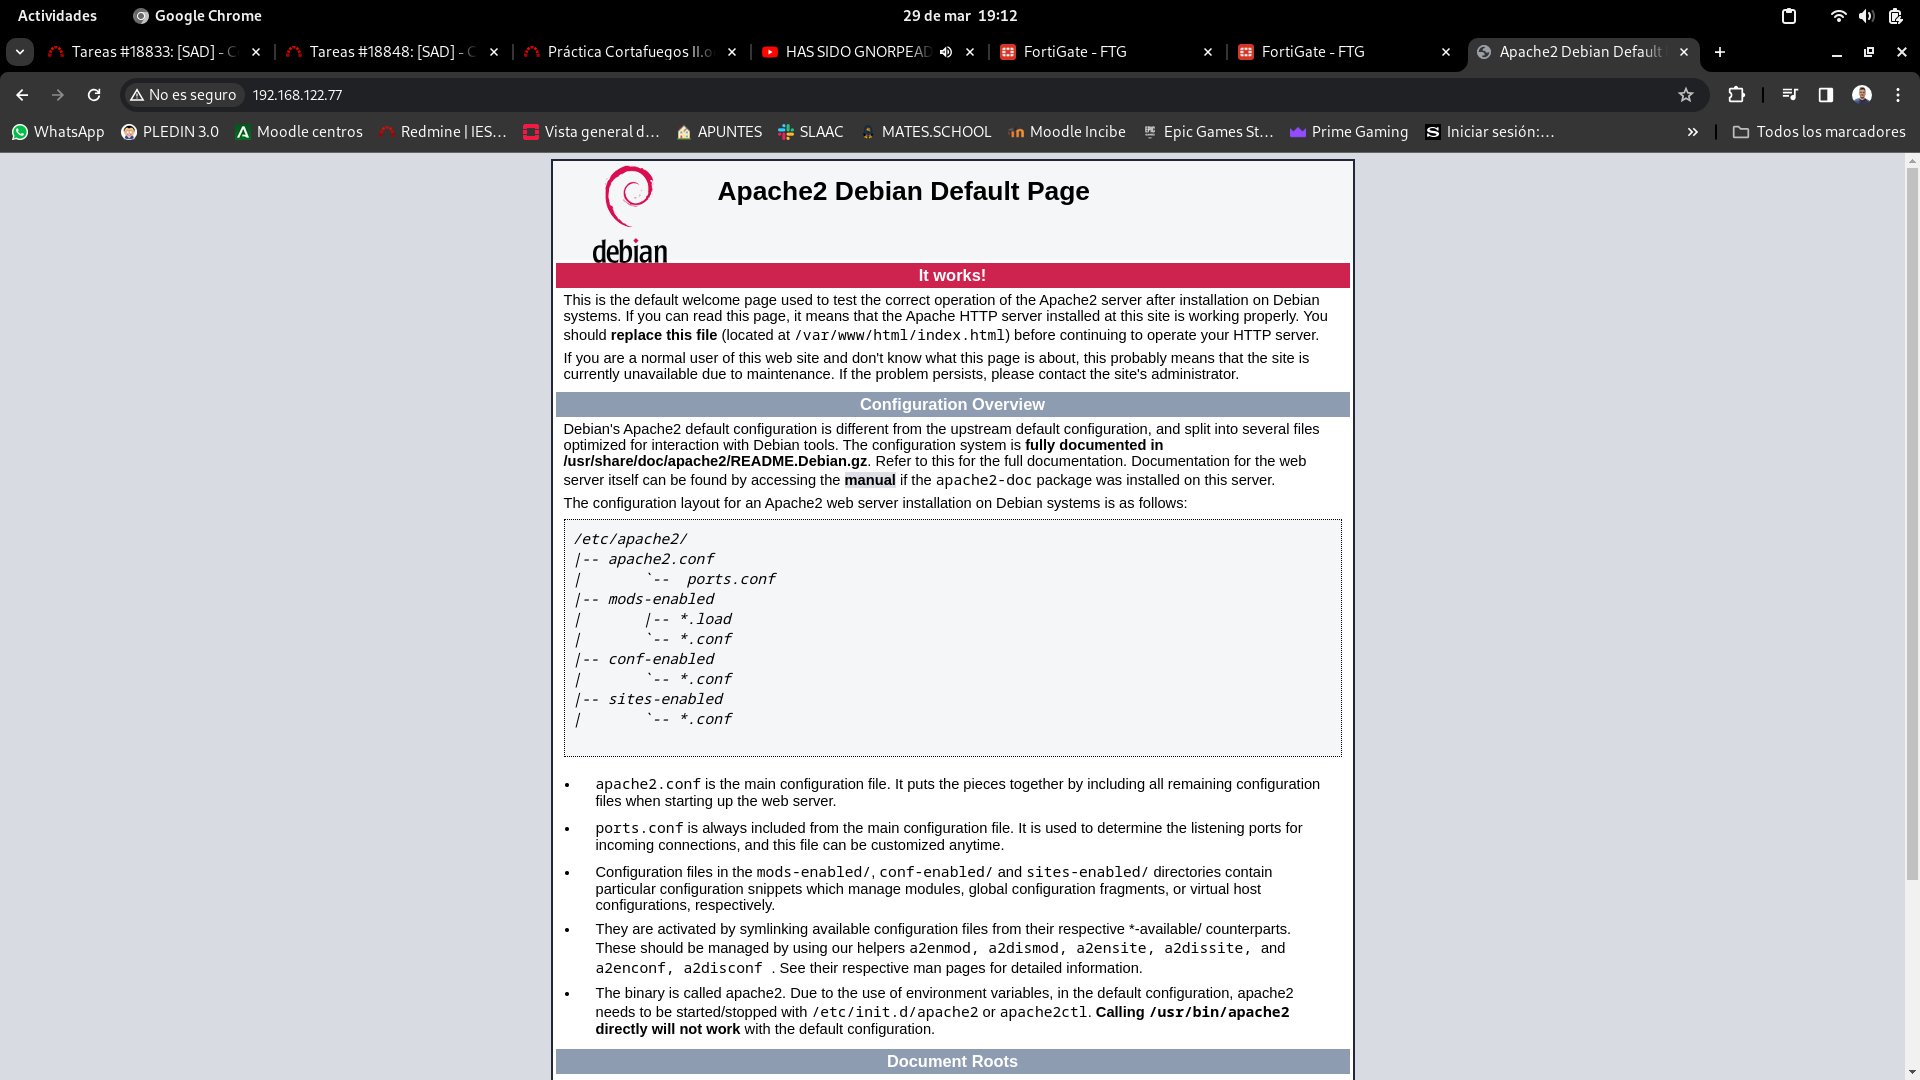
We will see that if we access the WAN firewall IP we will access the Hela Apache:
We will also create the DNAT rule for the FTP server:
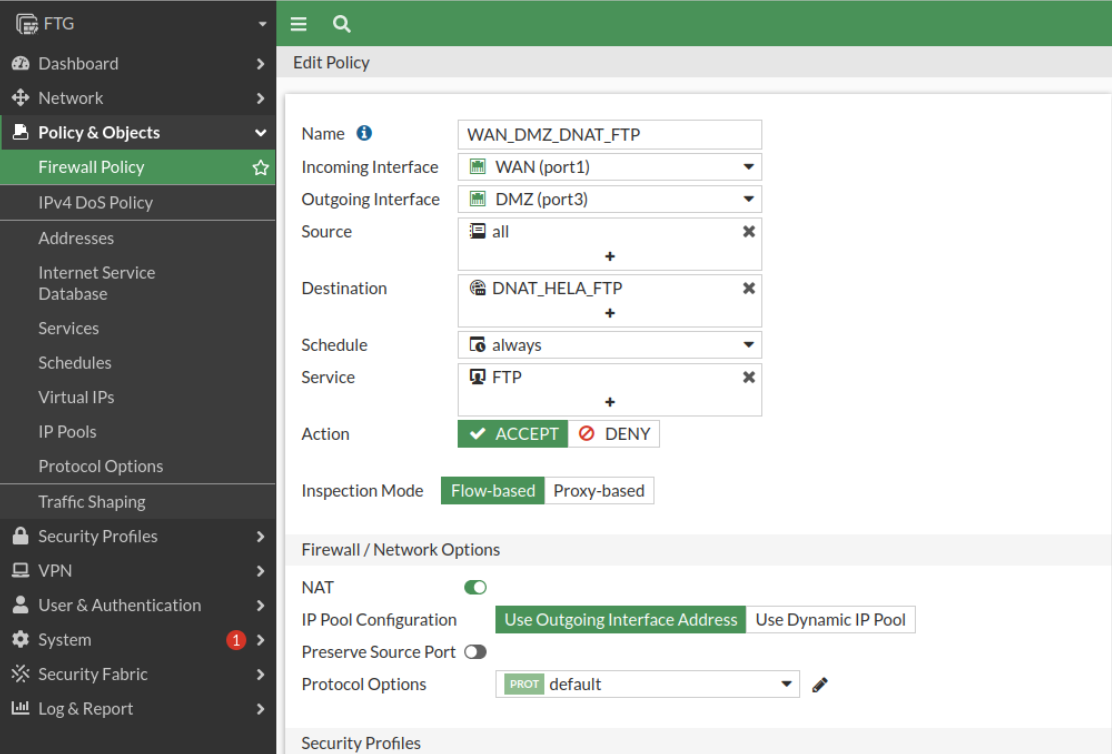
Let’s check access to the ftp server:
javiercruces@HPOMEN15:~$ ftp debian@192.168.122.77
Connected to 192.168.122.77.
220 ProFTPD Server (Debian) [::ffff:192.168.200.2]
331 Password required for debian
Password:
230 User debian logged in
Remote system type is UNIX.
Using binary mode to transfer files.
ftp>
If we check the rules’ hits, we’ll see that both of them have gone up:

The web server and the ftp server must be accessible from the LAN and from the outside.
To perform this exercise we will have to regenerate the 2 virtual IPs but now we will indicate the IP of the LAN card of the firewall.
For the DNAT of the web server:

We will repeat the same for the FTP service, changing the service:

We will now create the two DNAT rules to allow access from the LAN.
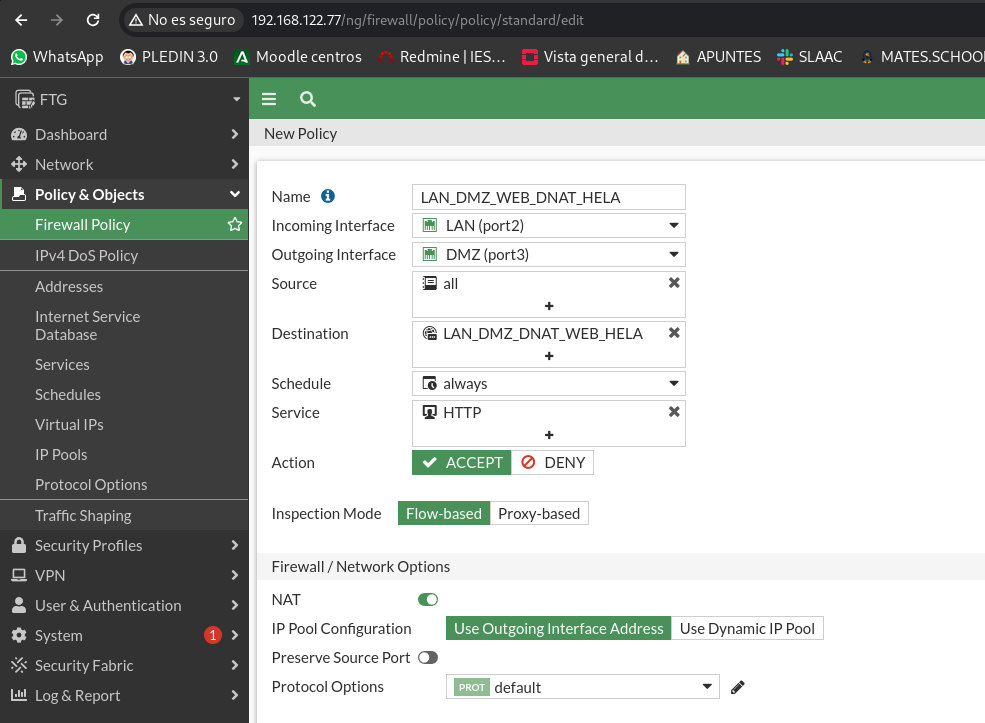
For the web server:
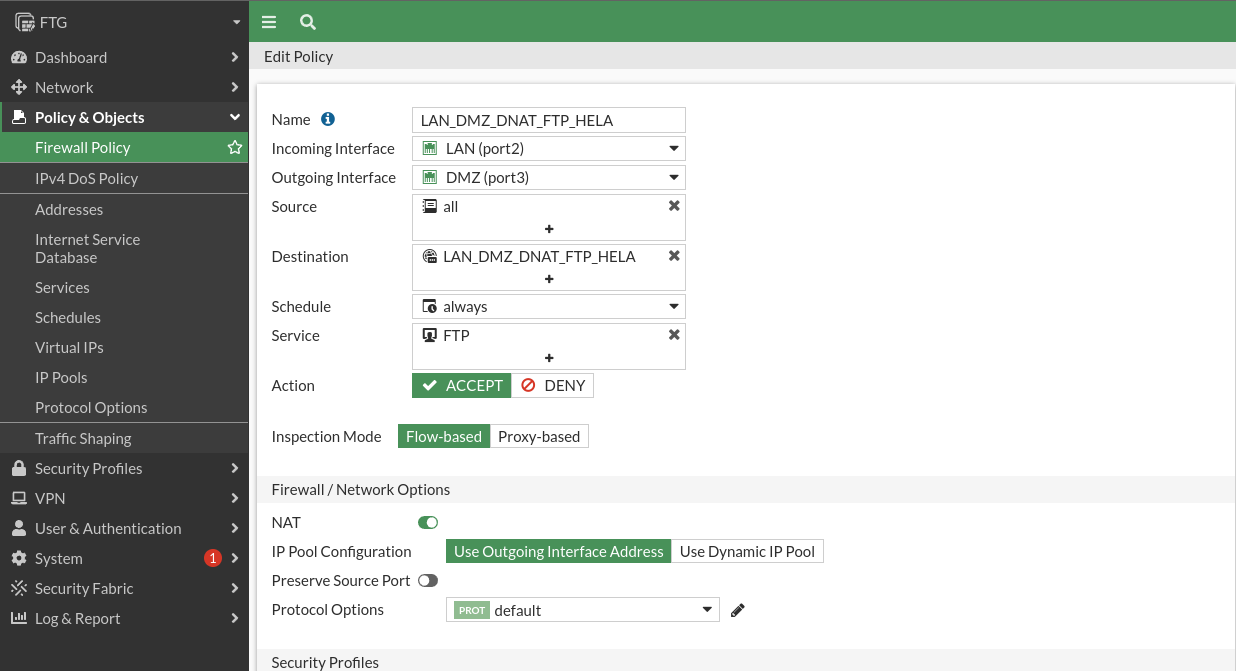
For the FTP server:
Let’s check that we can access both services:
osboxes@odin:~$ curl -I  http://192.168.100.1
HTTP/1.1 200 OK
Date: Fri, 29 Mar 2024 18:31:59 GMT
Server: Apache/2.4.57 (Debian)
Last-Modified: Fri, 29 Mar 2024 17:53:38 GMT
ETag: "29cd-614d051d4d640"
Accept-Ranges: bytes
Content-Length: 10701
Vary: Accept-Encoding
Content-Type: text/html

osboxes@odin:~$ ftp debian@192.168.100.1
Connected to 192.168.100.1.
220 ProFTPD Server (Debian) [::ffff:192.168.200.2]
331 Password required for debian
Password:
230 User debian logged in
Remote system type is UNIX.
Using binary mode to transfer files.
Let’s check that the hits are up in the rules:

The post server should only be accessible from the LAN.
We repeat the same steps, we will create a virtual IP to make the DNAT rule:
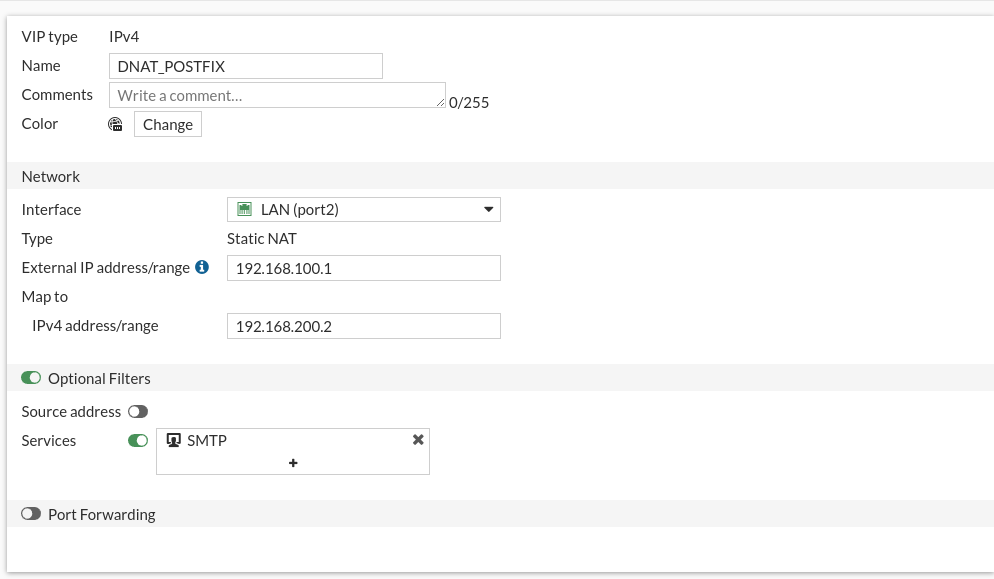
Now let’s create the DNAT rule:
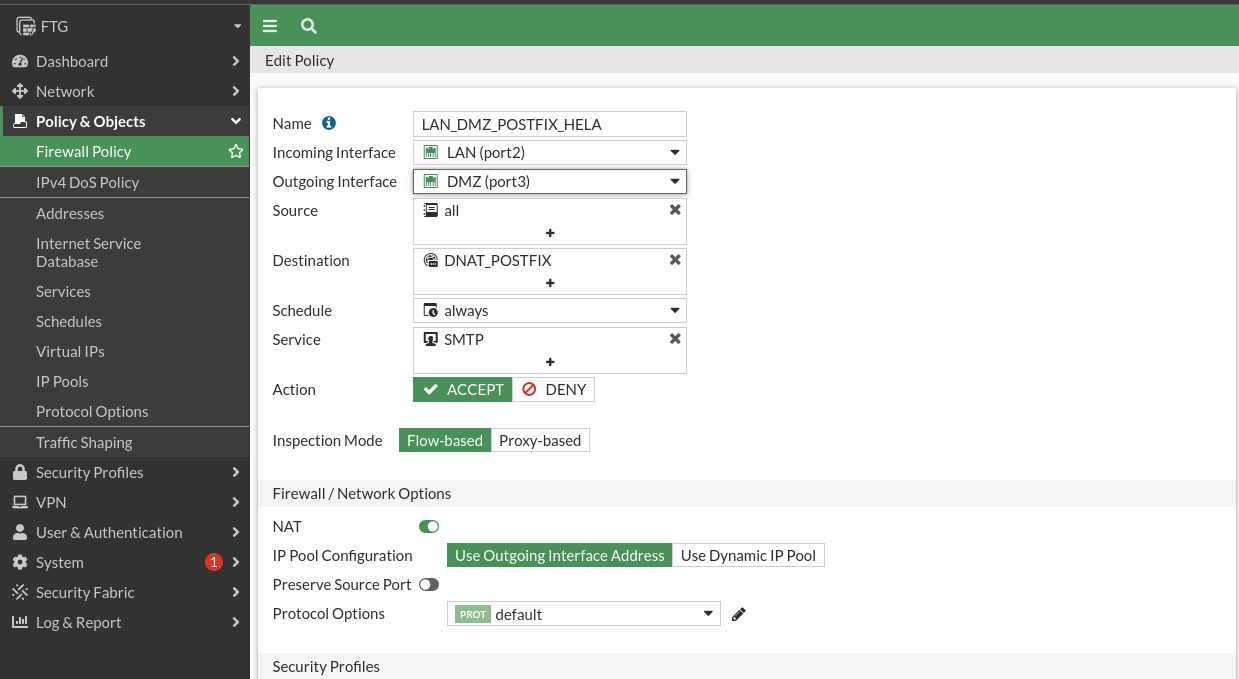
And we’ll check that from a LAN PC doing a telnet we get to the post server:
osboxes@odin:~$ telnet 192.168.100.1 25
Trying 192.168.100.1...
Connected to 192.168.100.1.
Escape character is '^]'.
220 hela.javiercd.gonzalonazareno.org ESMTP Postfix (Debian/GNU)
quit
221 2.0.0 Bye
Connection closed by foreign host.
We’ll see that the hit of the rule has gone up:

In the Loki machine you install a Postgres server if you don’t have it yet. This server can be accessed from the DMZ, but not from the outside.
We will repeat the process of creating a new virtual IP for this service. In addition in this case I have had to create the service as it did not exist.

Let’s create the DNAT rule:
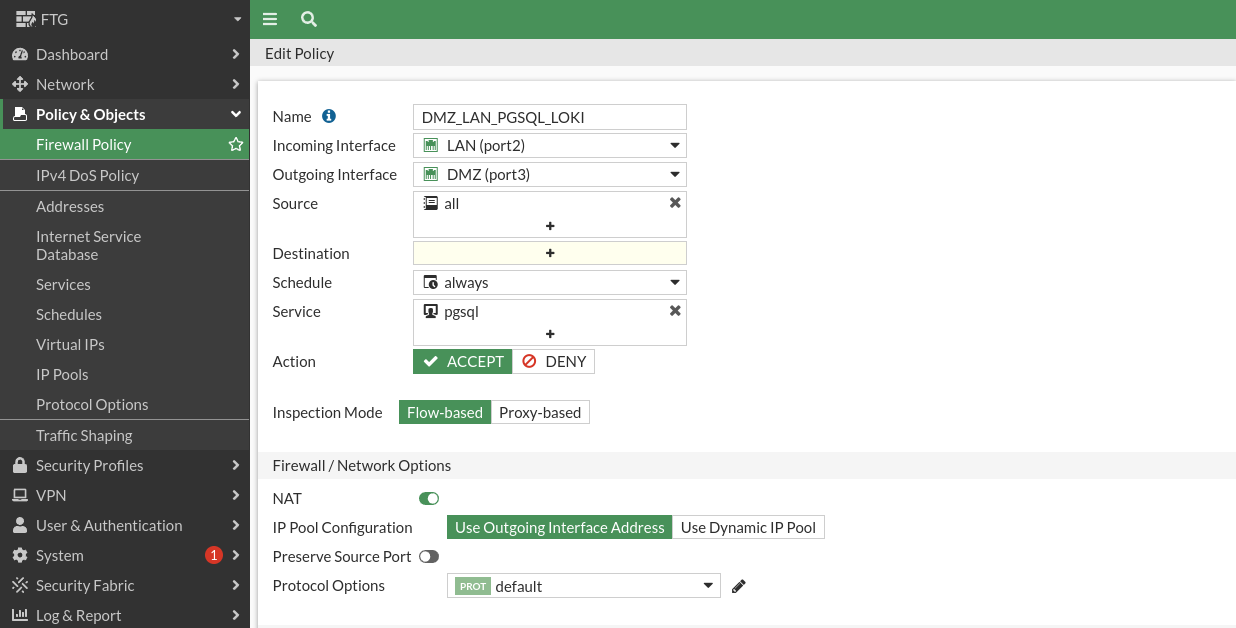
Let’s check that we have access to the pgsql server from the DMZ network:
debian@hela:~$ psql -h 192.168.200.1 -U postgres -W
Password:
psql (15.6 (Debian 15.6-0+deb12u1))
SSL connection (protocol: TLSv1.3, cipher: TLS_AES_256_GCM_SHA384, compression: off)
Type "help" for help.

postgres=# \q
We’ll check that the rule has hits:

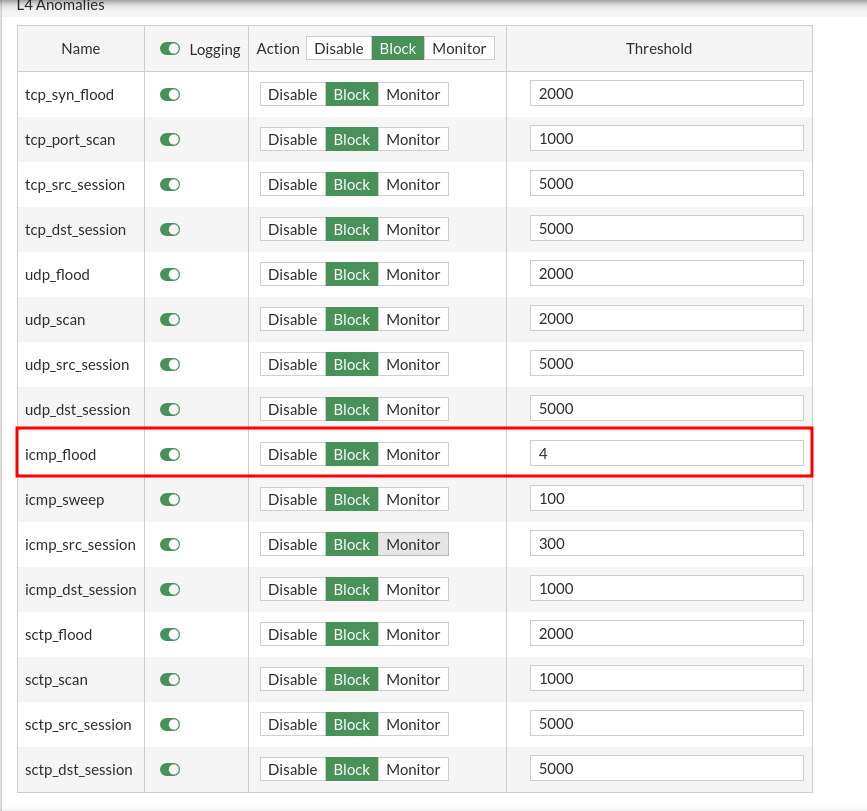
# Avoid DoS attacks by ICMP Flood, limiting the number of requests per second to 4 from the same IP.
Within the policy and object section, we find a section to create policies for DoS. In my case I have created one with the recommended values given by the manufacturer. And I’ve changed the ICMP Flood limit to 4 packages per second.
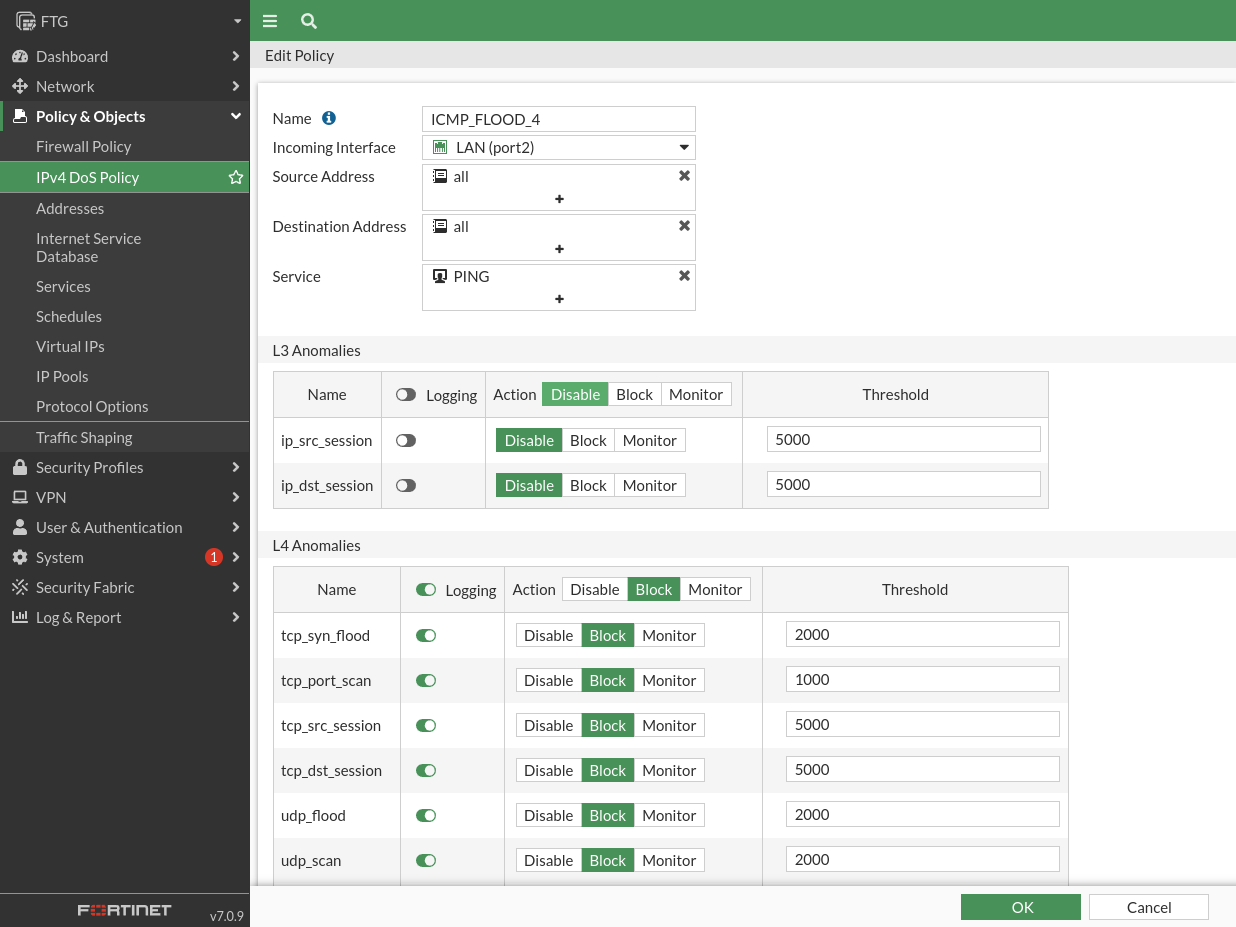
Let’s check that traffic blocks us if we get over that limit. With this command we are sending 3 packages per second that is less than the established limit so do not cut any packages:
debian@loki:~$ sudo hping3 --icmp  -i u333333 -V 192.168.100.1
--- 192.168.100.1 hping statistic ---
124 packets transmitted, 124 packets received, 0% packet loss
round-trip min/avg/max = 0.7/5.3/9.9 ms
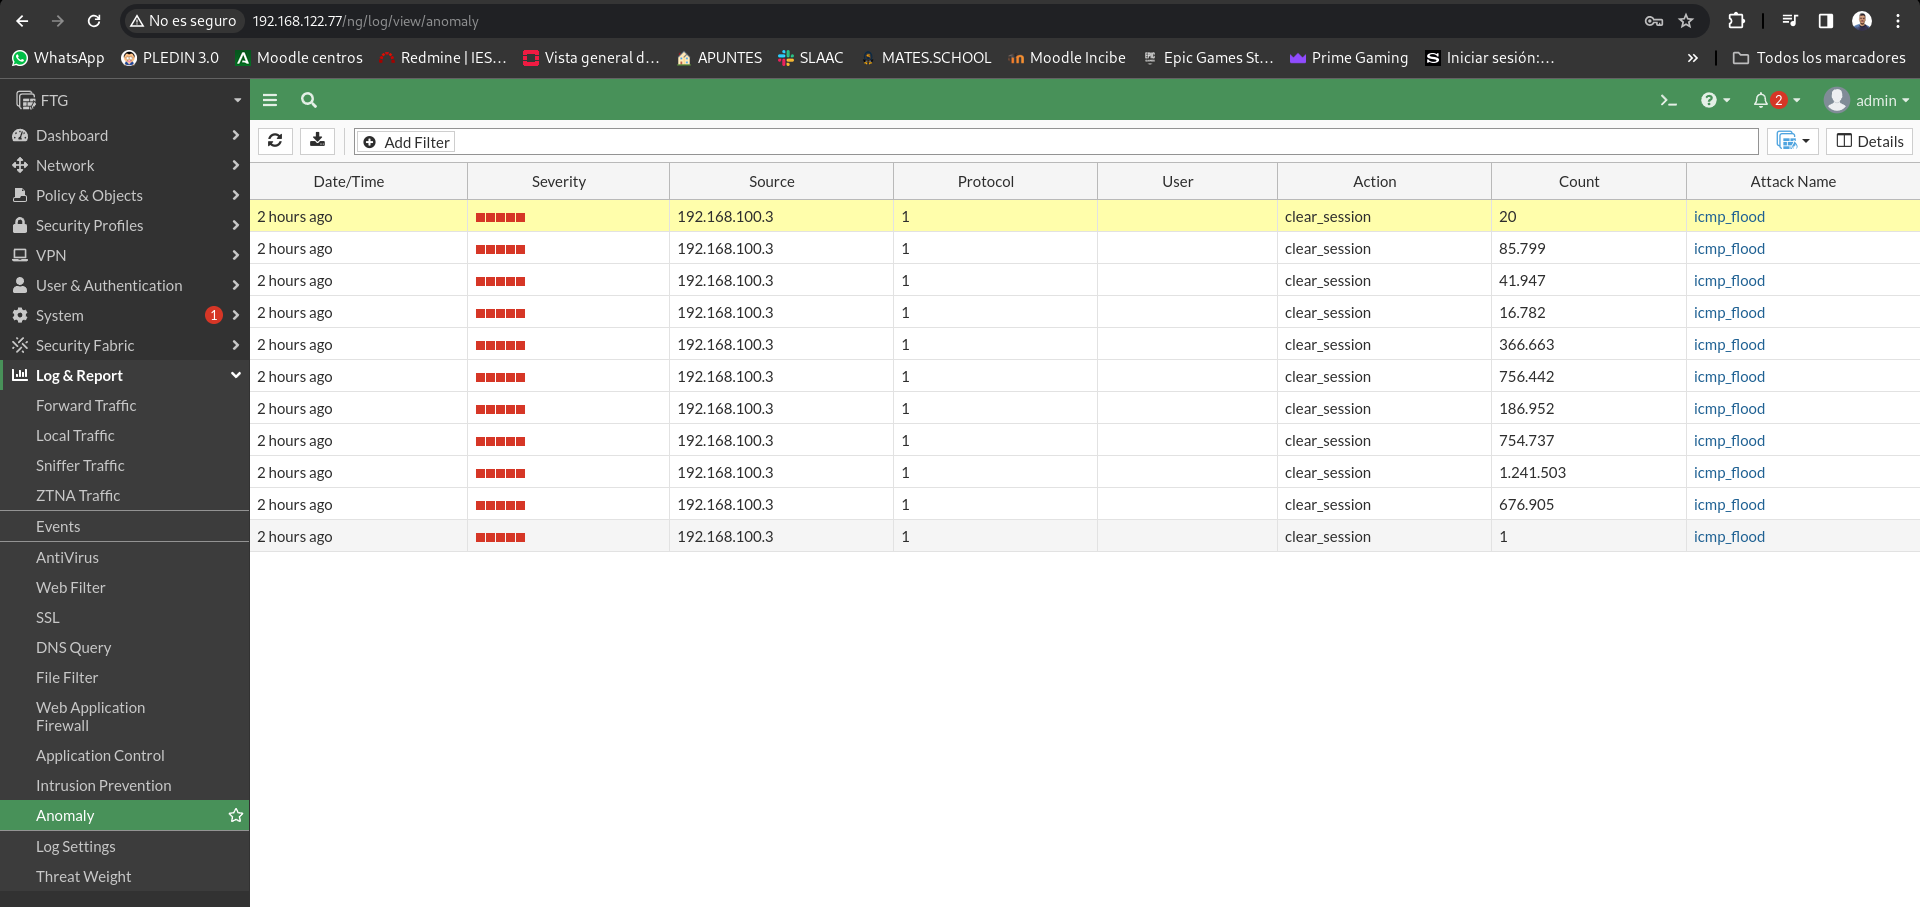
If we increase the packages per second, it will block all the packages that exceed 4 per second, so it will pass the first 4 of each second:
debian@loki:~$ sudo hping3 --icmp  -i u200000 -V 192.168.100.1
--- 192.168.100.1 hping statistic ---
44 packets transmitted, 10 packets received, 78% packet loss
round-trip min/avg/max = 4.6/5.5/6.5 ms
The firewall has recorded as an anomaly the traffic that has dropped:
Avoid DoS attacks by SYN Flood.
With the filter we have activated in the previous exercise we have limited TCP requests to 2000 per minute from the same IP to avoid this type of attack. We see that the filter eliminates malicious requests and does not allow the attack to have effect:
debian@loki:~$ sudo hping3 --flood --rand-source -V 192.168.100.1
using ens3, addr: 192.168.100.3, MTU: 1500
HPING 192.168.100.1 (ens3 192.168.100.1): NO FLAGS are set, 40 headers + 0 data bytes
hping in flood mode, no replies will be shown
^C
--- 192.168.100.1 hping statistic ---
930716 packets transmitted, 0 packets received, 100% packet loss
round-trip min/avg/max = 0.0/0.0/0.0 ms
It prevents them from doing port scans to Odin.
Instead of doing it to Odin by the topology itself, we’re going to do it to avoid scanning from the WAN.
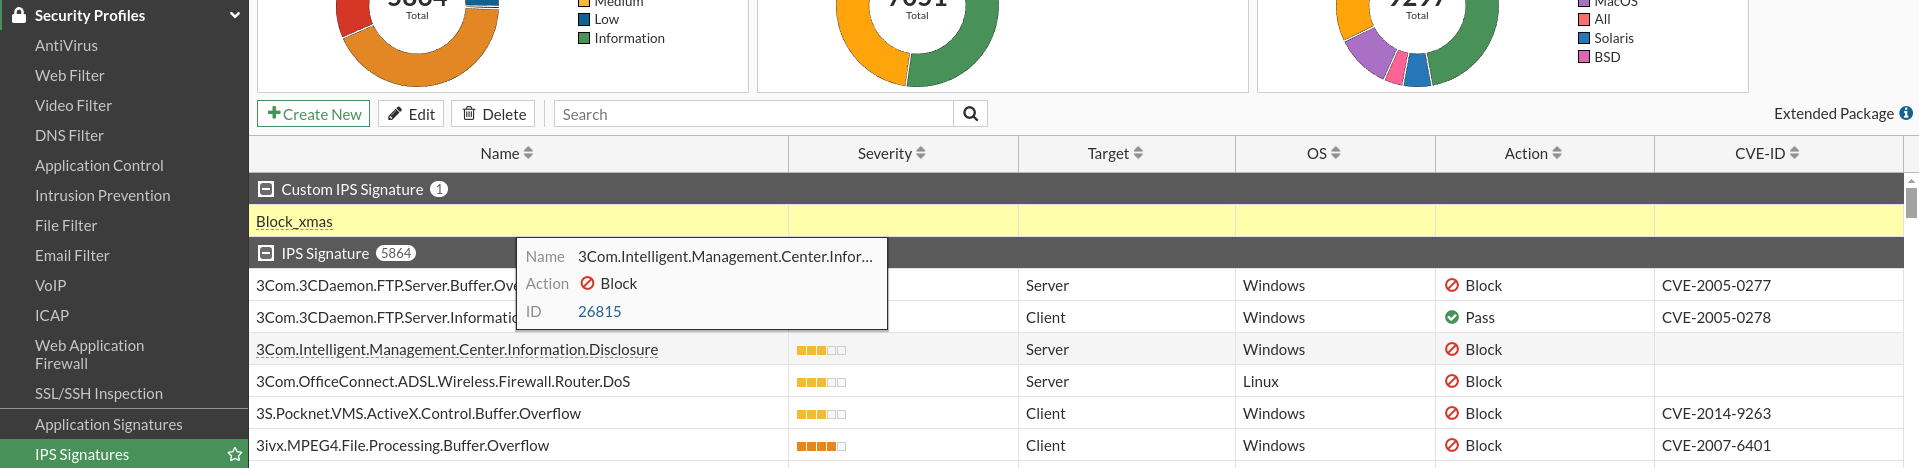
For this we open a terminal and what we are going to do is create a signature of IPS to avoid packages with a certain flag using a given scan. In this case we will avoid scanning NMAP XMAS.
FTG # config ips custom

FTG (custom) # edit "Block_xmas"
new entry 'Block_xmas' added

FTG (Block_xmas) # set signature "F-SBID(--name 'Block_xmas'; --protocol tcp; --flow from_client; --tcp_flags *FUP; )"

FTG (Block_xmas) # set action block

FTG (Block_xmas) #  end
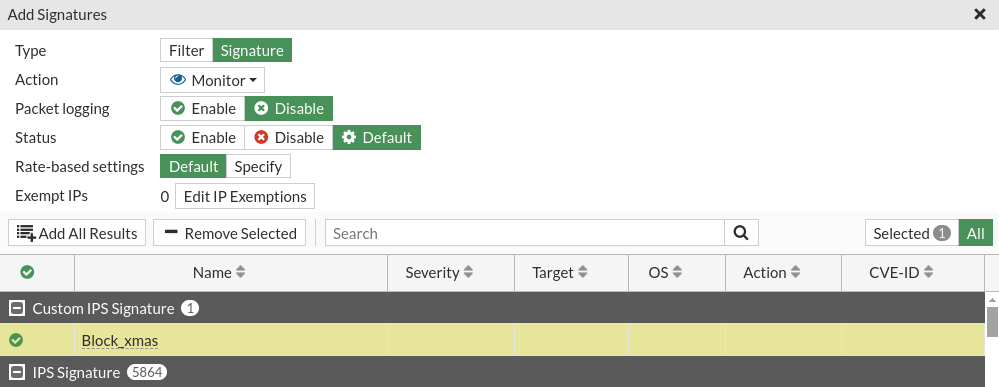
Once configured, we will see the rule that we have created in PIs signs:
Now we’re going to create an IPS rule to associate it with this signature policy:
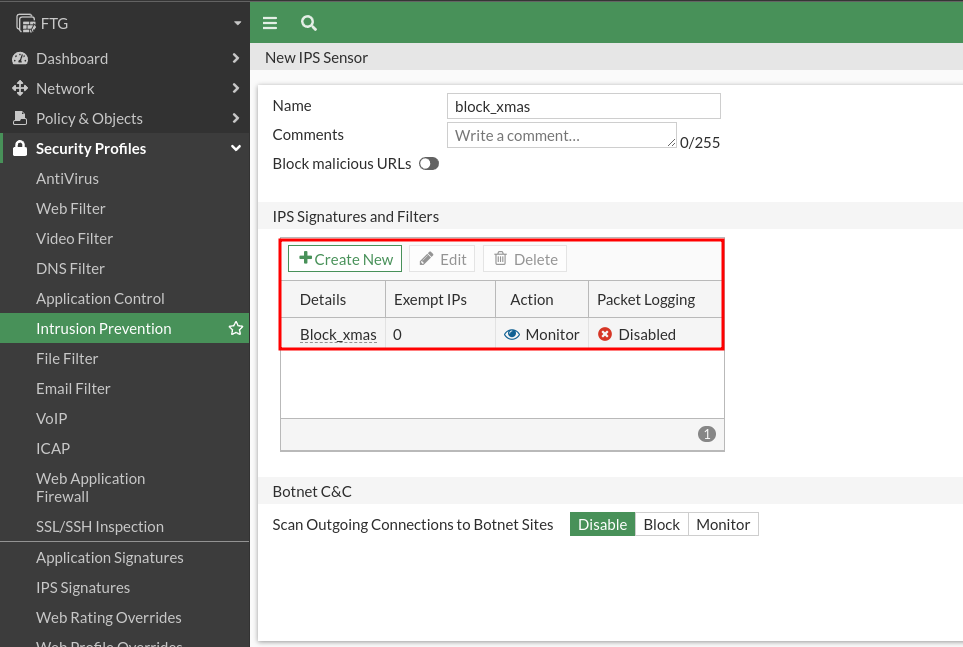
We will add in IPS signs and filters, the new filter we have created before:
Next in the DNAT rules where we want to control that do not know which ports we have open, we will assign the new IPS policy:
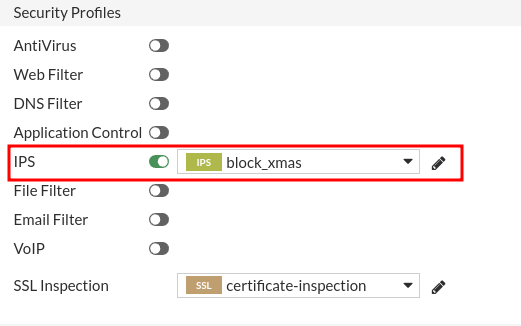
In my case we’re going to try it for the DNAT rule of ssh:

If I launch the NMAP from my host that is on the WAN network, we see that the 2222 port that this rule has open does not detect it:
javiercruces@HPOMEN15:~$ sudo nmap -sX 192.168.122.77
Starting Nmap 7.93 ( https://nmap.org ) at 2024-03-30 19:05 CET
Nmap scan report for 192.168.122.77
Host is up (0.00059s latency).
All 1000 scanned ports on 192.168.122.77 are in ignored states.
Not shown: 1000 open|filtered tcp ports (no-response)
MAC Address: 0C:18:45:93:00:00 (Unknown)

Nmap done: 1 IP address (1 host up) scanned in 21.28 seconds
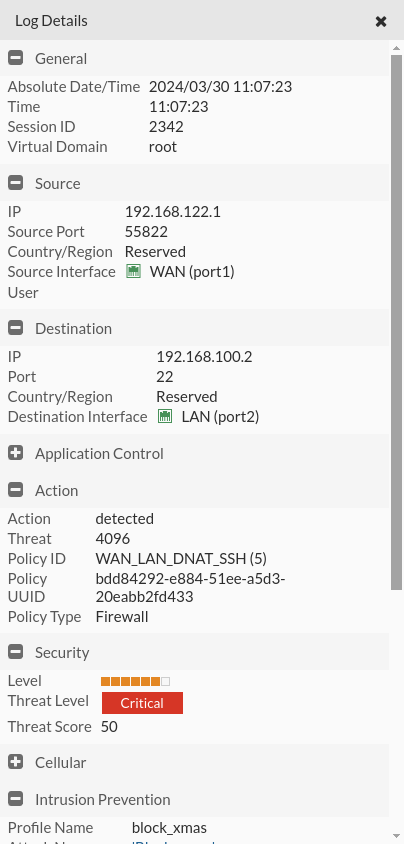
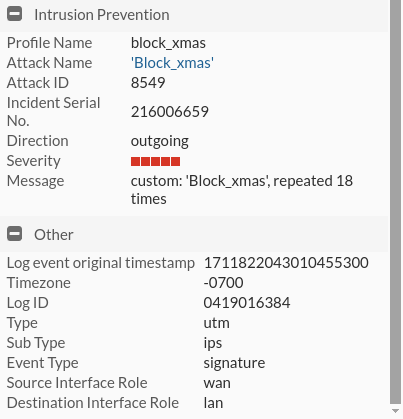
And the firewall itself will warn us that there has been a port scan that has blocked, to see this go to Log & Report > Intrusion prevention:

We can select it for more details: