Francisco Javier Cruces Doval
Sunday, September 1, 2024 | 9 minutes
Interconnection of database servers
This post addresses how to configure and manage connections between different databases, both homogeneous and heterogeneous, to facilitate interoperability between various database systems. Throughout the article, different connection scenarios are explored, starting with configurations between databases of the same type, such as Oracle to Oracle or PostgreSQL to PostgreSQL, and then moving towards heterogeneous connections between different technologies, such as Oracle to MySQL, PostgreSQL to Oracle, and vice versa. It also covers the steps needed to configure links, create users, and modify key configuration files, allowing remote consultations.
Homogeneous Connections
Oracle to Oracle
We will interconnect two Oracle databases, which we will call oracle1 and oracle2 to differentiate them throughout this practice.
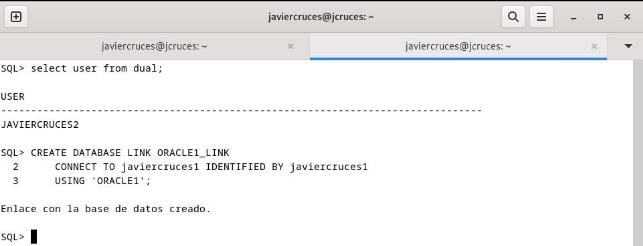
User Creation in Oracle1
First, we will create a user in Oracle1 who has permissions to connect to the database and to create database links:
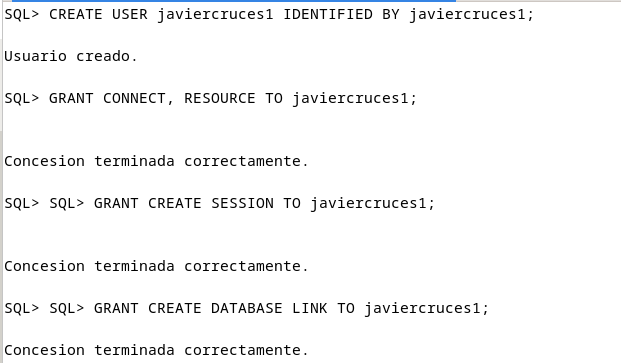
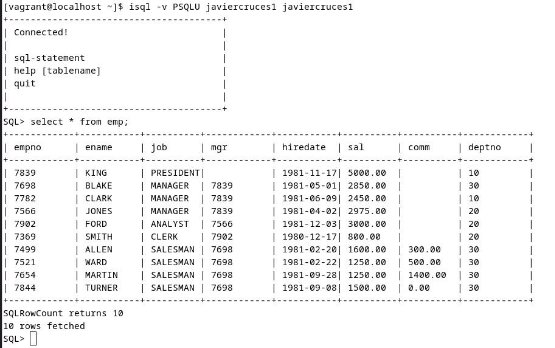
To verify that the user has been created correctly, disconnect from the current user and reconnect with the new user:

User Creation in Oracle2
Repeat the steps made in Oracle1 to create a user in Oracle2 with appropriate permissions to remotely connect and create database links:
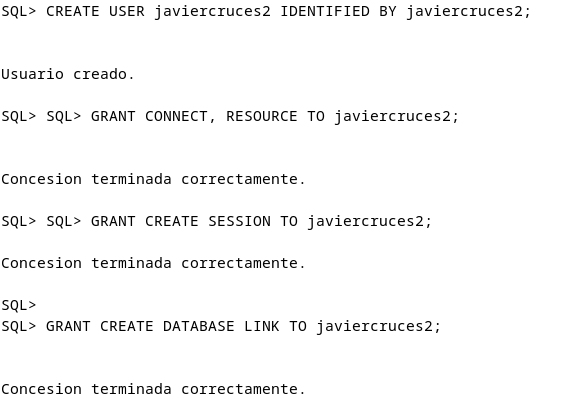
Verify the connection to the new user created:

Configuration of listener.ora and tnsnames.ora Files in ORACLE1
To ensure interconnection, we must configure the files listener.ora and tnsnames.ora. This will allow ORACLE1 to listen to the connections and recognize the location of ORACLE2.
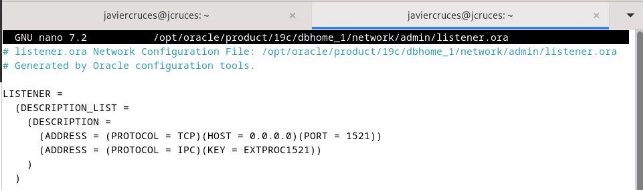
Listener.ora Configuration
Edit the listener.ora file so that ORACLE1 can listen to connections on the network:
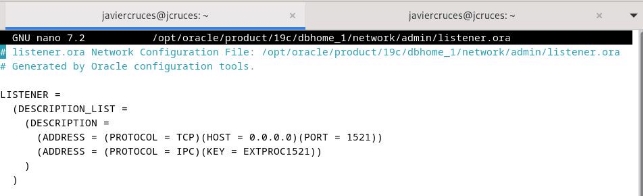
Note: Although it is recommended to allow connections only from specific IPs, in this test environment we have enabled general access. This file also defines the port used by Oracle.
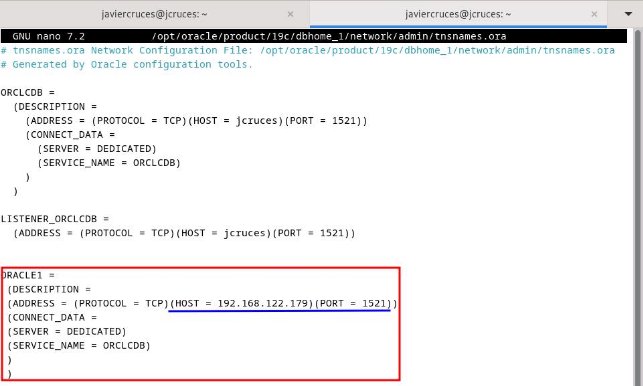
Tnsnames.ora Configuration
We will now set the file tnsnames.ora so that ORACLE1 knows where ORACLE2 is:
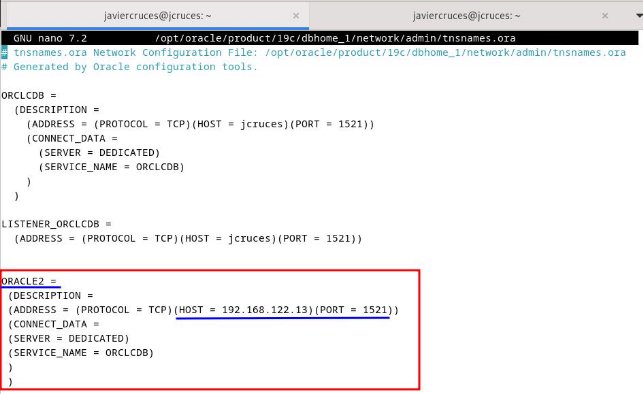
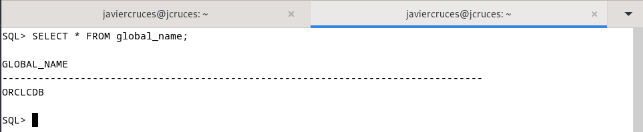
In this example, ORACLE2 is configured under IP 192.168.122.13 and listens on port 1521. It is also important to know the name of the remote service. If you don’t know it, you can run the following command on ORACLE2:
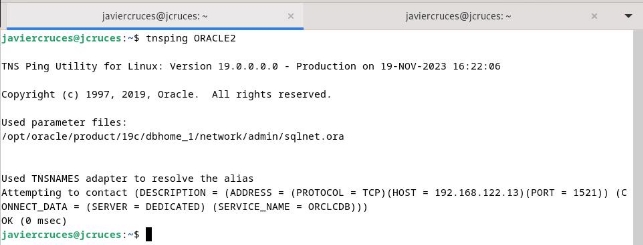
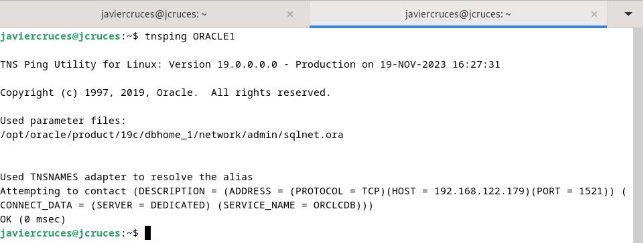
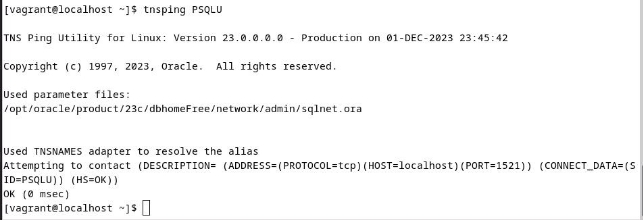
Connectivity Verification
To confirm that ORACLE1 can communicate with ORACLE2, we will use the tnsping tool with the configured alias:
Remember! If you did not set the
listener.oraon the remote server (ORACLE2), this test will fail.
Configuration of listener.ora and tnsnames.ora Files in ORACLE2
We will now repeat the same steps in ORACLE2 so that it can communicate with ORACLE1.
Listener.ora Configuration
Edit the listener.ora file so that ORACLE2 listens to incoming connections:
In this case, we have configured ORACLE2 to listen on any IP, using port 1521, as in ORACLE1.
Tnsnames.ora Configuration
Edit the tnsnames.ora file to define an alias that allows ORACLE2 to communicate with ORACLE1:
Connectivity Verification
Use the tnsping tool in ORACLE2 with the alias set for ORACLE1:
If the output is successful, it means that ORACLE2 can communicate with ORACLE1.
Remember! If you did not set the
listener.oraon the remote server (ORACLE1), this test will fail.
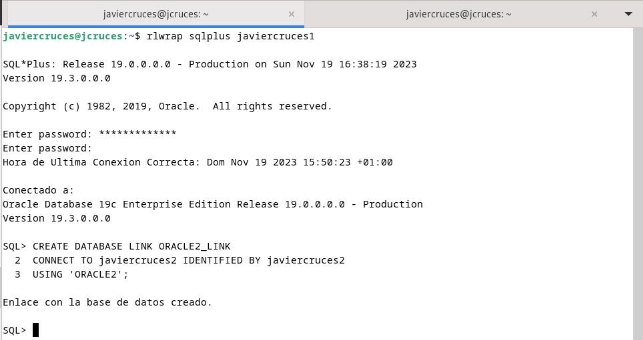
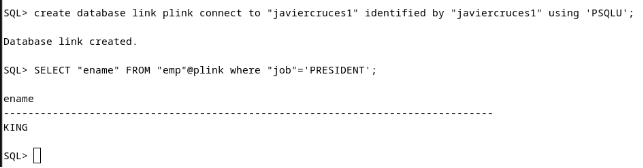
Creation of the Link from ORACLE1 to ORACLE2
At this stage, we will establish a link from ORACLE1 to ORACLE2. We will use a user with link creation privileges, such as javiercruces1, which was created earlier.
The link will receive a name, in this case, ORACLE2_LINK. We will specify that we will use the remote user credentials javiercruces2 and the connection defined in the file tnsnames.ora for ORACLE2.
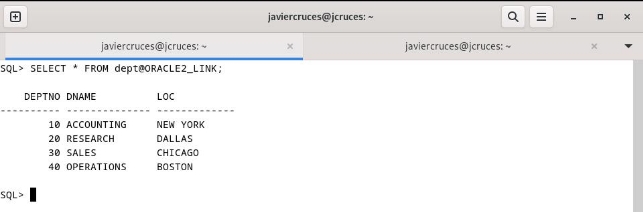
Link Verification
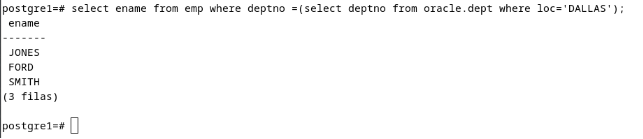
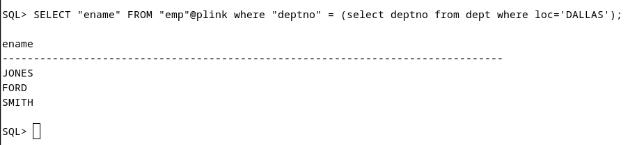
To verify, we will create the dept table in ORACLE2 and consult from ORACLE1:
Creation of the Link from ORACLE2 to ORACLE1
We will now set the link in the opposite direction, from ORACLE2 to ORACLE1. We will follow the same procedure.
With the user javiercruces2, we will create a link called ORACLE1_LINK. This link will use the remote user credentials javiercruces1 and the connection defined in the tnsnames.ora file for ORACLE1:
Link Verification
We will conduct a simple consultation using the newly created link:

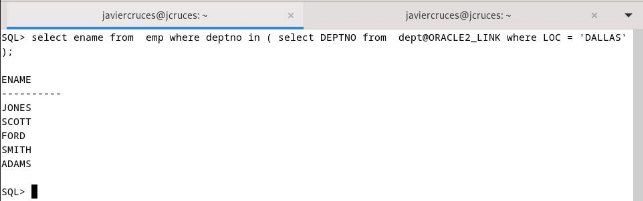
Simultaneous Consultations between ORACLE1 and ORACLE2
Now, we will check that it is possible to consult using both databases simultaneously from ORACLE1:
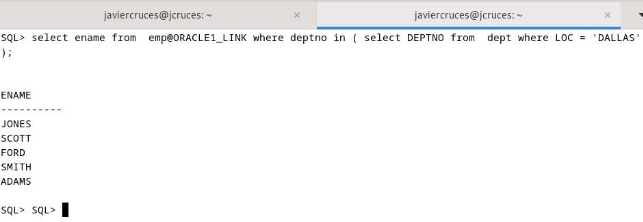
This same consultation can also be made from ORACLE2:
PostgreSQL to PostgreSQL
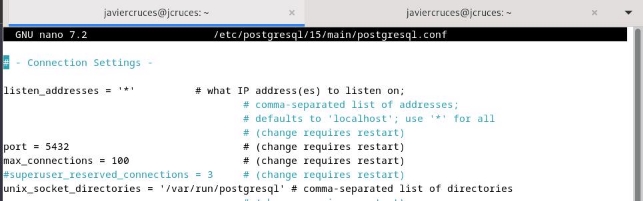
To allow interconnection, it is essential to configure both machines to listen to requests. This is achieved by defining the IPs and ports in the configuration file located in /etc/postgresql/15/main/postgresql.conf:
In addition, it is necessary to set up the networks from which connections will be accepted. This is done in the file pg_hba.conf:

After making these changes, we will restart the PostgreSQL service to apply them:

As in the previous section, we will use the Scott table schema, placing a table in each database for “remote” consultations.
Interconnect PostgreSQL1 to PostgreSQL2
To interconnect the databases, we will use dblink, a module that allows for consultations and operations distributed between PostgreSQL databases. This is achieved by establishing direct connections between them.
User Creation and Database in PostgreSQL1
First, we create the users and database in PostgreSQL1:

Enable dblink Extension
We will activate the dblink extension in PostgreSQL1:

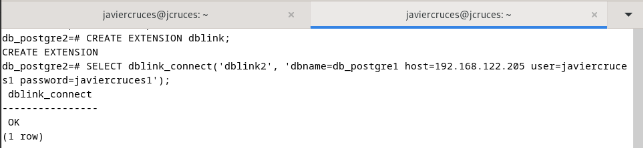
Creation of the Connection to PostgreSQL2
We will use the dblink module to establish a connection to PostgreSQL2:

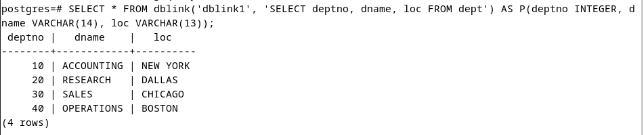
Conduct Consultations Using dblink
Once the connection is created, we can conduct remote consultations from PostgreSQL1:
Note: It is a bit tedious to define the fields for each remote consultation, which may make it difficult to use in more complex consultations.
Interconnect PostgreSQL2 to PostgreSQL1
User Creation and Database in PostgreSQL2
We will create the users and database in PostgreSQL2 following a process similar to that in PostgreSQL1:

Enable dblink Extension and Create Connection to PostgreSQL1
We will activate the dblink extension and configure the connection to PostgreSQL1:
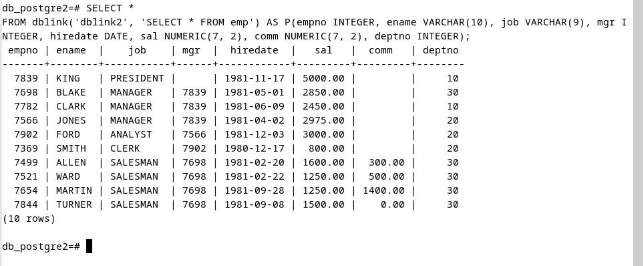
Conduct Consultations Towards PostgreSQL1
Now, we can consult from PostgreSQL2 to PostgreSQL1:
Simultaneous Consultations between PostgreSQL1 and PostgreSQL2
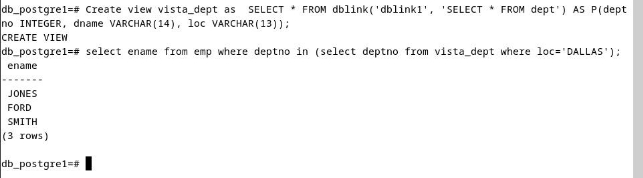
To simplify remote consultations between the two databases, we can create views. This avoids the need to manually define the type of each field in the consultations:
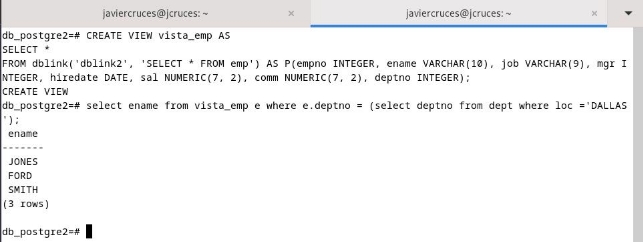
The same consultation can be made from PostgreSQL1 to PostgreSQL2:
Heterogeneous Connections
Oracle to MySQL
ODBC Driver Installation for MySQL
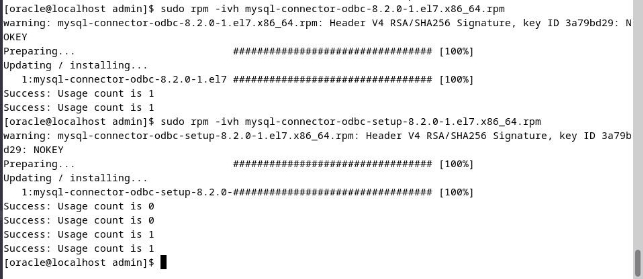
First, we download the ODBC driver for MySQL along with the necessary dependencies:

We access the official MySQL page to download the drivers and proceed to their installation:
Configuration of Heterogeneous Services in Oracle
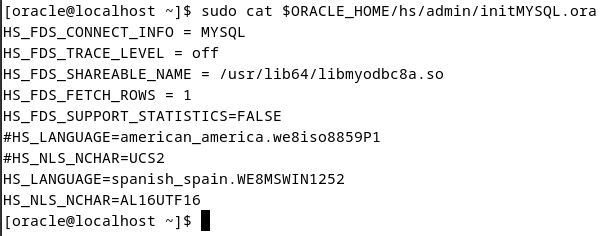
We access the hs/admin directory within our Oracle installation:

We edit the initMYSQL.ora file with the following content to configure Heterogeneous Services:
ODBC Configuration for MySQL
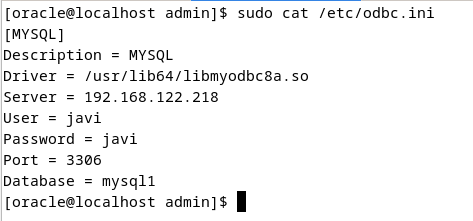
We set ODBC for MySQL, making sure we include the right credentials to connect to the MySQL database:
Configuration of the Listener in Oracle
We update the listener configuration to include localhost and the Oracle listening port:
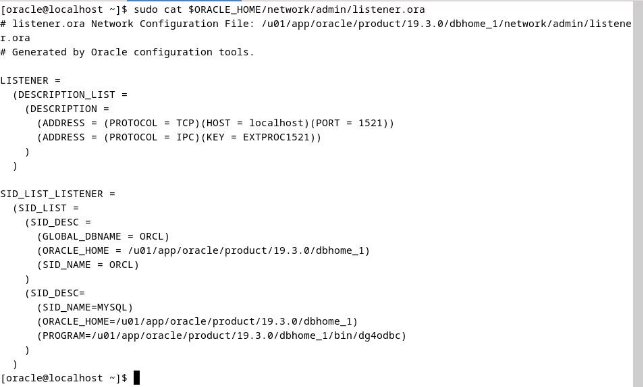
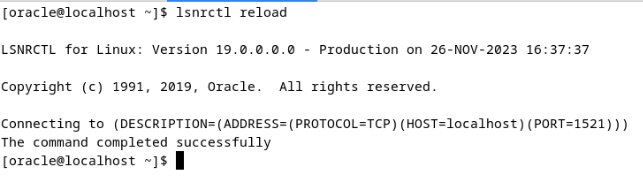
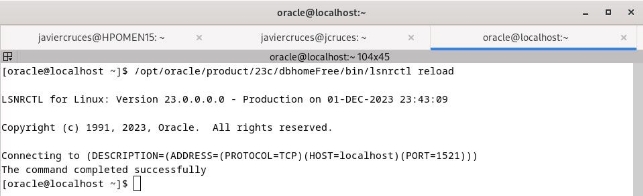
We restart the Oracle listener service to apply the changes:
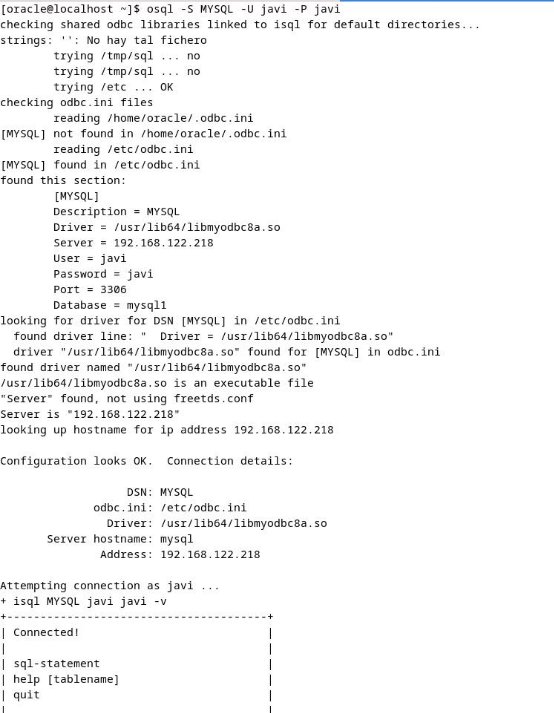
ODBC Driver Check
We check that the ODBC driver is working properly by connecting to the MySQL database. We can also use the isql driver to check the connection:
Creation of the Link between Oracle and MySQL
We created the link in Oracle to connect to the MySQL database:

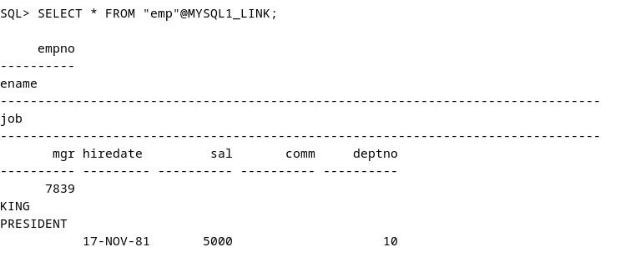
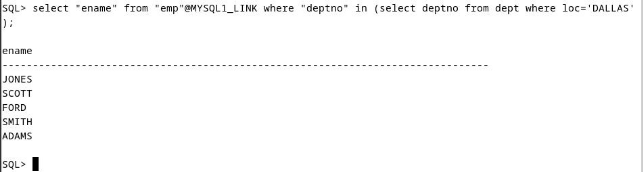
Conducting Consultations between Oracle and MySQL
We can make a simple consultation to the MySQL database:
It is also possible to consult using both databases simultaneously. It is important to lock in double quotes the names of MySQL fields and tables to be interpreted correctly:
MySQL to Oracle

Oracle to PostgreSQL
Note: A machine with Oracle Linux 8 and Oracle Database 23 was used for this section.
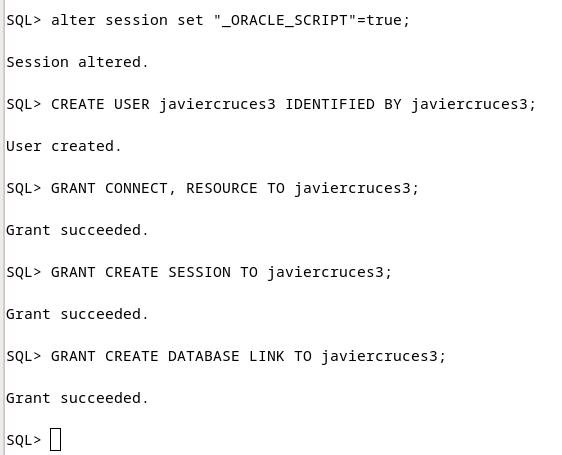
Previous Configuration in Oracle
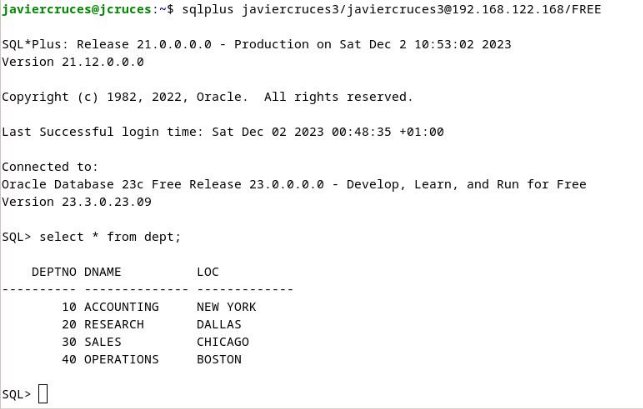
As an initial step, we created again a user and database in Oracle, assigning the appropriate permissions:
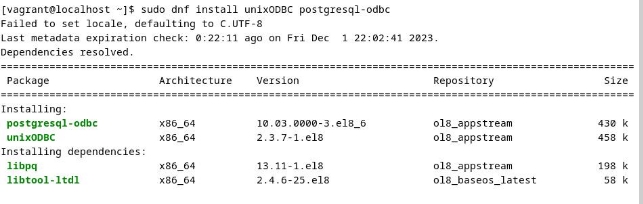
Driver Installation for PostgreSQL
We install the PostgreSQL driver using dnf. This command will also install the necessary libraries as dependencies:
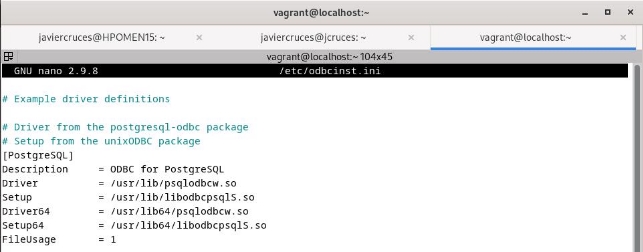
File Configuration odbcinst.ini
The /etc/odbcinst.ini file is used in Linux systems to configure ODBC drivers. We edit this file to register the PostgreSQL driver:
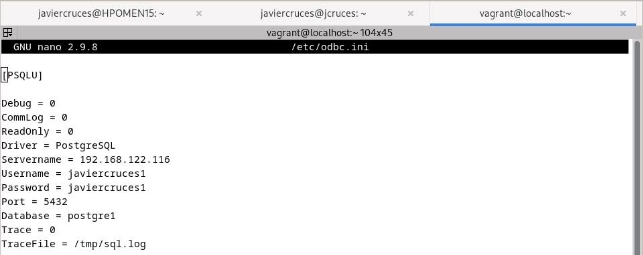
File Configuration odbc.ini
The /etc/odbc.ini file contains specific settings for each connection to a database. Here are the details of the connection to the PostgreSQL database:
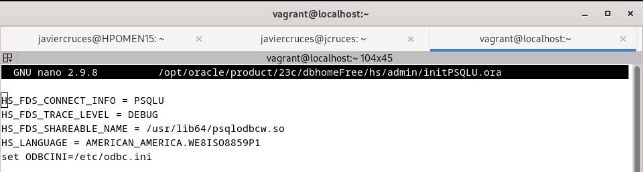
Configuration in Oracle to Use the Driver
We configure Oracle so it can use the ODBC driver. This includes updating the files needed to set up the connection:
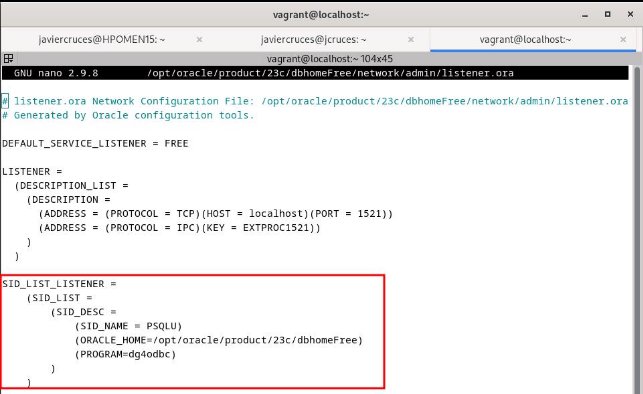
Configuration of the Listener in Oracle
We configure the listener file to enable communication with the PostgreSQL database:
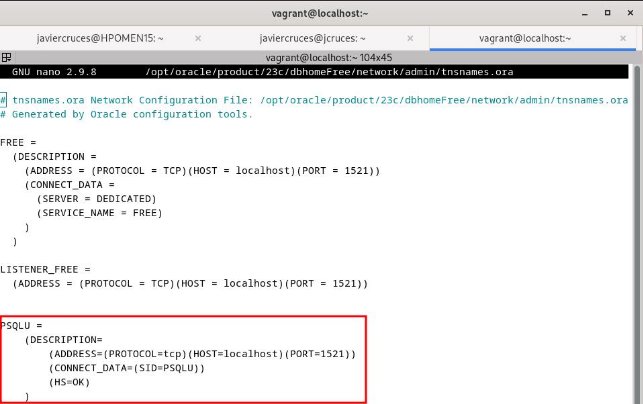
File Configuration tnsnames.ora
We add an entry to the tnsnames.ora file to define the connection to PostgreSQL:
Reboot of the Listener
We restart the listener service to apply the changes:
Connection Test
We check the connectivity using tnsping:
In addition, we test the connection using the ODBC driver from the terminal:
Creation of the Link in Oracle
We connect to Oracle and create the link to the PostgreSQL database. In the queries, the names of fields and tables should go between double quotes, and the values between single quotes:
Simultaneous Consultations between Oracle and PostgreSQL
We can conduct combined consultations between the two databases:
PostgreSQL to Oracle
Download and Install Necessary Packages
From the official Oracle page, we will download the following required packages:

Since the system used is Debian, it is necessary to convert the RPM-format packages to DEB using alien. The process will take about 5 minutes, and the packages will be installed automatically when using the -i parameter:

Oracle Connection Test
Once the packages are installed, we check that it is possible to remotely connect to the Oracle database to ensure that the configuration is correct:
Download and Compile oracle_fdw
The next step is to install oracle_fdw, an extension for PostgreSQL that allows you to connect to Oracle. We download the latest version from the official repository:
- Repository: oracle_fdw in GitHub
We clone the repository and compile the source code:

Within the downloaded directory, we run make to compile:

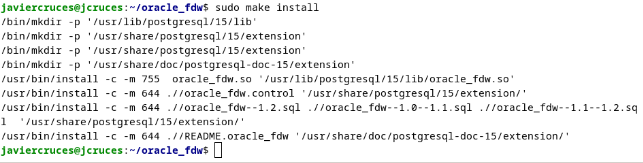
Finally, we install the extension with the make install command:
PostgreSQL Configuration
Creation of Extension: We connect to the PostgreSQL database where we want to create the link and set the extension
oracle_fdw:
Creation of the Schema and Foreign Server: We create a schema called
oracleand set up a foreign server pointing to the Oracle database:User Mapping: We create a mapping between the local PostgreSQL user (
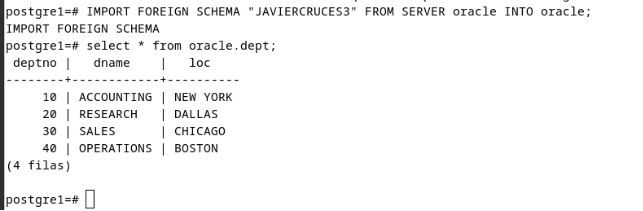
javiercruces1) and the remote Oracle user (javiercruces3). We also grant the necessary permissions on the schema and the foreign server:Importation of the Schema: With the local PostgreSQL user, we import the Oracle user’s table schema to the local foreign server:
Combined Consultations
Finally, we can conduct consultations involving data from both databases (PostgreSQL and Oracle). This allows us to work with information distributed in an integrated manner: